How to Make a Corded Lamp Look Hardwired
I am so excited to share this project with you because it made me feel like a genius but really it was so simple! With some help from my smart hubby, I figured out how to make a corded lamp look hardwired! Not “hiding” them in plain site by a cord cover or whatever, but how to hide plug in lamp cords IN the wall.
Before:

After:

Hard wiring wall sconces usually requires an electrician and money money money. As you might know me, I almost never hire people to do work that I could figure out myself. This is TOTALLY something doable like that. My hubby has basically become a pro at hiding cords since he is Mr. Tech but also loves a clean, professional, and wireless look. So by taking literally a few extra minutes to re-route the cords and drill a couple holes in the wall, I saved myself a lot of money and ended up with a gorgeous hard-wired looking sconce. This frees up lots of space on the nightstand and makes my room look high-end.

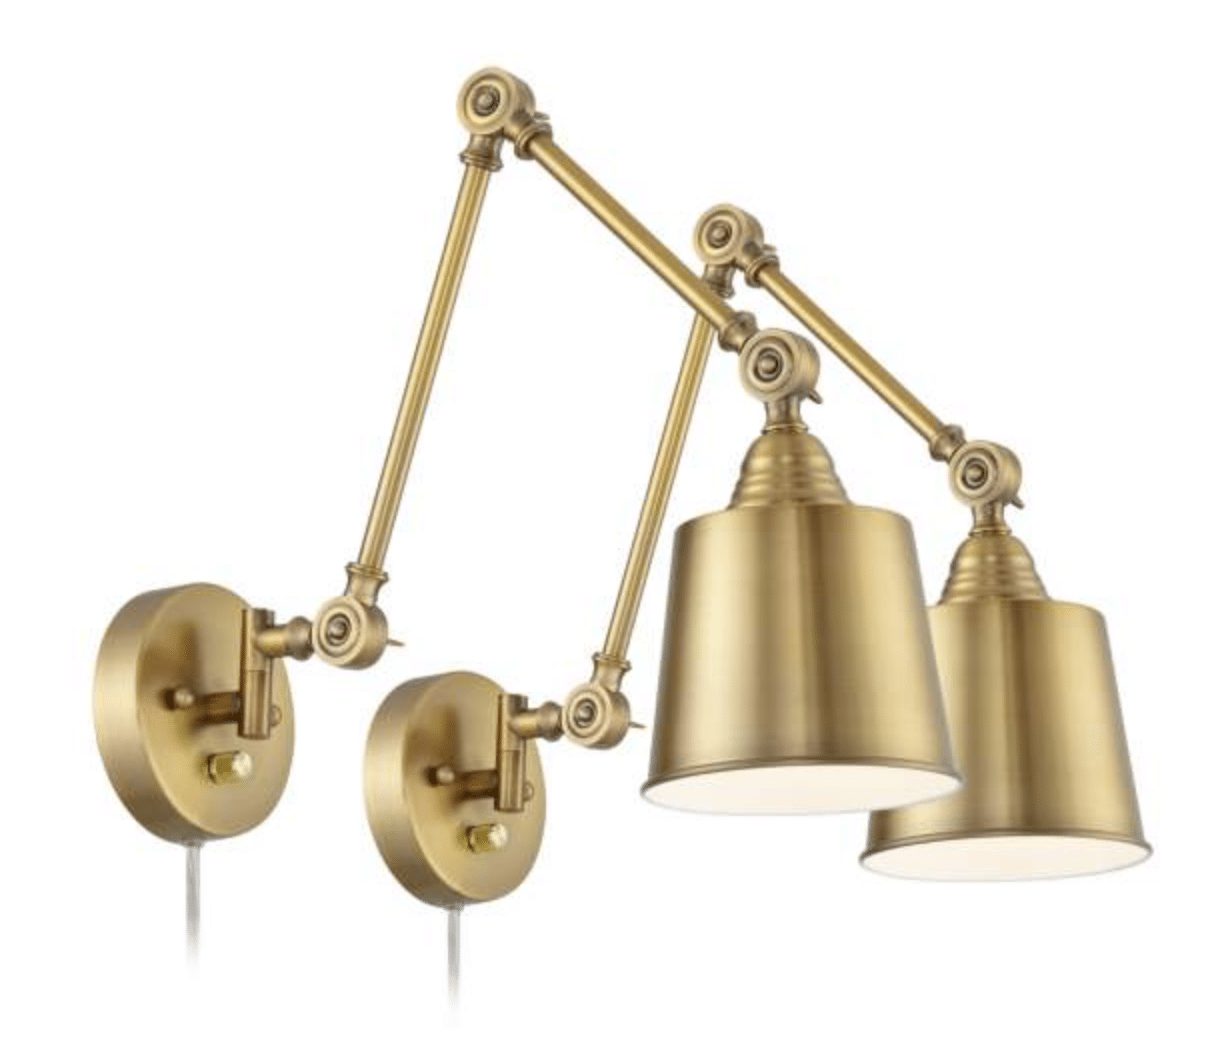
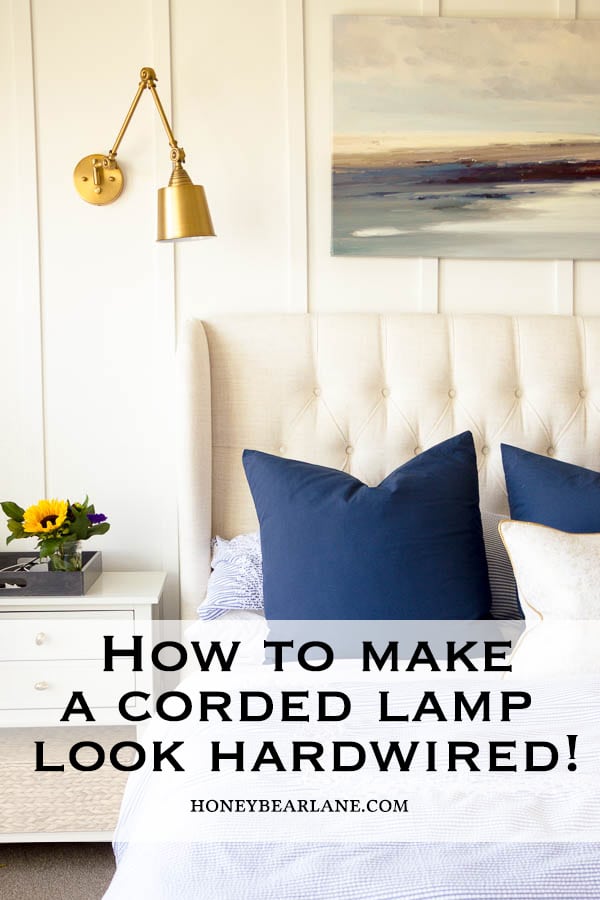
Start with a Plug in Sconce lamp
I ordered my wall sconces from Lamps Plus because I got 2 for $100 which was a great deal. They have the adjustable arm, come in a really beautiful brassy/gold finish, and were everything I wanted in a sconce for a really good price. Plus free shipping! They came two days after my hubby had arm surgery and so he wasn’t going to be able to help me at all. I took them out of the box and was a little dismayed when I saw that the cord was threaded through a small hole at the bottom of the sconce and wouldn’t easily be un-threaded. Then I saw that there wasn’t any space in the mounting plate for a cord to go through either. I started thinking about drilling holes through metal and quickly started looking up pictures of sconces with cords just hanging down to see if I could be okay with seeing the cord. But in order to truly make a corded lamp look hardwired, you don’t want to see any cords.
ReWiring the Lamp
I showed my husband the dilemma and he easily resolved it. The cord was threaded through the metal and then divided into two separate smaller cords which were attached to some other electrical wiring. They were secured with some black rubber covers and I just thought there was no way of getting those off without destroying them. Hubby said no, they were just clamped shut, so just get pliers and squeeze it open in the opposite direction. I did that and the covers slipped off easily. Then I just had to untwist the wires, take the ends through the hole in the sconce, and then re-assemble.
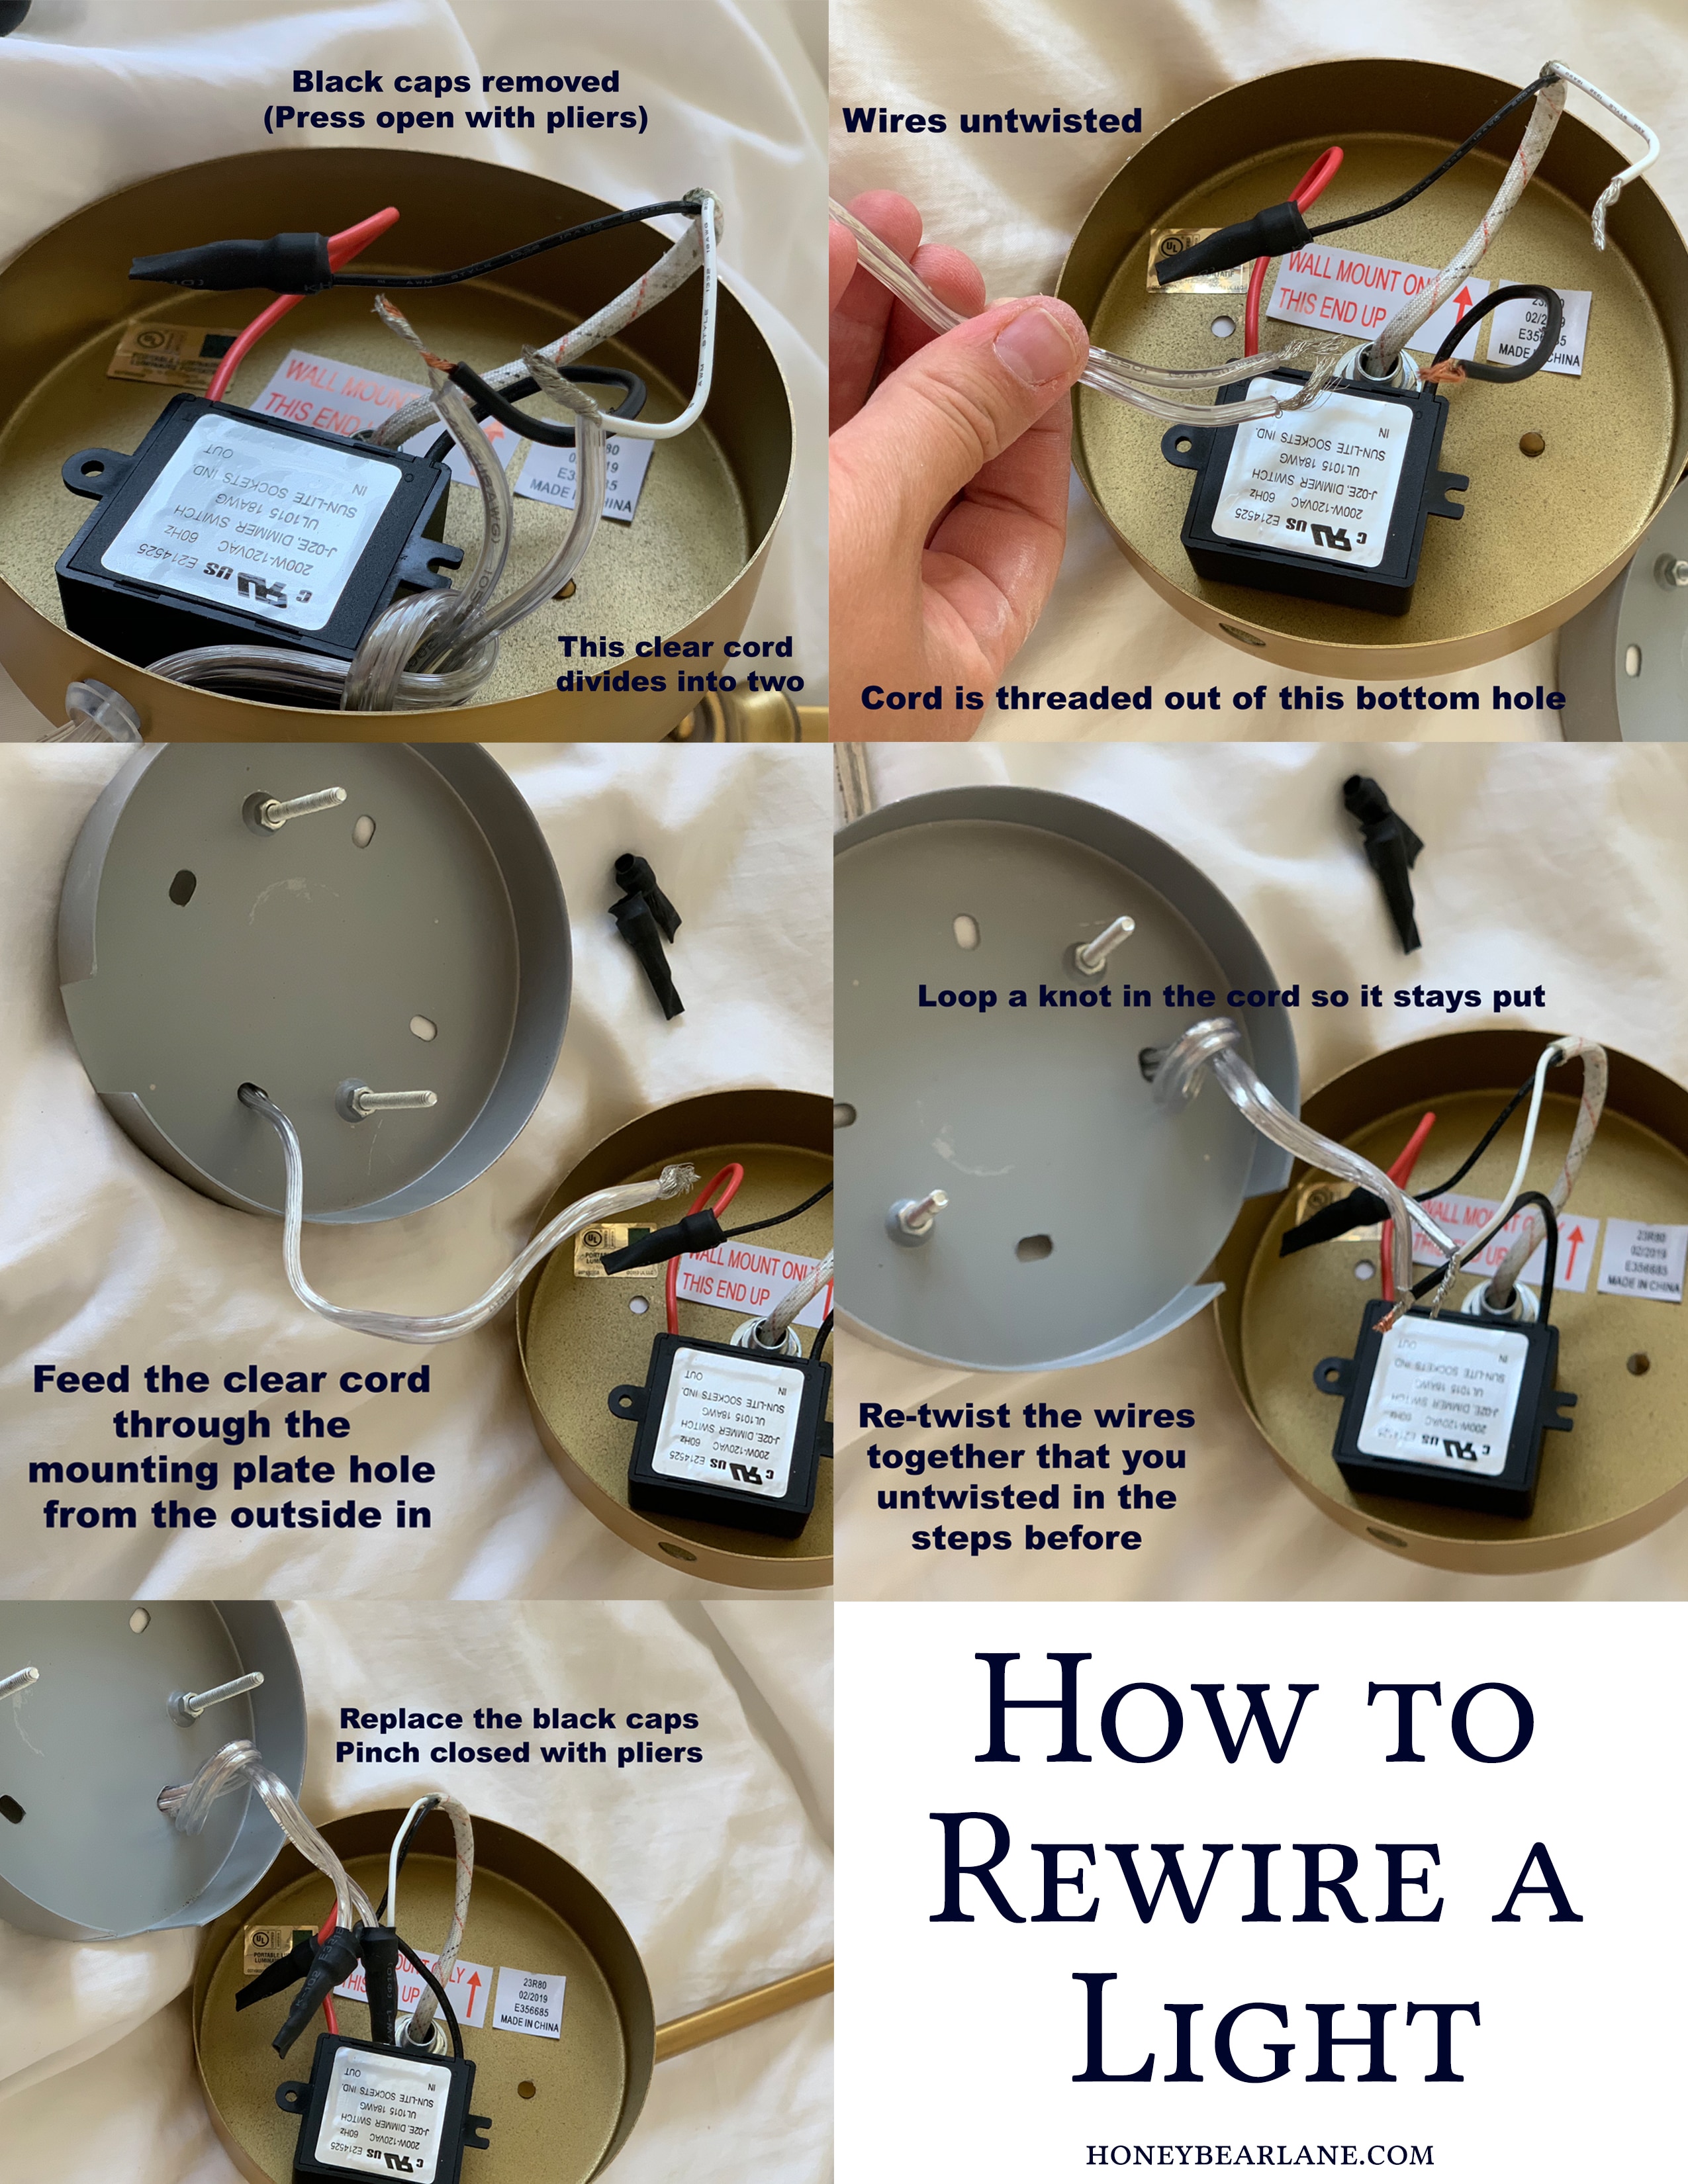
There was also the matter of the mounting plate. Hubs said to just use three holes to mount the light instead of the 4 and use the fourth hole to thread the cord through, making sure the cord comes forward through the wall side of the mounting plate. Then I could re-twist the exposed wire ends together, put the rubber covers back on, and clamp them shut. It sounds harder than it is. The only thing here is to make sure the hole you put the cord through in the mounting plate corresponds with the hole you drill for the cord in the wall.
Drilling and Cutting Holes in the Wall
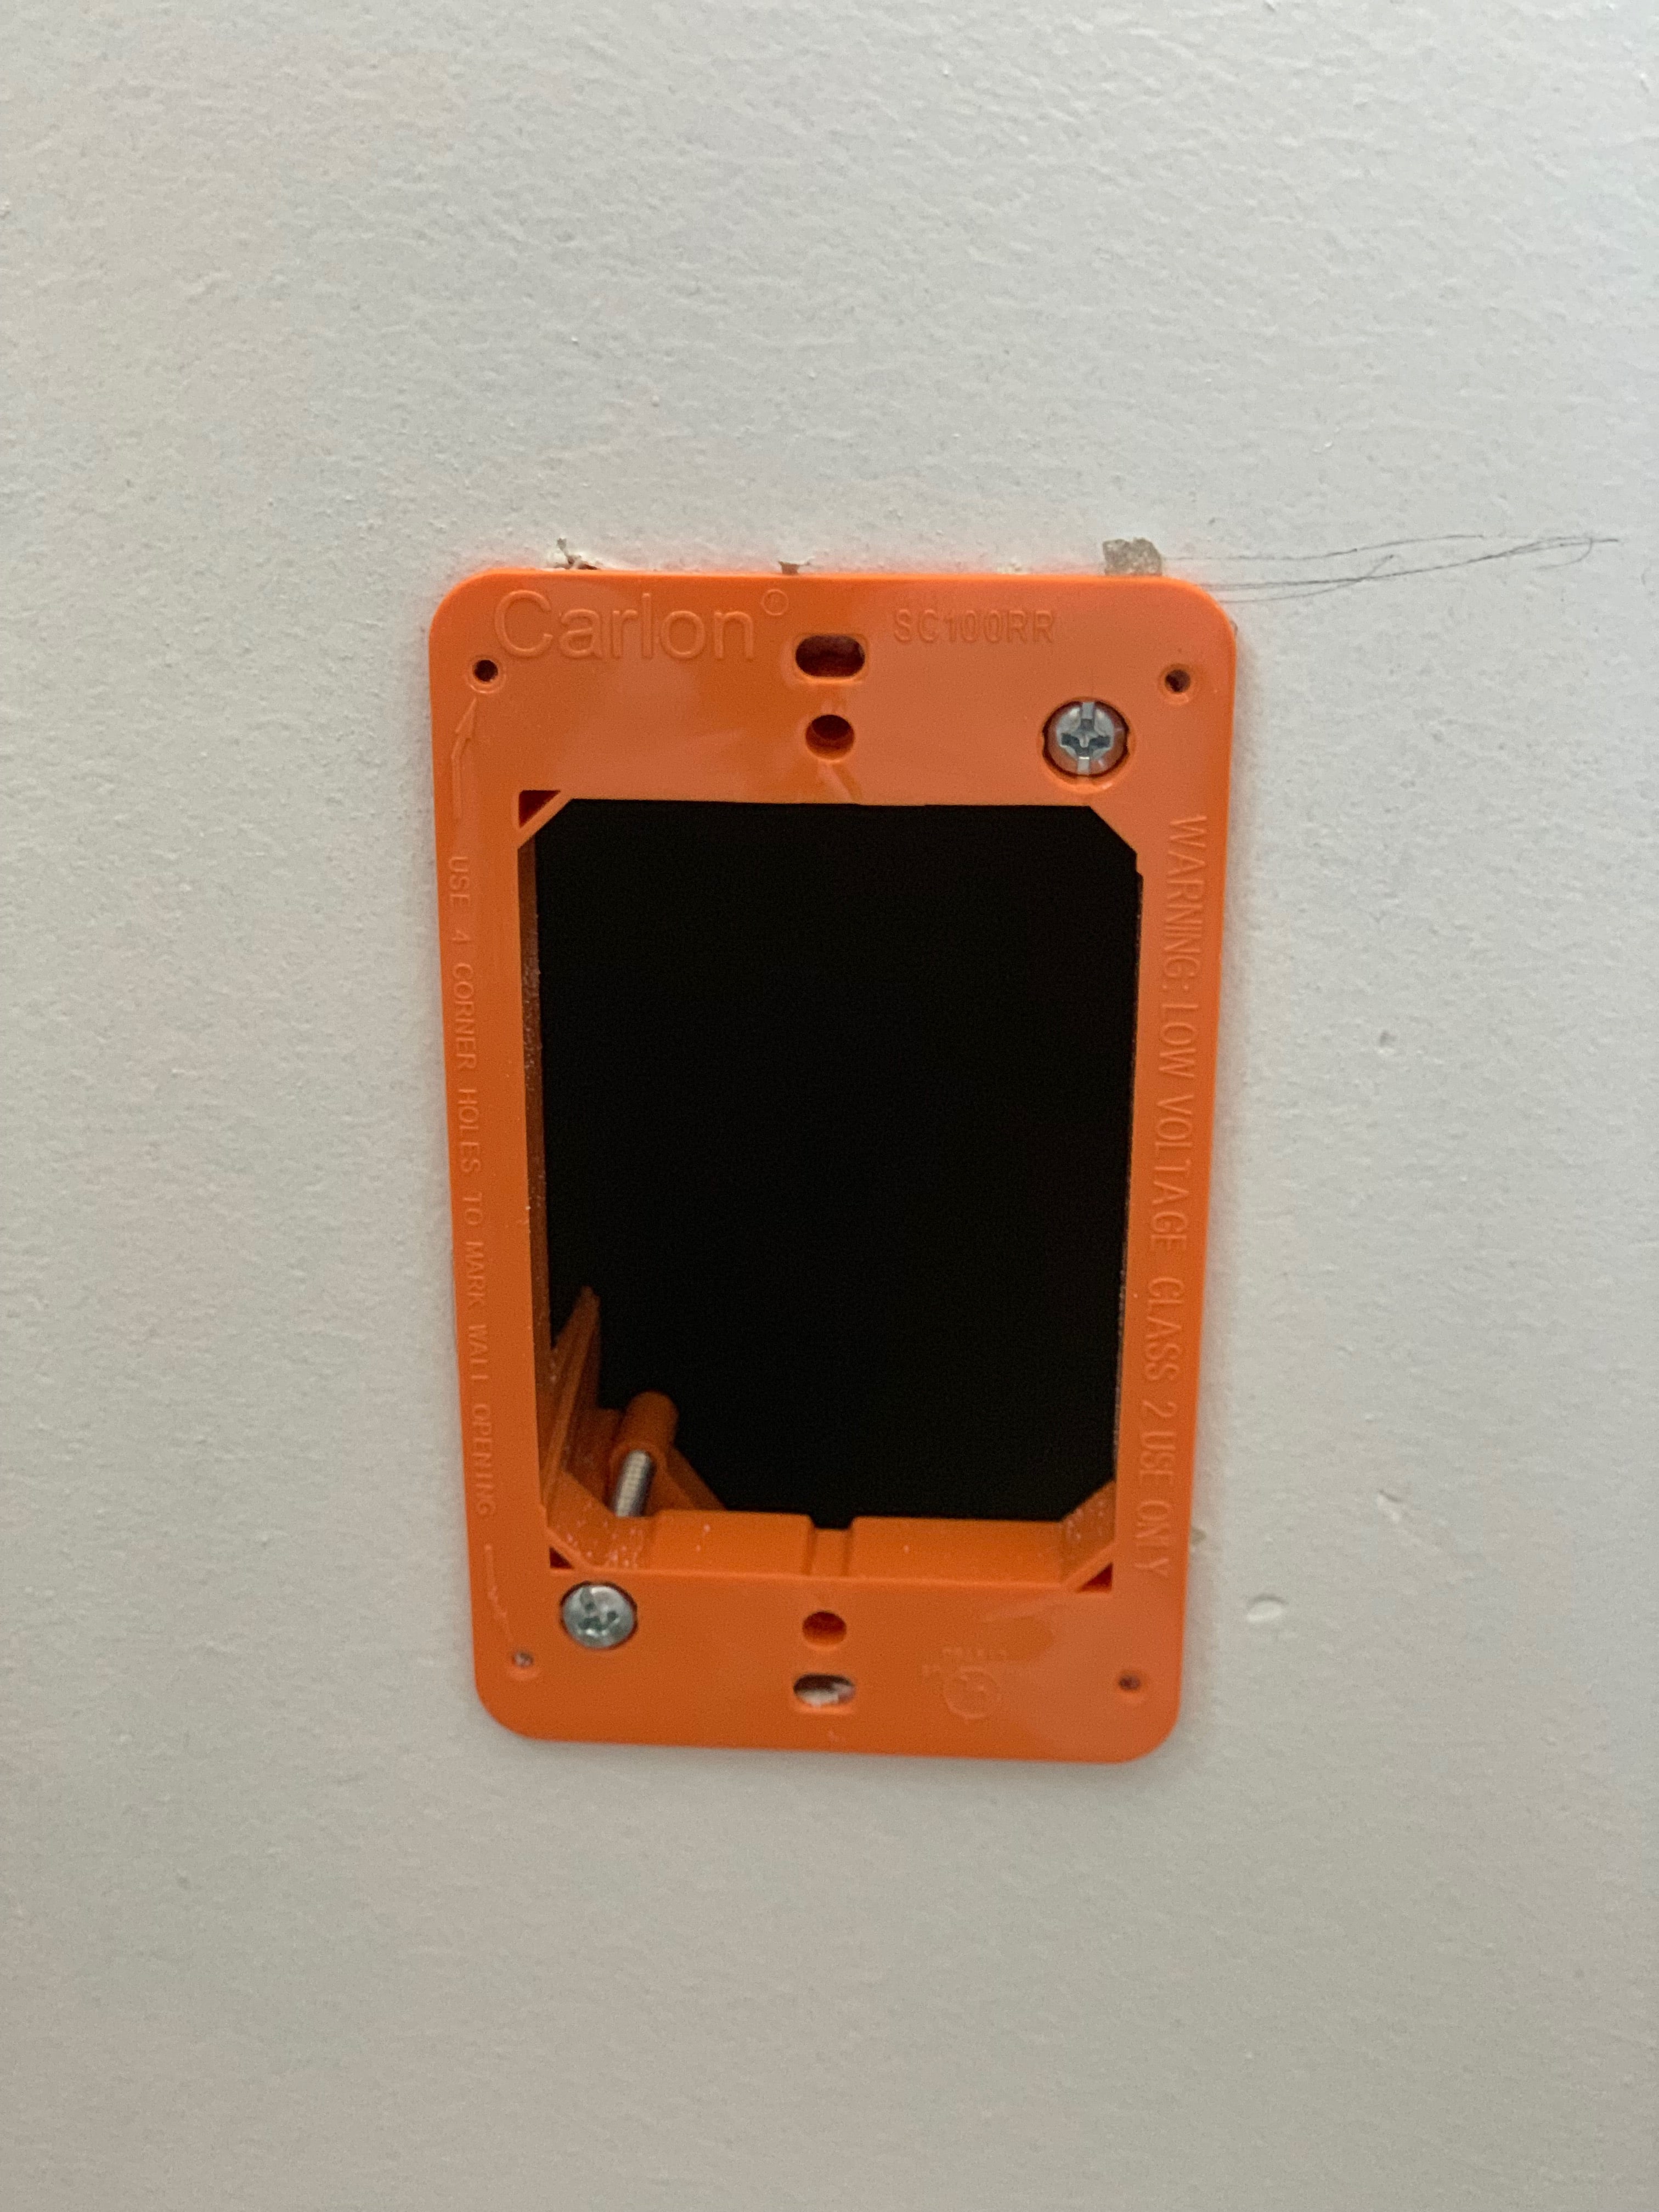
I used the mounting plate to first mark the spots to drill on the wall. I located the studs in the wall and went in between. I also marked a larger hole for the cord/plug to go through into the wall.
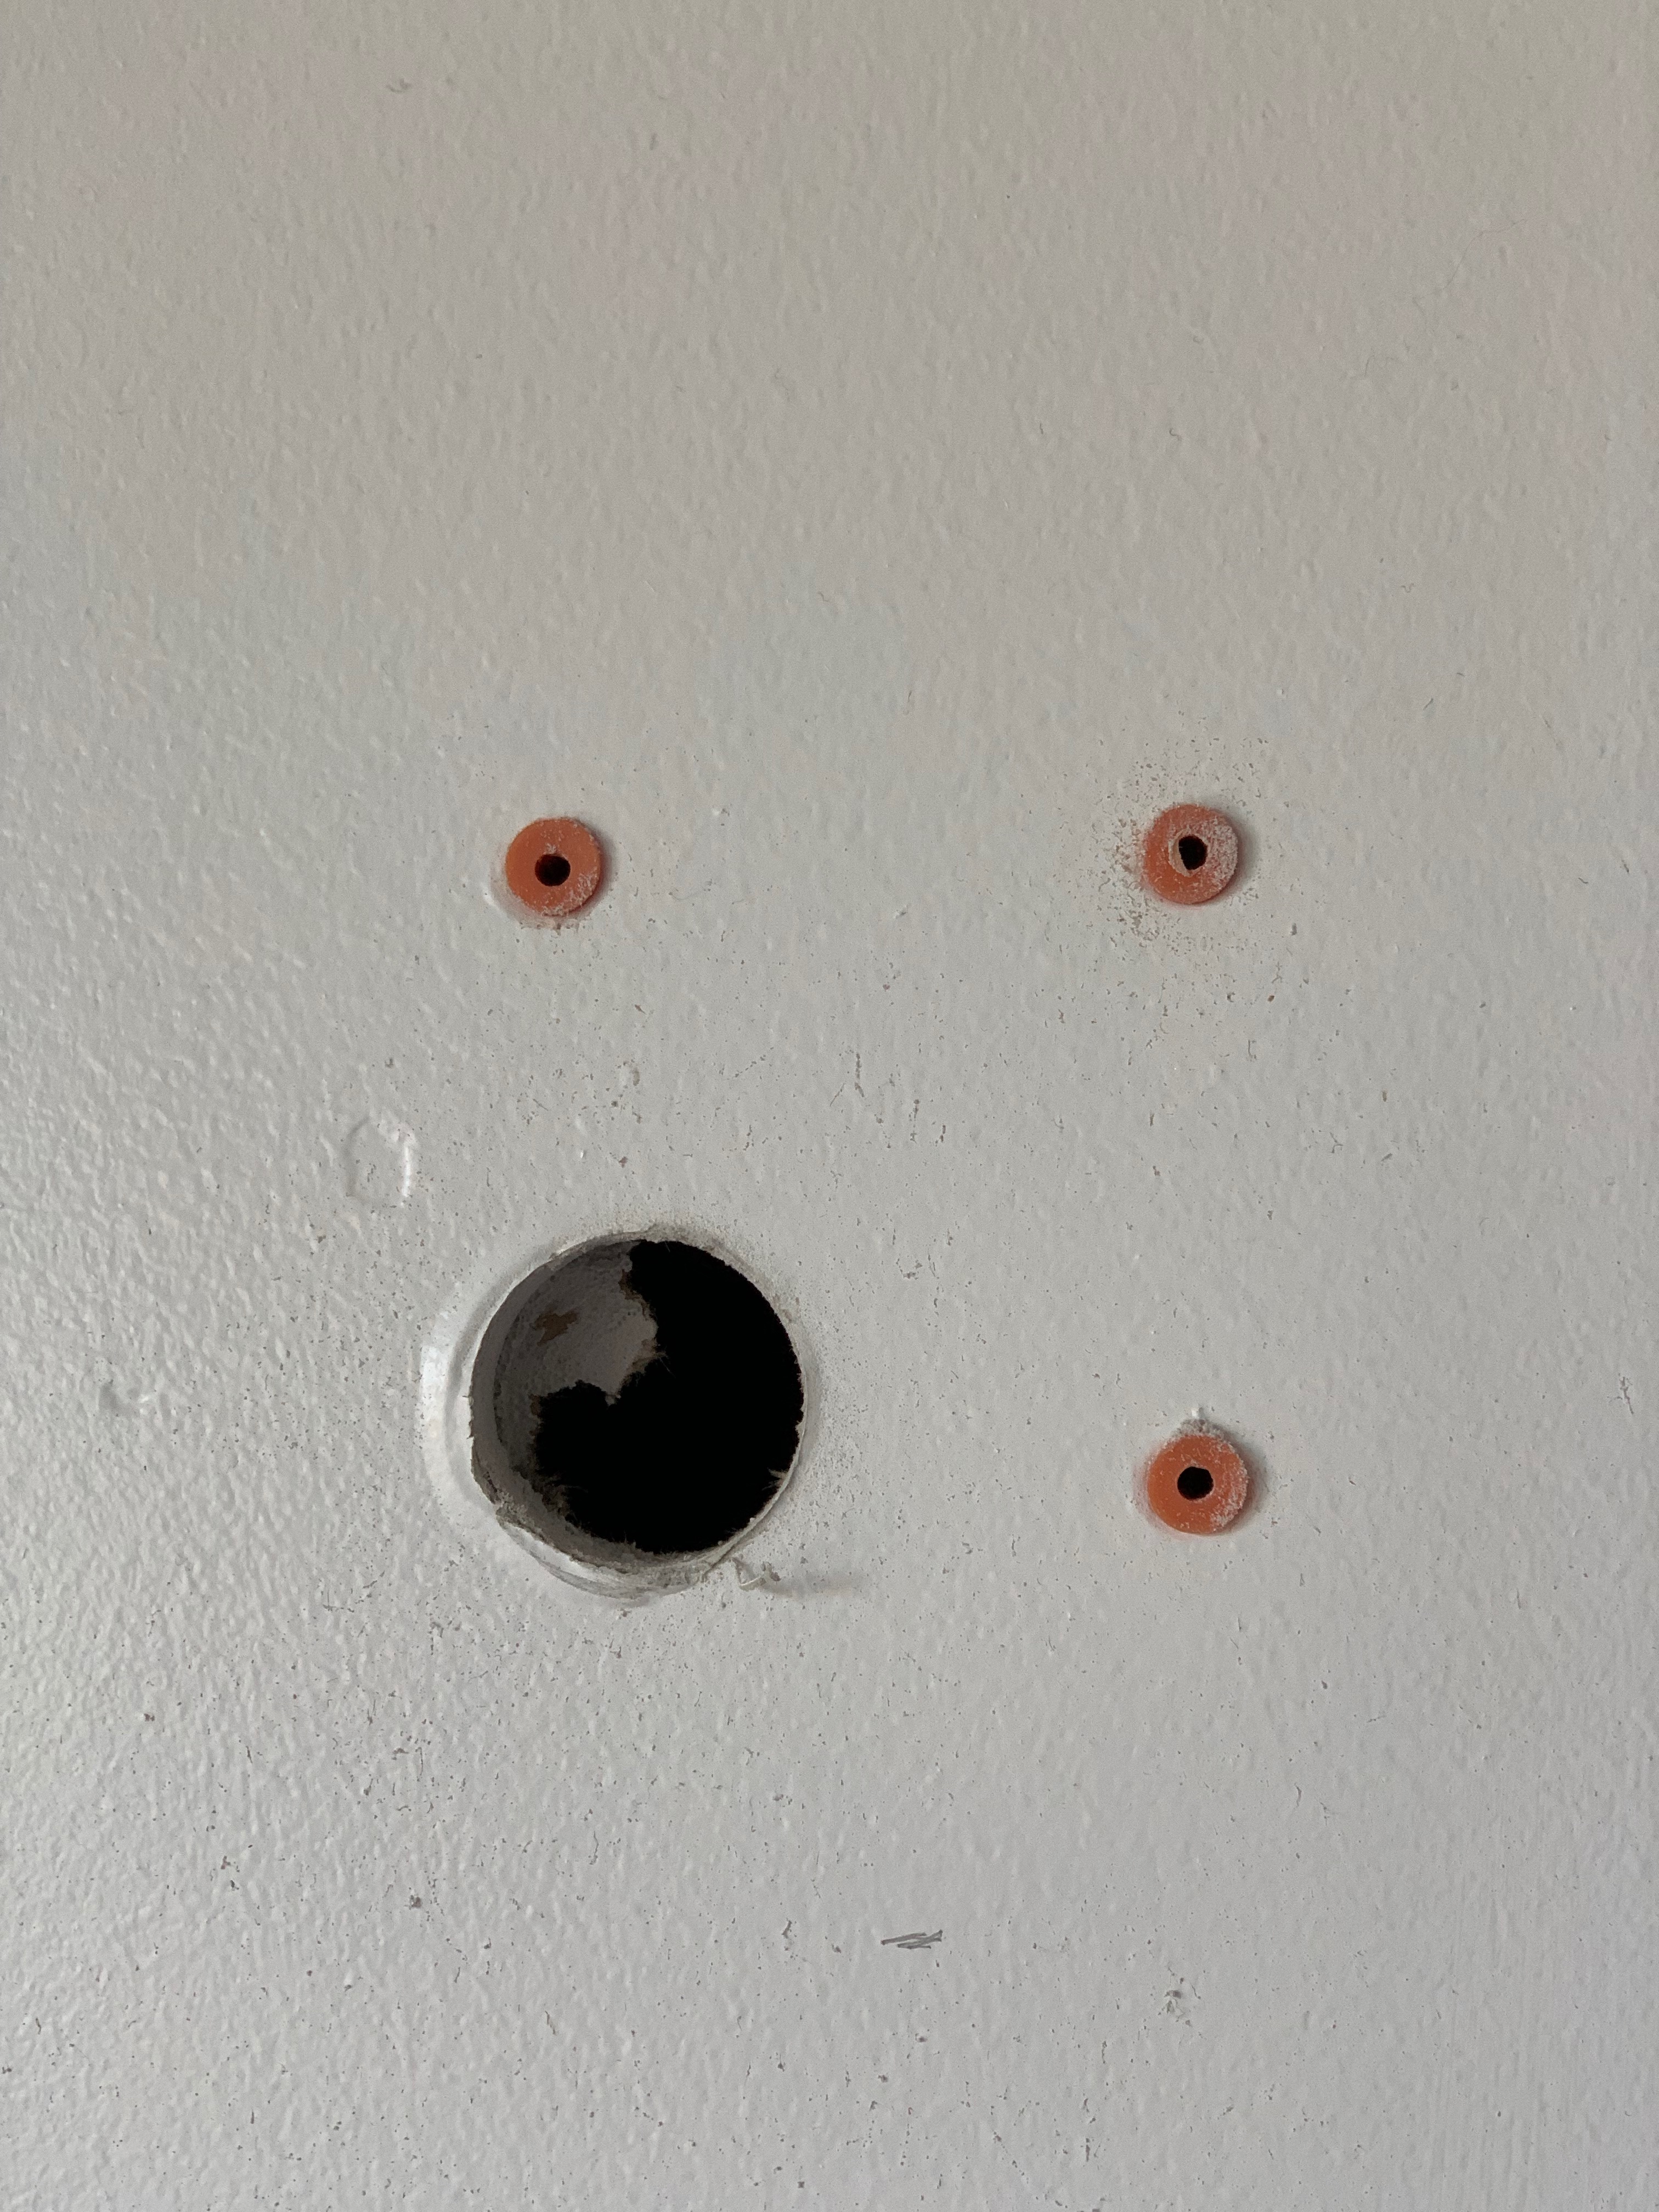
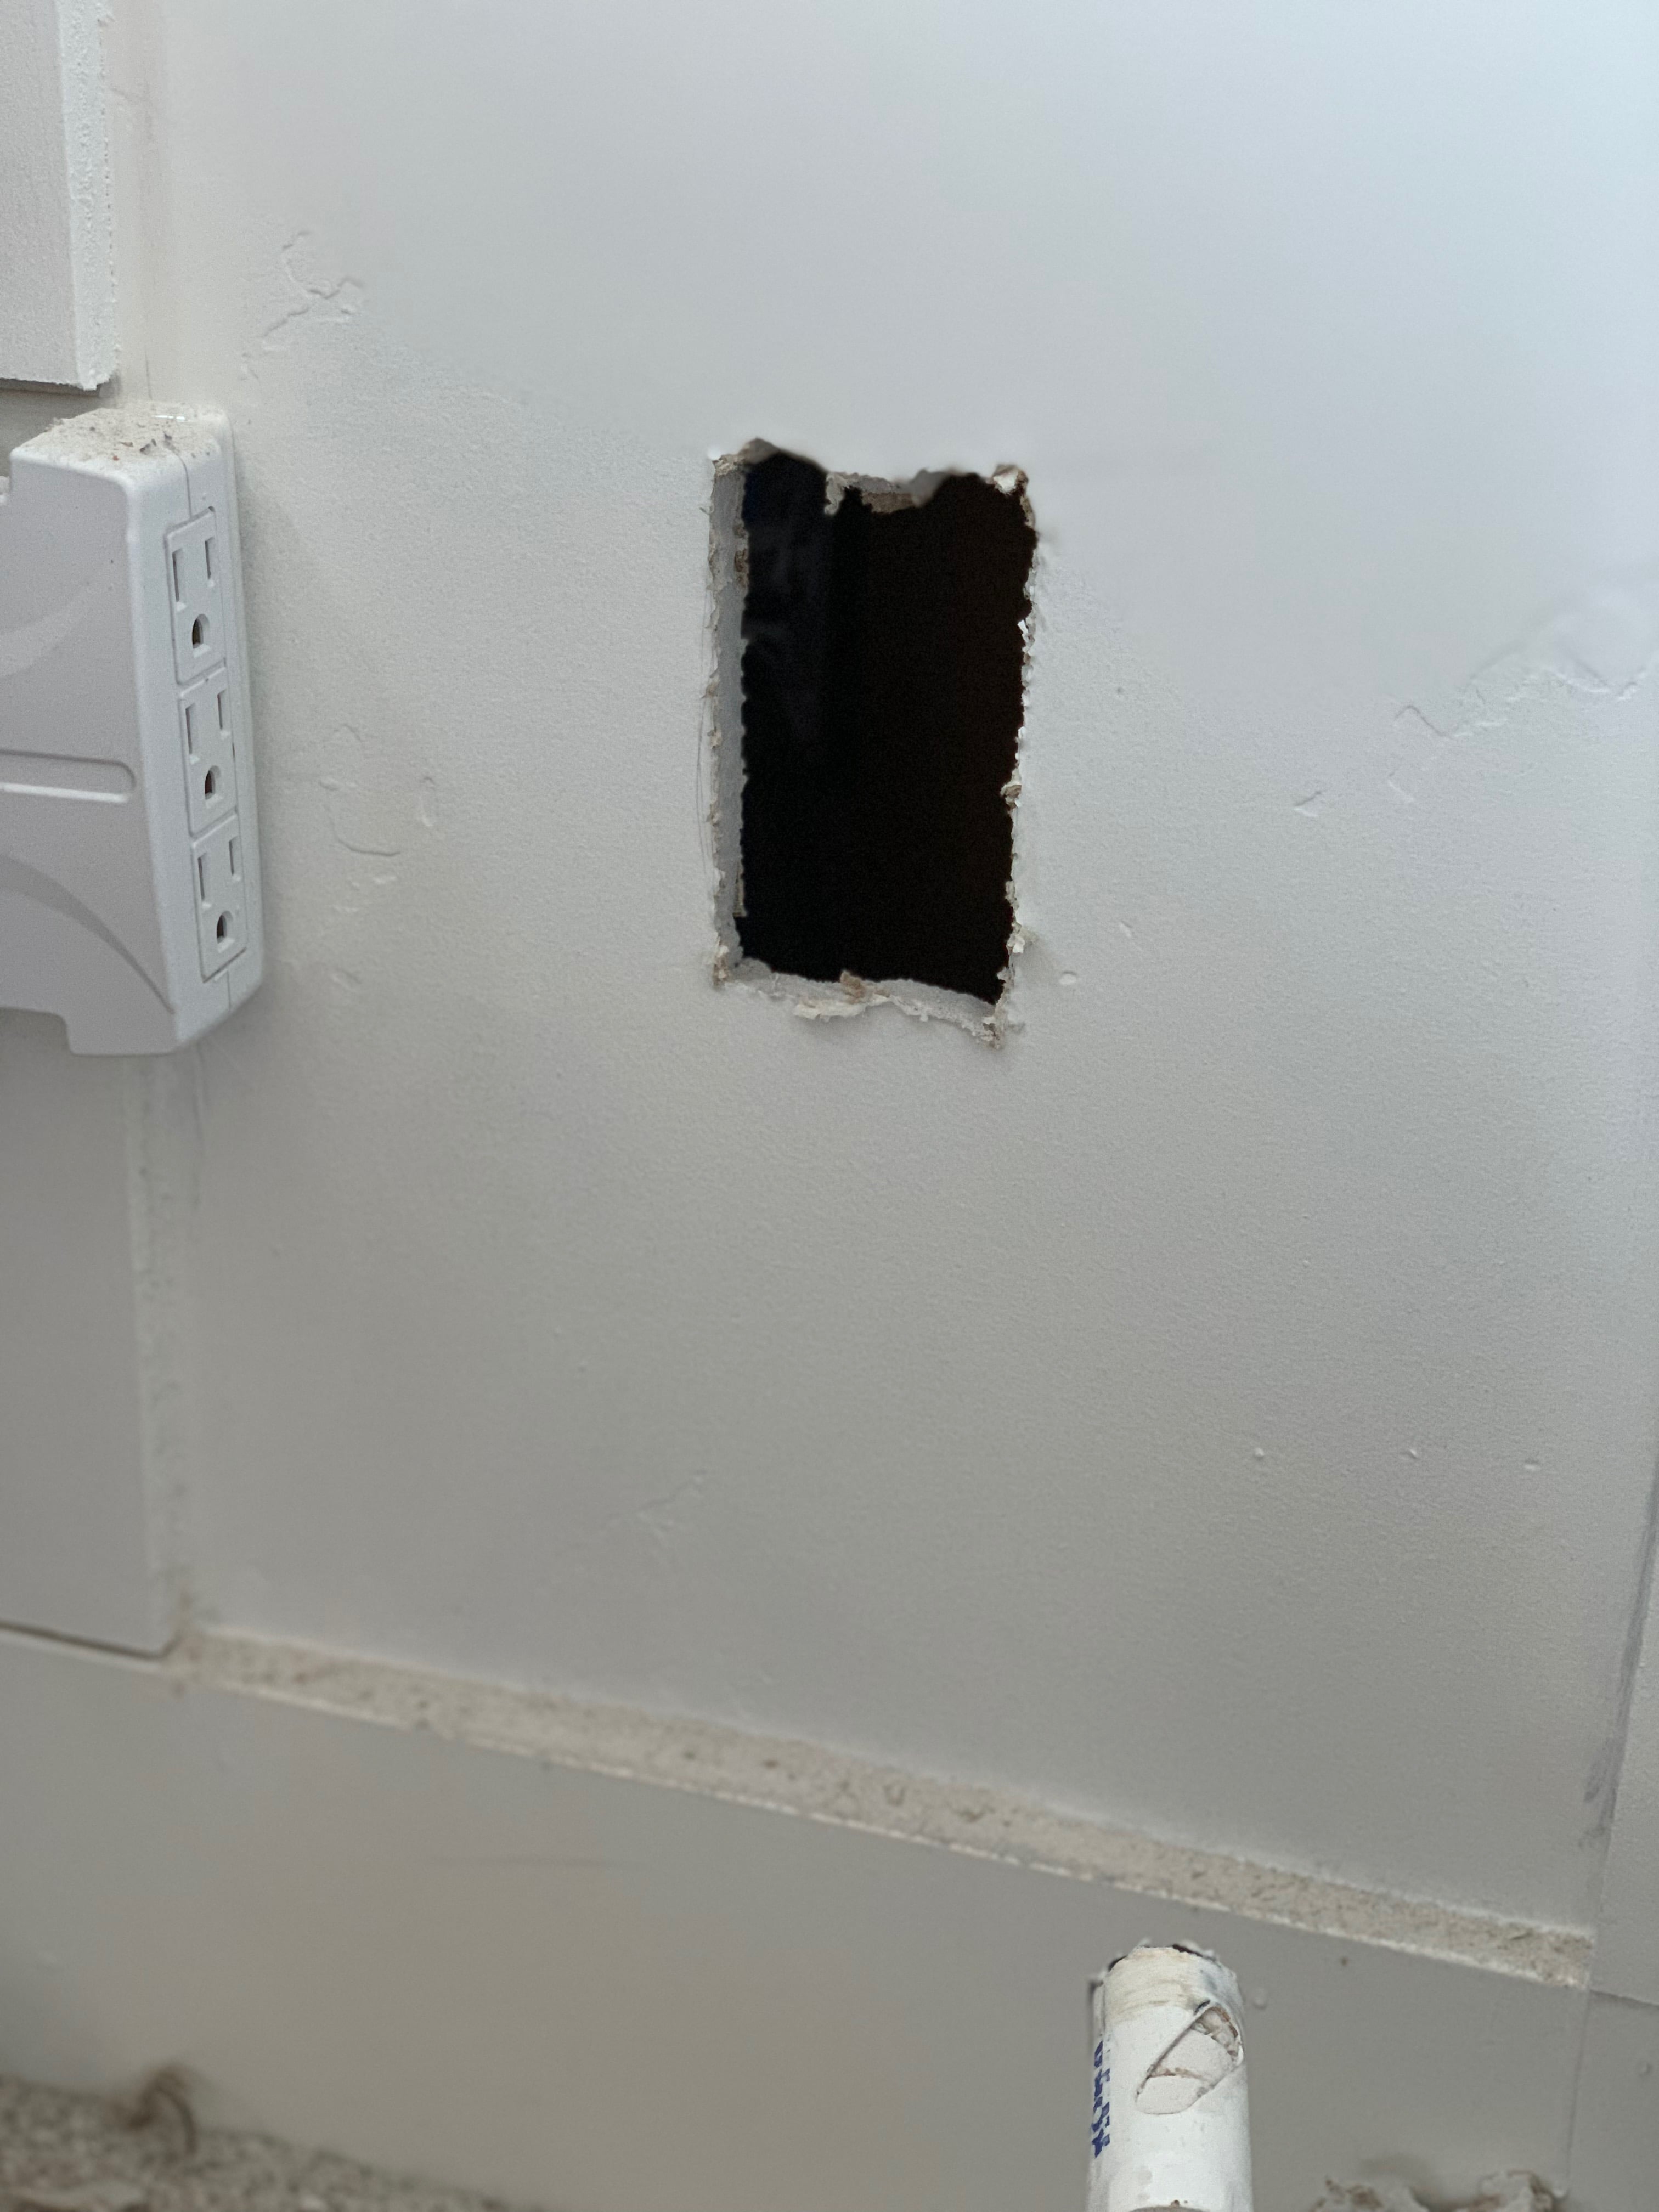
Then I went down to the floor and marked a small outlet-sized rectangle to cut out of the wall, lining the top up with the actual outlet. I drilled the holes for the mounting screws (and drywall anchors) and then used a hole saw bit to drill a larger hole. I used the hole saw to also help me drill out the drywall for the rectangle. This is a bit scary (I’m putting a huge hole in my wall!) but it will be okay. It always looks worse before it looks better. I used a small knife-the ones that come with those pumpkin carving kits-to cut out the rectangle.
Installing the Sconce
The next step is to thread the cord down through the wall. This is the tricky part. We were super fortunate that since we built this house, my husband took tons of pictures of the wiring in the framework before the drywall was put up so we could see exactly what was in the walls. This made it easy to see where the fire blocks were and any other obstructions in the wall. If you do encounter a fire block, read this article for tips. For us it was easier to do because I just dropped the cord down inside the wall while a helper grabbed the other end through the rectangle hole cut at the bottom. It’s also going to be tricky if you have insulation inside the wall. You can buy “fishing” rods to help with this.
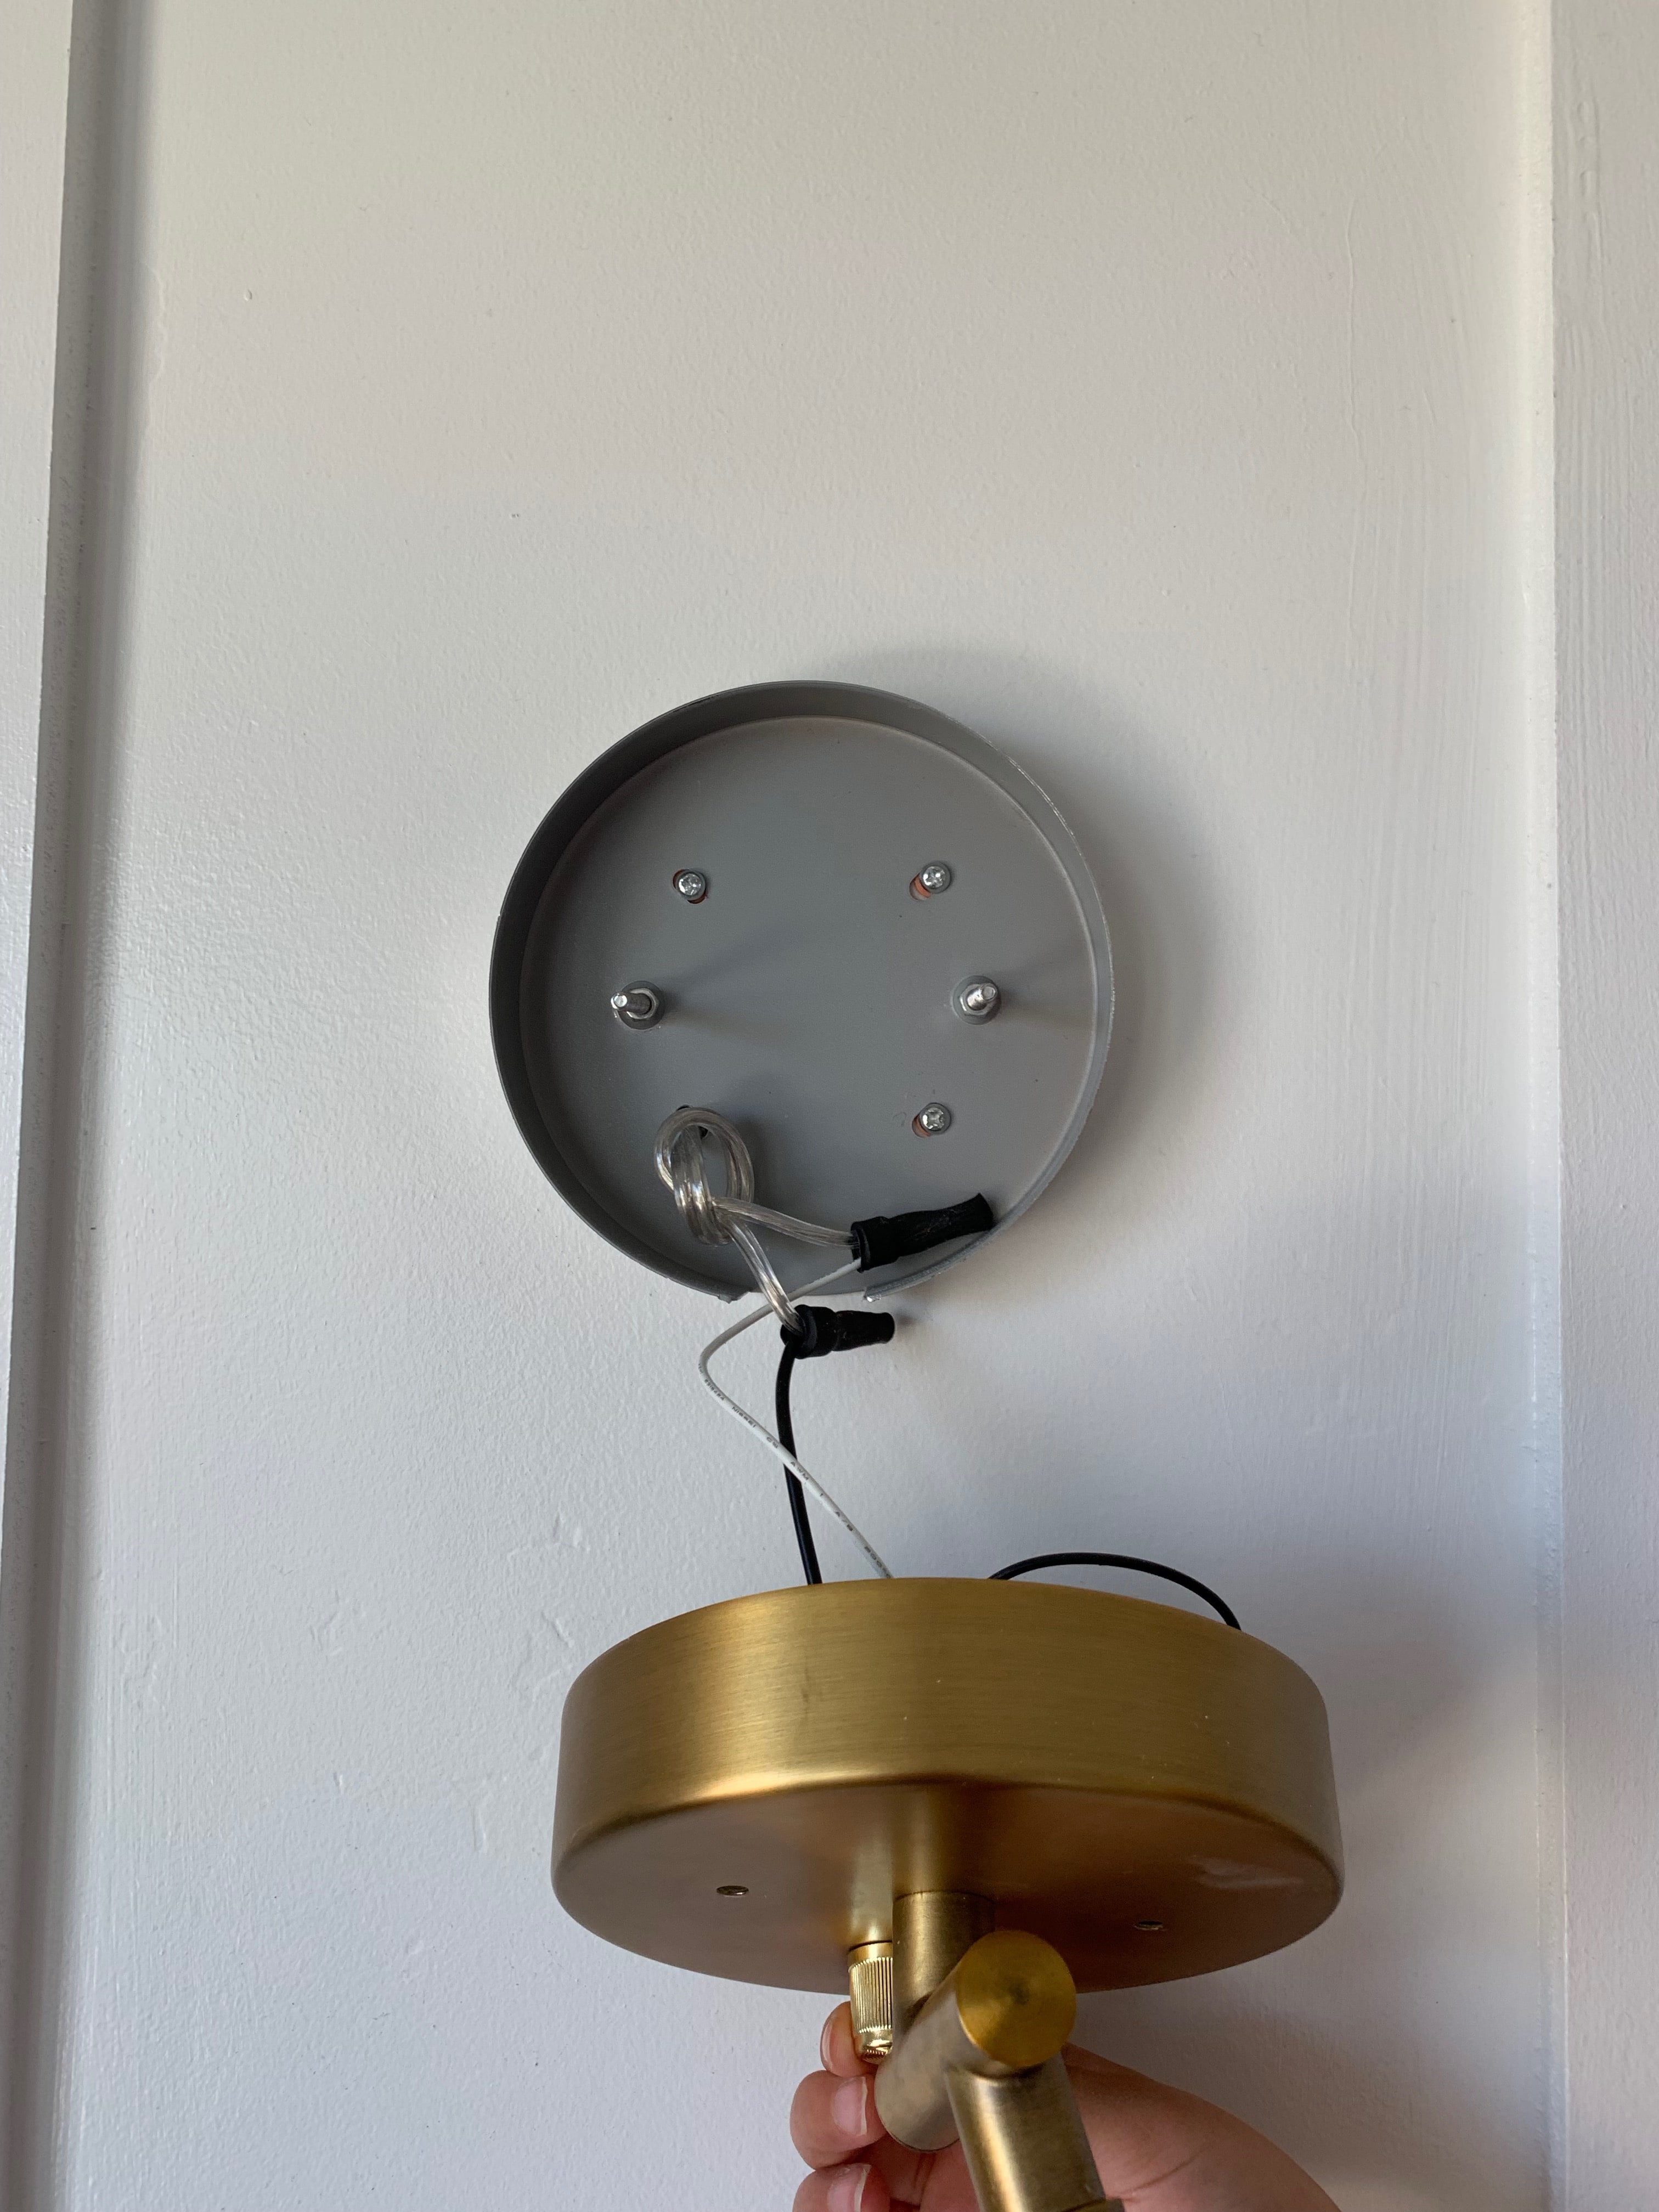
After the cord was fished through, I had my helper hold the sconce up while I drilled the mounting plate into place. Then I tucked all the wires inside the base and fastened the sconce onto the mounting plate (it has bolts that are held up by decorative ball screw covers.) That was it for mounting the sconce!
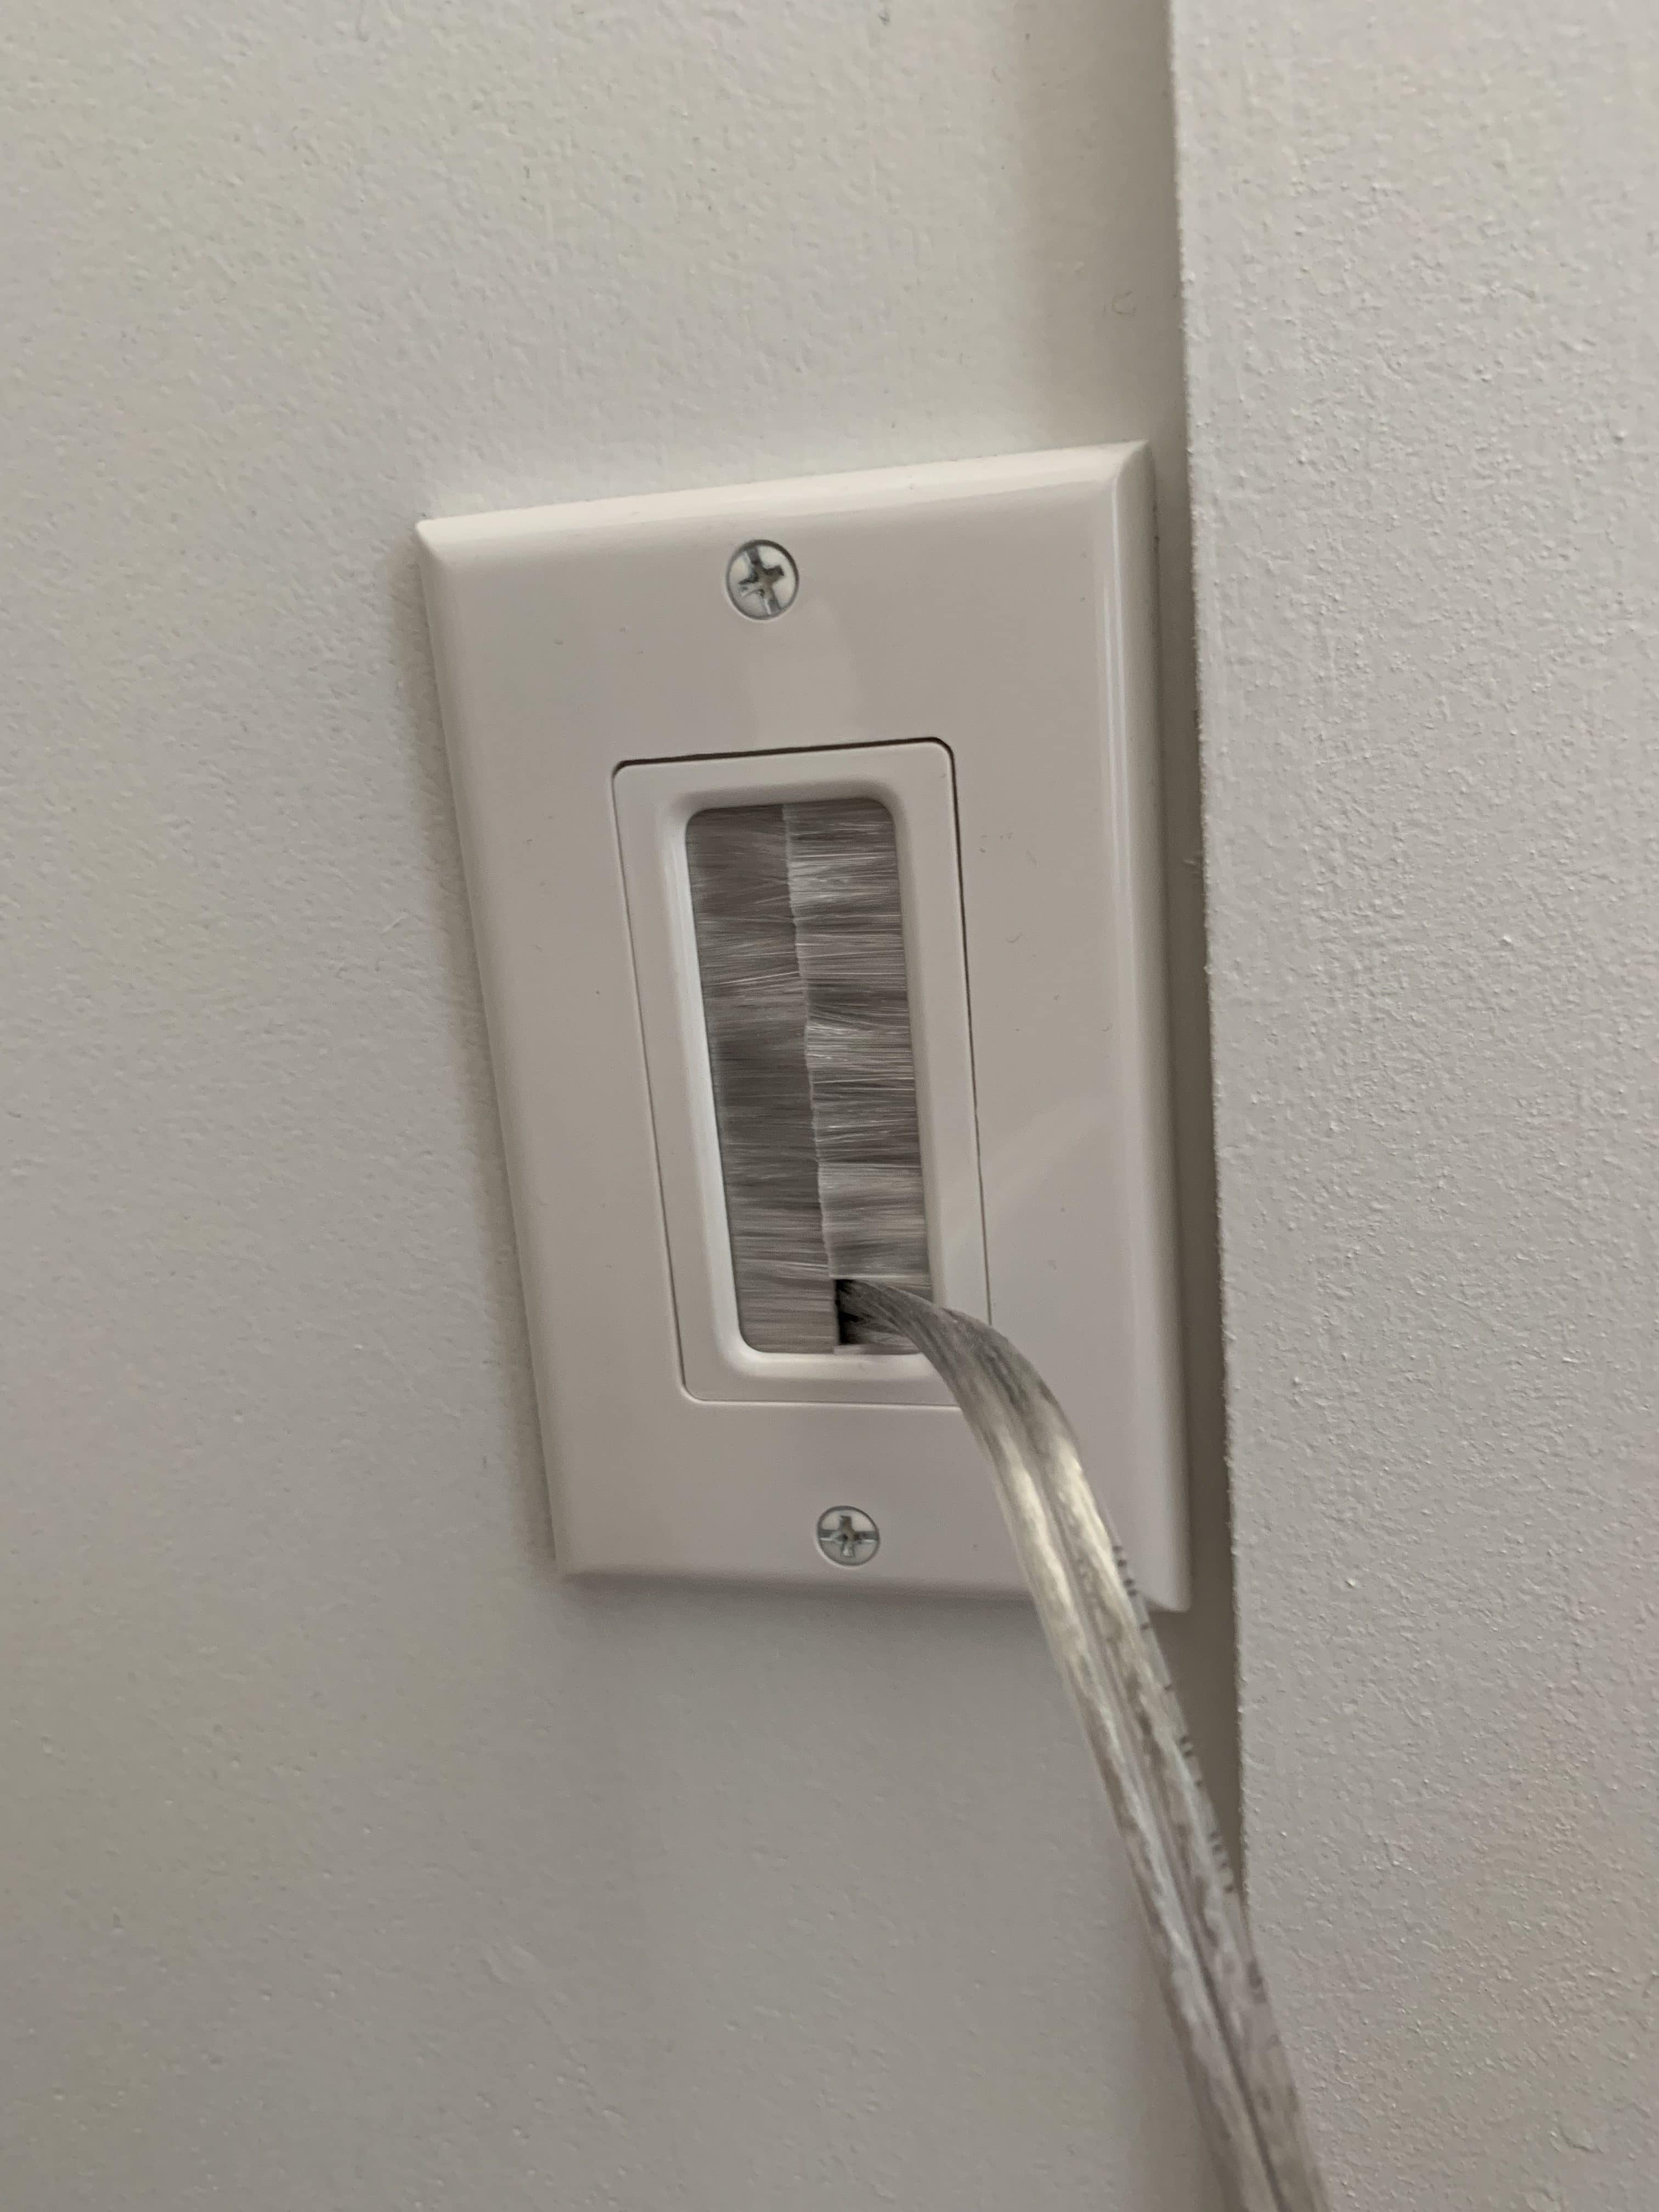
Covering the Hole
For that rectangle cut into the wall, we had these orange rectangle things you can buy at a home improvement store which fit into the hole and you use a screwdriver to tighten an anchor in place. Then you can buy a faceplate to go over it which makes the hole look like an intentional outlet of some sort. We have these ones which we call ‘hairy’ for lack of a better description.
That’s it! I know that kind of sounds like a lot, but to us it was worth the extra effort to not see the cords. And what’s nice is that we didn’t have to pay an electrician to hardwire anything and also if, for some reason, we decide to move our bed to another spot or remove the lamps, these holes can be patched up and painted over.

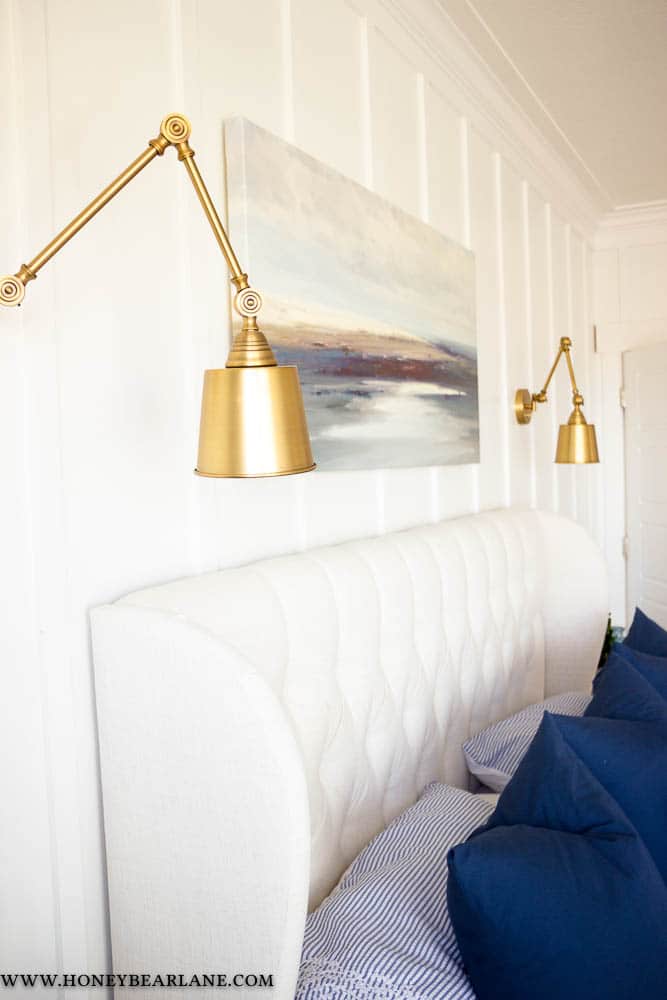

I seriously love the way these lamps look. We used Phillips Hue smart light bulbs in them so we could make them turn on and off at certain times and my hub linked them up to those Flic buttons where you can literally stick anywhere to control your lights. I’ll link these below!
And don’t forget to pin how to make a corded lamp look hardwired for later!
Great instructions! I have the exact same dilemma (different light fixtures) but the cord comes out of the bottom of the metal ‘base’. I had given up on hiding the cords but now I can, thanks to you!
The electrical part is the uneasy part for me. Is this something I can do myself with no other guidance except for following your directions? Also did you use a specific measurement to hang from your bed? Thanks for sharing!
We didn’t really do anything truly electrical except undo the wire and then redo it exactly how it was. To get it through the wall we just fished the cord inside the wall and it comes out down by the baseboard. I’m sure you could do it!
Was your wall a stud wall or a brick wall? The wall I would like to do this on is brick.
Thanks
It’s a stud wall with drywall (sheetrock) over it. I am not sure how to make it work with a brick wall, sorry!
Would this be the same process after we convert a hardwire sconce light to a plug in sconce light?
Yep, I think so!
This is dangerous and against code the way you have done it. Wire needs to be Romex or in conduit to run in a wall. Consult an electrician and don’t risk burning your house down to save $300.
What is a flic button and do you have a link to them ?
Isn’t this against electrical code to run a power cord behind the wall?
I don’t know for certain, but I doubt it, since all electrical cords are behind walls. Especially since we didn’t have any insulation here.
Definitely against code. 110v lines have to be Romex (where allowed) or conduit. Running regular high voltage power cables are against code for being a fire hazard.
Yes it is. Not sure why this person would post this and not put a disclaimer. In the US https://thehometheaterdiy.com/safely-run-cables/#:~:text=Avoid%20Running%20Power%20Cables%20Inside%20of%20Walls!&text=It's%20actually%20against%20article%20400.8,permanent%20wiring%2C%20ie%20wired%20outlets.
If you’re in the U.S. this goes against the National Electric Code ( which is the code all states base their own electric codes on – so the NEC is generally baseline. )
It’s actually against article 400.8 in the NEC (National Electrical Code). You should not run power cables through a wall as a substitute for permanent wiring, ie wired outlets.
You can read more here instead of digging into the NEC itself:
https://www.ecmag.com/magazine/articles/article-detail/codes-standards-out-sight-out-mind
The project came out amazing and I found this page just looking for examples of how to approach something similar, BUT it definitely does require following code.
It’s a really easy fix to just pull romex and put in electrical boxes though – so I really do recommend you fix this, ( since you’ve posted this publicly if for there is an electrical fire in your home your insurance company could refuse to pay out based on this post showing what they call “negligent work” i.e. unpermitted work that wouldn’t have passed a simple inspection.
Just an fyi.