Sharing is caring!
(I suppose that when I buy craft supplies I tend to think of a lot of projects I can do with that item. And it seems to be yarn right now. And apparently yarn=spiders.)
Supplies
- Yarn
- Liquid Starch (in laundry supply section at grocery store)
- Some flour
- Balloons
- Cheap spider rings
- Ribbon
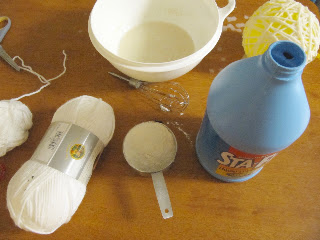 |
| Here was my workspace. I got a medium size bowl, poured some liquid starch in it and mixed some flour in to thicken it up more. I whisked it to get rid of lumps. |
 |
| This is what the liquid starch looks like. |
 |
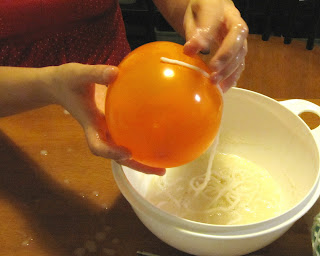
| I cut off a really long piece of yarn and blew up some balloons. I soaked the yarn in the starch/flour mixture. I also recommend using newspaper on your surface because it took me like a week to scrub off all the goop! |
 |
| Just started wrapping the soaked yarn around the balloon… |
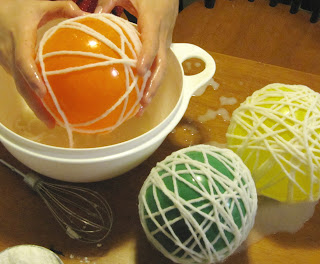 |
| ..trying to get good coverage but not super thick. |
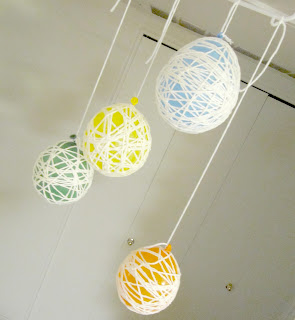 |
| After I wrapped four balloons of varying sizes, I hung them up to dry (I tied some yarn to the balloon tied part) for 24 hours. Make sure they are completely dry, good and stiff. |
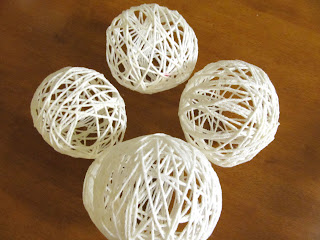 |
| Once they were dry, I popped the balloons inside (which delighted my son) and they came off easily. |
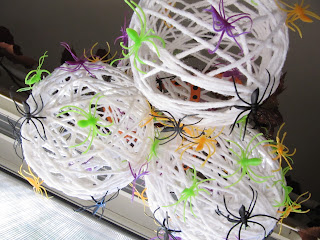 |
| Then I stuck the spider rings on, just by attaching the ring part to the strings. |
 |
| Hung them up with some Halloween-y ribbon! Creepy spider egg sacs! |
This type of project is so versatile and I know I’ll be doing more. I think I’m going to make some balls to hang from the ceiling in my kids’ room in the right colors. Also a very cute decoration for any party! Or you can cut out a bottom and use as a candle cover (except only use with those fake flicker candles!)
AND IF YOU’VE READ THIS FAR…
IT’S TIME TO LINK UP!!!
I’m so excited to be doing my very first linky party! If you don’t know what linky parties are (and don’t feel bad because I just barely found out a few months ago), here is how I would explain them: You have a blog, you make awesome crafts/projects. You can enter your craft/tutorial’s link (the URL) into my linky widget and it will help you create a little thumbnail of your project’s picture. Then you grab the html code on the right side of my blog that looks like this:
…and you put it somewhere on your blog to link back! Easy Peasy. Linky parties are a great way to get others to notice your project that you worked long and hard on AND to get inspired by everyone’s creativity. I also want to feature some of your projects after the party so pu-lease link up everyone! It can be seriously anything you’ve created, I would love to see it all!


I love this project! What a great idea for spider webs. Another seasonal project to add to the list. I have a non-halloween related Liquid Starch project of my own waiting in the blog post cue.
http://boyohboyohboycrafts.blogspot.com
I love this! What an awesome idea!! Thank you for sharing! 😀
Ok – are you going to be around for the Trunk or Treat? You should totally hang these from your trunk and the kids take a ring for their treat! If you dont, I just might!
I like giving something other than candy 🙂
Cute idea! Love the link party! I will be joining 🙂
PS – I added the HTML to the side of my blog for Scrap Happy Saturday!
This is amazing!!! They turned out so cute and way creepy:)
How fun and spooky! I love the colors you have used – very neat! Hope you are enjoying your weekend! ~ Stephanie Lynn
These are so much fun. I tweaked it just a little. While you are mixing the starch and flour add a healthy dose of glow in the dark paint. They make spooky decorations to hang outside during Halloween.
Do you think ribbon would work? I don’t have white yarn on hand…try to go the super frugal route. Thanks!
Hmmm…not sure. But you can always try!
So…I tried this with diluted glue and ribbon…FAIL! (I was triying to use what I had on hand) hahaha…oh well…just learn from my mistake. Not sure if it was just the glue or a combination of both. The glue stuck to the ballon and the ribbon just seemed to slide off each other when I was done deflating the ballon. Anyway…yours look great…maybe wel’ll try again the right way next time. 😉