Sharing is caring!
Here is my cupcake tower tutorial! I’m sure you’ve seen projects like these floating around, but believe it or not, I couldn’t find anything like this on the internet, which is why I made one.
Supplies:
- Old plates
- Old candlestick holders or something like it
- Epoxy glue
- Spray paint
- Masking tape
- Contact paper
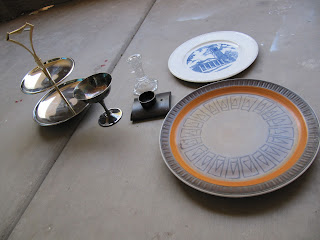 |
| I went to Savers and bought a bunch of old plates. I also found this convenient two-tiered serving dish. I’m pretty sure you could find something like it. I tested out my plates and candlestick holders at the store to make sure they would sit well on top of each other. |
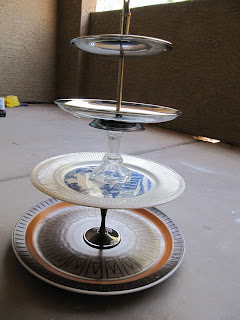 |
| Yep, works great so far! |
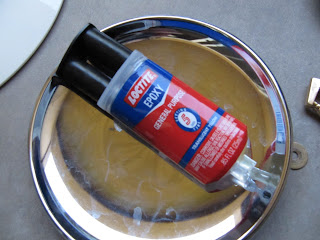 |
| Got my epoxy glue. Make sure you mix the two types of glue (it’s double-barreled) to make sure the glue sets properly. (Just squeeze it out and mix with a toothpick.) |
 |
| Use your epoxy glue to adhere the candlestick holders to your plates. Tape it into place so that it doesn’t move and can dry properly. Allow it to dry for 24 hours. |
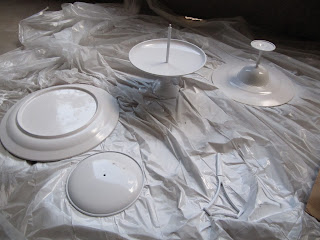 |
| When you’re done, spray paint all your pieces white. I used Rustoleum brand to make sure that the paint would stick to the metal. |
 |
| I used this as my template for the peppermint swirl, from an online image I found. Make sure that the wide end is longer that the edge of the plate so you can wrap the contact paper around the edge. To get the proper sizing, you can measure the diameter of the plate and divide by two (to get the radius…remember geometry? You didn’t think you’d ever use it again…) The radius is the length of the swirl. |
 |
| Cut 6-8 pieces of your template out of contact paper for each plate. This is super easy if you have a Silhouette, but I didn’t have one (does someone wanna give me one for free?! 🙂 so I cut by hand. Find the center point of your plate (measure out the radius) and put the point of the swirl piece there. |
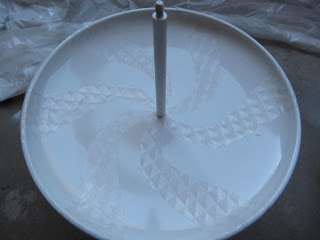 |
| Play with the layout until you get it how you like it. |
 |
| Make sure all the contact paper is firmly pressed to the plate and then spray paint red. It doesn’t matter if this brand is Rustoleum or not since you’ve already sprayed paint on there. Let it dry for awhile before you peel off the contact paper. After you peel it off, spray the whole thing with a clear varnish spray paint to seal it. |
 |
| Now stack up all your pieces and voila! I didn’t glue all my pieces together because 1) it would be easier to store separately, 2) easier to handle all together, and 3) I can use each piece individually to either stack up in a tower or sit next to each other. So many uses! |
|
|
|
|
Are you wondering why there is suddenly a square plate in there? Well one of my plate didn’t work out right the first time around when I tried to do a different design, so I opted for a plain white. I like it.)
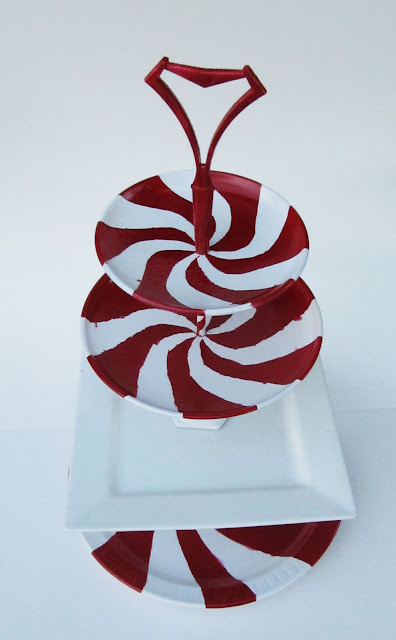 |
| If you look closely, you can see that some of the lines aren’t super clean. You will probably get that affect, but don’t stress about it because it still looks cool! (If you use a Silhouette you might have cleaner lines.) |
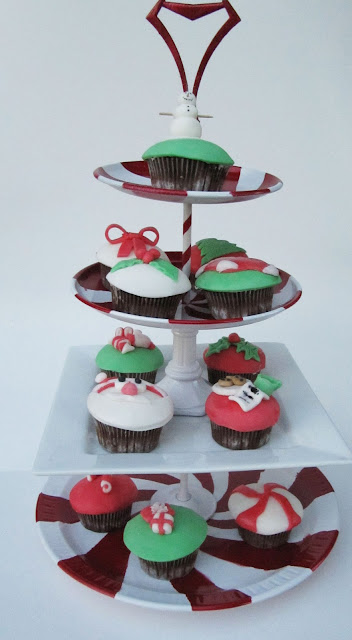 |
| And who’s gonna care when you have put your adorable cupcakes on top of them? |
In case you don’t know how to make fondant cupcakes, I will be doing a tutorial on these on Thursday!


Great idea, this turned out amazing!
This is so cute!
so so pretty!
Thanks so much for sharing – we're doing a Dr. Suess themed baby shower on the 4th of Dec and this is a great starting off point for our very own homemade decoration! ♥
Heidi, this was so cute! I love the peppermints and am really loving the addition of the square plate. Congrats on making it to the final round! You rock!!
Um, all I can say is GENIUS! So smart and practical…those cupcake towers are usually $20 or more and this is quick and easy! (c:
http://loveallthingsbrightandbeautiful.blogspot.com
Ahhh, contact paper! I was wondering how the heck you got those swirls so lovely. I need to do something like this ASAP for a boutique display on Saturday.
BTW, do you have anything you'd like to sell at a boutique? It is in Gilbert.
BEAUTIFUL!!! I love how you made your tier. I might even be able to attempt this one. Great job in the entire competition! Thanks so much for participating and making it so fun! Can't wait to see the cupcakes on Thursday (they were WAY too cute)!
What an awesome idea! LOVE IT!
So cute! Great idea. I HIGHLY recommend investing in a Silhouette! I bought one a few months ago on Overstock for under $200 and it has already paid for itself just by me using it to make Christmas and birthday gifts.
Heidi! It looks and turned out so great! I am in awe of you and your mad skills! Congratulations on being one of the three finalists. I really enjoyed working with you!!
Hey there! I just wanted to let you know that I am planning on featuring this cupcake tower this weekend! You can keep an eye out for it Saturday morning!
Anestazia <3
http://yourworkistodiscoveryourworld.blogspot.com/
maybe if you painted it white and then contact papered and painted white again then red. it wouldnt bleed as bad under the paper..
I LOVE this! It is so festive! Thanks for the great idea!
Rebecca@RootsAndWingsCo
Featured this on Craft Gossip this morning Heidi 🙂 Happy Thanksgiving!
http://homeandgarden.craftgossip.com/peppermint-cupcake-tower/
Did you leave the contact paper on? Or did I miss that part…
Looks great – I'll have to keep my eyes open for something similar.
Love the idea!
Super cute! I love this..isn't it awesome what some glue and spray paint can do??!!! lol =)
Great idea! Are the paints food safe?
LOVE this! Very cute! I'd love for you to link this up at our holiday party! http://iheartnaptime.blogspot.com/2010/11/crazy-christmas-crafter-link-up-w.html
http://umwowstudio.blogspot.com/2010/11/homemade-cupcake-stand.html
DID IT DID IT DID IT!!!
Adorable!
Oh my goodness, I LOVE this!!! We're having a peppermint party and I just might have to make this for our party!!!
Ok, I just attempted this…not nearly as awesome as yours but I like it. Thanks for the tips!!!
My friend did a tutorial for one of these a few months back at budgetwisehome.com Great job on yours, very festive!
Oh, it is so very cute! I'm going to start looking for plates because I want one too!
Very Cute!!