• Home
  • About
  • Contact
  • Shop
    • Patterns

Honeybear Lane

DIY Decorating

  • DIY Tutorials
    • Projects
    • Building
    • Sewing
    • Quilting
    • Crafts
  • Home Decor
    • Home Decorating
    • Honeybear House
    • Organization
    • DIY home decor
  • My Home Tour
  • Recipes
  • Holiday
    • Valentines
    • St Patricks Day
    • Easter
    • Spring
    • Summer
    • July 4th
    • Fall
    • Halloween
    • Thanksgiving
    • Christmas
  • Entertaining
    • Printables
    • Parties
  • Wellness
    • Essential Oils
    • Health and Wellness
    • Weight loss
DIY· home decor

A Cozy Farmhouse Bathroom Update

February 10, 2016

Sharing is caring!

525 shares
  • Share

Framed Mirrors

The last thing I had a chance to do in here was to frame out the builder-grade mirrors.  This is such an easy project that adds a lot of character to a bathroom.  I purchased 1×4 MDF that was pre-primed, about $5 for each piece and I needed 6, three for each mirror (this bathroom has two separate sinks and mirrors which you might not be able to tell–sorry if that’s confusing!)

frame a builder grade mirror

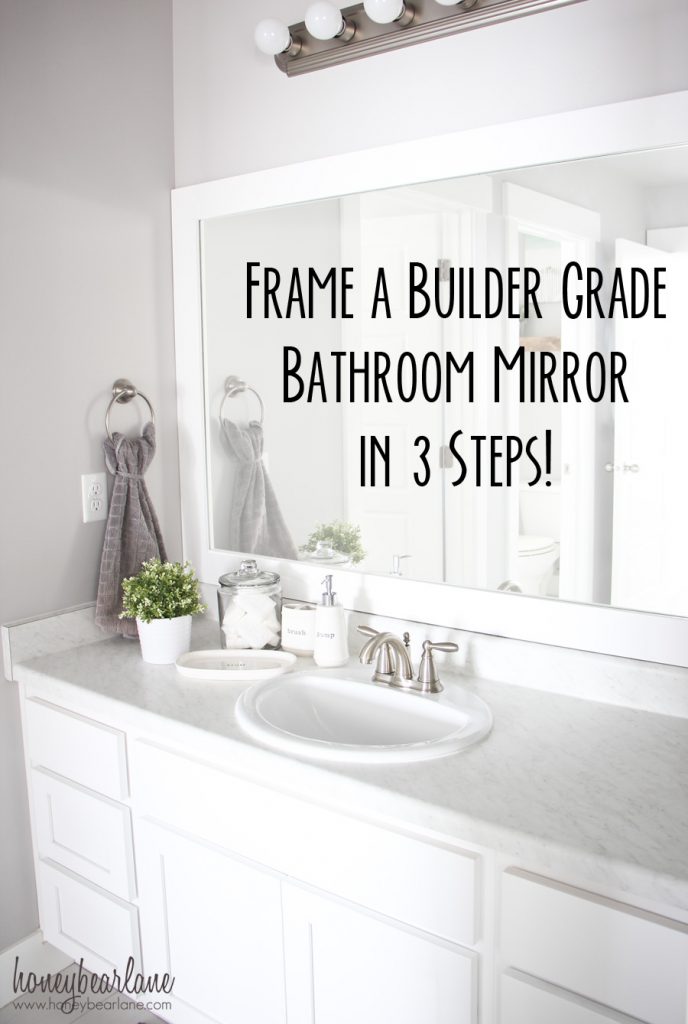
My rule is that if the cabinet is white, frame the mirror in white too.  If the cabinet is wood, frame the mirror in the same stain as the cabinet.  But it’s not a hard and fast rule, just one that might help you if you don’t know which to pick.

Step 1:  Measure and Cut

I measured the length and width of the mirrors and cut them, mitered at 45 degrees, to size.  You have to cut them with the mitered corners like this:  \_____/ and the long ends will be the measurement of the length and width.

Step 2:  Paint

Then I painted them before putting them up.  I didn’t have to paint the sides or back because the back was pre-primed in white and the sides were pretty much all covered and non-exposed.  Here’s a tip:  let the latex paint cure fully before touching them to each other (like when you carry them to the bathroom) because if the paint touches itself it will rip itself off.  Just speaking from experience, that’s all.

Step 3:  Attach

Finally I used Liquid Nails to attach them straight to the mirrors.  I lined up all the mitered corners and they fit so well that I didn’t even need to tape them to the wall or mirror while I waited for it to dry, except in once spot that wasn’t supported by the wall.  Once it was dry, I caulked the lines in the corners and touched up the paint.  That was it!

Pages: 1 2 3 4 5 6

Filed Under: DIY, home decor 8 Comments

Comments

  1. Amber says

    February 27, 2016 at 6:02 pm

    I love the beach print you have in the bathroom!! Where did you get it?

    Reply
    • Heidi @ Honeybear Lane says

      February 29, 2016 at 4:57 pm

      It’s from Home Goods. Thanks!

      Reply
  2. Nicole says

    September 11, 2016 at 3:15 pm

    What color gray is on the walls?

    Reply
    • Heidi @ Honeybear Lane says

      September 11, 2016 at 11:55 pm

      It’s color matched to Passive Gray Sherwin Williams.

      Reply
  3. Alexandra says

    August 24, 2017 at 6:38 am

    Loved this, Heidi. Farmhouse style is beautifully clean and simple with a touch of nostalgia. Pinned and shared on my Wife Sense FB page.

    Reply
  4. Lynn says

    June 23, 2021 at 1:07 pm

    what did you use for the top trim (where the towel hooks are)?

    Reply
    • Heidi @ Honeybear Lane says

      August 17, 2021 at 10:15 pm

      It’s a pre-primed MDF piece, approximately 1×6 or possibly 1×8, I can’t remember.

      Reply

Trackbacks

  1. 76 Ways To Decorate A Small Bathroom | Shutterfly says:
    March 9, 2022 at 6:37 pm

    […] Source: Honey Bear Lane […]

    Reply

Leave a Reply Cancel reply

Your email address will not be published. Required fields are marked *

Popular Posts

  • DIY Farmhouse Table and Bench
  • 20 Handmade Christmas Presents to Start Sewing Now
  • IKEA Hack: Expedit into Long Storage Unit
  • My Gorgeous DIY Office Built ins Reveal
  • 8 Steps to an Epic Halloween Party
  • DIY Mudroom Bench
  • Build Your Own DIY Outdoor Furniture
  • Tips for Painting Stair Balusters
Welcome

Hey there--I'm Heidi! I teach women how to decorate, DIY, and design so that they can love the home they live in.

  • Facebook
  • Google+
  • Instagram
  • Pinterest
  • Twitter

Creative Commons License
This work is licensed under a Creative Commons Attribution-NonCommercial-ShareAlike 3.0 Unported License

Privacy Policy

Copyright © 2022 Honey Bear Lane. Custom site by Moonsteam Design.
525 shares