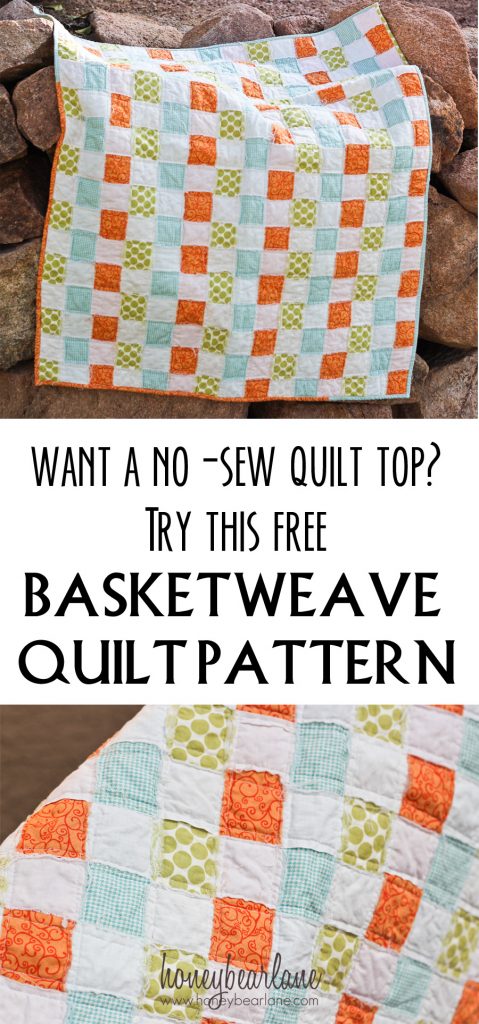
Basketweave Quilt Pattern
It looks like a lot of work, right? Would you be surprised to know that it wasn’t? That the whole project took me only a few hours?

It’s a great beginners pattern with a NO-SEW top!!
The basic concept is an old one: cut strips of fabric and then weave them like a basket. Actually I’ve never woven a basket so I don’t know if that’s quite the right description. But that’s what I’m calling it regardless.

The biggest trick to this idea was the way to transfer the whole woven top without it coming apart. I really wondered how this would be possible. At first I tried packing tape but that was a sticky mess. Finally it came to me: freezer paper!
Update: Some readers also suggested here you could use fusible webbing, which you would not have to tear off later. Great idea!


Read on for the full tutorial…
Materials:
- 1/2 yard of three different color fabrics, cut into 2″ strips OR 1 jelly roll
- 1 yard of cream/white colored fabric, cut into 2″ strips
- 1 yard of backing fabric of your choice
- 1 yard of low-loft batting
- 1/2 yard of binding material (or use leftover strips of fabric)
- Thread/Safety pins
- Freezer paper
- Tape

I drew this out so it would be clear in case you don’t know how to weave. For the top, you’ll want to cut approximately 15 or 16 strips for one side and 18-20 strips for the other. For this quilt I cut one side from three fabrics (green, blue, orange) and the other in all cream. The colored strips were cut 44″ and I think the cream was a little shorter, because I was using up scraps. Make a grid (I did this on my kitchen table AKA my craft table) and let the strips hang over the sides) and tape down the strips like shown.

Then you start to weave. Bring one top strip down and then one side strip over. Bring the next top strip down and then the next side strip over, but tucking them under and over. Another method is to bring all the strips from one side down and then weave in the other side’s strips. Whichever is easier or more fun. Because really, it’s pretty fun. Just do it in a spot where your little ones can’t mess it up if you can’t finish it all at once.

Once you’ve woven the top, make sure it’s all tightened up so that all the fabric is touching and there are no holes.
Then you will take freezer paper and lie it on the top, shiny side down. This top took two large pieces. I lay it over and ironed it on on the cotton setting with no steam. The freezer paper adhered to the fabric and kept it all together. Then I folded the top in half and put it out of the way.
Next I lay a yard of my backing fabric right side down on the table (or floor if you want). It’s a good idea to tape it down, although I didn’t because I was in a rush. You can follow my quilt basting tutorial here or keep reading.
After the backing fabric, you place a piece of batting that is same size or slightly smaller, and finally the woven top. Don’t take the freezer paper off yet!

After you’ve made your quilt sandwich, you’re going to start safety-pinning. I safety pinned all along, every several inches. I rolled the quilt up as I went along to make things easier.
(This is where the no-sew part ends, so if you don’t sew, find someone who does to help you with this step!)
After the center quilt is pinned, I sewed a border around the perimeter of the quilt to keep those ends together. I always use the edge of my presser foot as my seam allowance guide (which is about a 3/8th seam allowance.) I lined up the edge of the presser foot with the edge of the outermost woven strip (not the little outer pieces that aren’t really woven, they will be cut off) and sewed all around the perimeter. Make sense? And yes I sewed right through the freezer paper.

After that step, I carefully removed the freezer paper. Just rip it right off, it won’t mess up the stitching. Everything is together so now all I have to do is quilt it!

To quilt, I just sewed about 1/4 inch from the edge of each strip. It makes a grid, which is quite delightful, I think.


To finish the quilt, I used my perfect machine binding method. Then I threw it in the washer to get the ragged wrinkly quilt look. Yay!
This basketweave quilt pattern was a fun experiment and I’m really happy with how it turned out. Try it sometime–especially if you can’t even sew, just do the top and have a sewing friend do the quilting/binding part. It’s something to be proud of!
This looks so easy and like something I really want to try. But what is freezer paper?
It’s a Reynolds product you can find by ziplock baggies and the like. Freezer paper looks like this: http://www.google.com/imgres?um=1&hl=en&sa=N&biw=1244&bih=629&tbm=isch&tbnid=v6EH3e8h9HKiLM:&imgrefurl=http://musingsfromhel.blogspot.com/2011/01/freezer-paper-stenciling.html&docid=dVjQGRoRoRsfSM&imgurl=http://4.bp.blogspot.com/_JzRpztNfJVU/TSs89kSYiwI/AAAAAAAABBQ/dIqBEYKJ7q4/s400/reynolds-freezer-paper-roll–1014-p.jpg&w=300&h=300&ei=wVo5T-5gqMexAtr-jPkB&zoom=1&iact=hc&vpx=131&vpy=282&dur=489&hovh=210&hovw=219&tx=132&ty=164&sig=105529760113427749119&page=2&tbnh=137&tbnw=191&start=21&ndsp=25&ved=1t:429,r:6,s:21 (sorry for the super long link!!)
This quilt is ingenious! Love it! I’m still curious about the freezer paper. I’ve not used it before. Do you iron it on and it sticks?
Yep! then you just rip it off.
Definitely in foil aisle and it’s white. Shiny side adheres when ironed. it’s great for pattern making and quilting. Just draw quilt design on non shiny side iron on and quilt then tear off gently
Is this large enough for a baby crib quilt? It is so precious!
yes it should be! Thanks!
Hello Heidi,
I just found this site and love it, it is a beautiful little cot cover, I think I would like to try this in a check fabric for my hubby as a throw for his chair I’m so glad that I found this site Many thanks Margaret ( from Bonnie Scotland )
suggestion make make 4.5 in strips stitch right sides together and turn right side out, press then weave, no fraying seams. Quilt will wash and last longer. For beginners please note, especially if cheep discount store fabric (you know the stores even their fabrics which are as expensive as quilting shops, is NOT the same quality!) If you shop your local quilt shops learn their ‘sale section’ or when on sale; find a line you like(?) also check out on line quilt purchases as long as you have the line of fabric say Moda or Andover; and the print like ‘Little house on the Prairie’. If you cannot find locally on sale check out on line sites. You n WILL be surprised at the high quality of fabric compared to local stores. If you don’t like that I would say Hobby Lobby has better quality than any of my non-quilting fabric stores (get the higher priced yardage at 30% or coupon 40% off. My local quilt shop has a $4.00/yd and a $7.00 per yard section. I now make ALL Pillowcases with quilting fabric they last years!!
How can you sew them together and then weave
Cut a 4..5″ wide strip, fold strip RST & sew down long edge. This is now a tube.
Turn through so right side out, press so seam is open & in the middle at the back.
Repeat for as many strips as required.
Weave together as above.
This will use more than double the fabric of the original method but will give a neater & more durable quilt top.
Oh I get it, so now you are weaving tubes. You could do that will Jelly rolls too! or better yardage I suppose, cut wider
This is brilliant
that sounds do-able or you could cut your strips on the diagonal. This would give the raggedy look without the fraying. I would go nuts the way this is presented, always snipping threads.
Wow Heidi!! That is super cute!! I love the frayed basket look -I am definitely adding this to my to-do list!!
Thank Bev!
This is SO CUTE. I love it!
Oh my goodness thank you for sharing!
I am totally going to have to make one of these!!!!
I could probably figure this out if I took the time, but how big did it end up? I’m looking to do a twin sized quilt for my daughter and I think we both might love this! I know I’d have to get a lot more fabric, but I’m trying to figure out just HOW much more! Thanks for posting this as a tutorial!
It’s about 32×36 I think? It would be ambitious as a bigger quilt, that would be awesome! I think I would probably times it by four.
Thanks for responding!I appreciate that! I think it would be a great pattern to use for a bigger quilt since it would be fairly easy to hide where you have to join the fabric to make longer strips. My daughter really likes it, so we might go for something like that! Thanks!
Could it be done as 4 panels and joined together I wonder ? Would be a manageable size? Obviously you would have to do it before backing
So cute! I think I may try this sometime!
Thanks!!
Really cute! And you did it with three little kids in the house. You give me hope!
Well with a new baby you don’t get out much, haha. You totally can do this.
What a fun project! Great fabrics too.
Thank you!
So cute! I never thought of doing this way before!
Thanks! It’s a pretty fun project–would be great to teach kids too.
Wow! What an idea! I never would of thought of that. So cute! and you have three kids in the house, crazy I only hope when I have kids I’ll still be able to do stuff! Thanx so much for sharing!
Natalie
http://www.projectdowhatyoulove.wordpress.com
You learn to be fast, haha! Thanks Natalie!
Darling….might even be easy enough for me to try!!!
Thank you! It is pretty easy and quick, you can do it!
This is so adorable- and you make it look so easy! How will the blanket wash? Is it stiff because of the paper? Sorry for all of the questions- I’ve never made a quilt and I have been wanting to learn how for a long time!
If you read the directions, you will see that after you baste the quilt with the pins, you’ll remove the paper. The paper will be long gone before you wash it!
I read the directions but I’m confused at how to remove the paper AFTER you have pinned and basted it.
Just rip it off!
How can you rip it off the freezer paper when it is on the inside of the quilt sandwich. Reach in? I still don’t get this part.
The freezer paper goes on the top of the quilt top, so it’s not in between the quilt sandwich. But one option others suggested would work too, you could use fusible web on the bottom and that way you wouldn’t have to bother with ripping the freezer paper off.
I absolutely love this! I pinned it so I don’t forget about it. Definitely want to try it out. It would make a really fun quilt for my daughter! Thank you for sharing.
I really love this look and idea. I’m definitely going to try this for a friends baby. My one question is: do you think the “strings” from the raw edges would be a choking hazard. I don’t want the mom to think I am giving something “dangerous” even though I don’t think it is. Just curious as to your 2 cents:) Thanks for the tutorial and blog!
Maybe you could use pinking shears to cut the strips. I think that would prevent any long strings. I think it would be an adorable baby quilt any new mom would appreciate.
Clip the edges and make it a rag quilt, no long strings.
Heidi,
No way…definitely a “WOW” project and I really can’t wait to try this technique out!!
Thank you so much for stopping by and I’m pinning this on my to do list asap!!
Thanks Kari!! Always such a great day to be featured on UCreate. 🙂
I love this. Two questions: What are the final dimensions? Would you consider it the size of a baby quilt or one for an adult to snuggle in?
I think it was about 32×38 finished. Definitely a baby quilt, probably not big enough for an adult to snuggle it, but that wouldn’t be hard to do.
Thanks Easy show me on picture how to make it etc .I wll made it Thanks
C’est magnifique. Je pense que ce sera mon prochain projet de couture. Merci pour les explications.
Peony
Beautiful! I’m pinning this for sure! Also, I love the colors you chose – somewhat similar to the color scheme and quilt for my younger daughter’s nursry: http://ajennuinelife.blogspot.com/2011/07/nursery-prep-quilt.html
It’s lovely! Thanks so much!
Cant wait to try this out!
~Jamie
I just saw this on uCreate and had to leave a comment. I LOVE this! It’s such a clever idea, and your execution is so wonderful. I’m totally inspired to make my own. Thank you for sharing and taking the time to make such a great tutorial!
Thanks for your comment Kelli!
Oooooh I love this… I have a bunch of baby gifts to make and was trying to think of something pretty & useful, but quick. Kaching!! Thanks for sharing, it’s lovely!
Brilliant!! Can’t wait to try it!
quite lovely! going to try this one for sure… and I don’t quilt! thanks much!
Oh good–go try it!
Cute project. Can’t beat fast and fun!
One suggestion: If you use a light weight fusible interfacing (like Pellon 911) rather than freezer paper, you can lay the fusible on the table, or your ironing board, fusible side (bumpy side) face up. Then weave your fabric strips (right side up) on top of it. When you are done weaving, press the quilt top and the strips will be fused in place and attached to the interfacing. It will be easy to quilt without having to remove the freezer paper.
That’s a good idea, although you’d have to tape the interfacing down to the table really well first because otherwise it would get shifted around like crazy. I guess if you weaved the strips wrong side up you can lie the interfacing on top and iron it on.
If you weave the strips wrong side up, you simply cover the whole thing with your batting, then backing right side up and pin around the edges. Flip and pin the rest.
Love it! Did you prewash your fabric/batting?
Nope–I used to always prewash everything but sometimes I just don’t have time so I have been skipping the prewashing step more. And it didn’t make a difference at all once I washed it.
Love this idea. I’m going to pin it for future reference. The colors are great, too.
Thanks so much!
This is a super cute idea! I love making quick baby blankets for friends and this would be a perfect addition to my collection of ideas.
Thanks!
I love this, and you make it look so easy. My mama is a quilter but I am a tad timid around the sewing machine. You think she would like this if I made it for her bday in April?
New Follower too!
~Jen @ hutchinsonherd.blogspot.com
Yes definitely! The key is to do a careful job of basting the quilt. If you do it well then you should have no issues while sewing. And it’s all just straight lines so it’s great practice! Good luck!
i loveity love love this quilt! i wanna pin it on pinterest, but i can’t figure out how. please help??
thanks,
jen 🙂
You have to install the Pin It button on your browser bookmarks bar. If you can’t figure that out, you can always search ‘basketweave quilt’ on pinterest, find it and repin! Thanks!!
This is BRILLIANT. I love the technique. You should patent it:) Your quilt is beautiful. I am featuring it at somedaycrafts.blogspot.com.
Thanks Michelle!!
What a wonderful idea!! thank you for sharing. 🙂
This quilt is so adorable! Thanks so much for sharing such great directions and pictures. It’s a definite must make 🙂
Found this on pinterest and LOVE it!! Love your blog too and now you have a new follower!! Thanks so much for sharing your creativity!
Did you use a walking foot on your machine or simply you standard 1/4 inch foot ?
I want to do this as a table runner for easter, simple yet adorable. Thanks for sharing.
Katrina
Actually neither. I lined up the inner edge of the left side of my regular presser foot (I actually use a satin foot as my standard) which makes it 1/4 inch. I bought a 1/4 inch foot once but it didn’t work with my machine and I never got around to getting another one, haha!
You are a genius! I can’t believe how awesome it looks. You would never know that you took a shortcut.
I made this quilt to day. What fun! Instead of freezer paper, I used spray ‘Quilt Baste” on one side of my bat and then I attached my backing to it, “pressing it” on with my hands. Turning it over, I sprayed the other side of the bat and then laid out the white strips and basted them on the ends to the back and bat and laid every other white strip back over the basted edge and off the bat. I then laid out and the first colored strip, pinning it at the top and then laid every other white strip over the colored on, pinning it at the bottom. I proceeded this action, every other white strip back over the just placed strip, with each remaining colored strip. When finished weaving, the back, bat, and top were completed and sticky basted to take to the machine for quilting. I then did a quick hand baste stitch all around the edges. Quilting, trimming, and binding it off tomorrow. TIP: While the white strips are long and unwoven yet, I folded each the long end half way back on itself to make a shorter strip making them easier to control while weaving them. A large colored flat head pin helps to easily find the end of the strip for folding them back for weaving.
Interesting Cheryl! Glad it worked out for you!
I started cutting strips on Thursday night. I was weaving and going to the grocery store for more freezer paper on Friday morning. By Sunday I finished the binding. LOVE the simplicity and fun of this quilt. Thanks for the inspiration. You can view mine at: http://new2quilting.blogspot.com/2012/03/basketweave-quilt-finish.html
FUN FUN, Heidi!
Thanks Kathy! You did a great job, I love it! I shared it on my FB page!
Worked great! And I DON’T sew. Only reccomendation; dont use 1 yard white bc it is the main color on the woven side. I would reccomend to use your *favorite* fabric instead of white. I did a childrens dinosaur themed one and wish I would have used the dino fabric as the majority. There is always next time!
Great to hear!
Cute! I love the fabrics you chose. I don’t think I have ever heard of low loft batting. Then again, in my town I have to just take what I can get, I won’t be able to find it here anyway…..
Low loft batting is simple thin batting. High loft is really thick batting. That is what I use for my puff quilts (in the border.) Good luck!
Thank you for posting this amazing idea. I made a larger version of it for a friend for her birthday. It is so easy and fun! Thank you!!
Cool! I’d love to see a pic!
Im a REALLY new sewer and would like to try this, but I’m confused on how to remove the paper? if you’ve sewn around the perimeter of the quilt how do you get the paper out? thanks, lovely quilt
ok, nevermind I finally got it, lol the paper is laid on top not under , duh
Yep–the paper is laid on top and once the perimeter is sewn, you can rip it off!
I made this last Thursday and Friday for a baby shower on Saturday. It was very easy and fun! Thanks so much! Instead of the freezer paper, I just used painters tape and taped the backing and batting to the table, and did the weaving over the top of it. I kept my cutting mat underneath, and pinned on every other square. No problems at all! I also kept the pins in it, until it was all sewn together. There were a few tucks, but since the look is kinda rag-like, I didn’t mind it at all. It probably took me about 2 hours to cut the strips, get the fabric setup, and weave the quilt. It took about another 4 to sew the top and bind it. I would recommend being careful with the light color strips you choose, because the darker colors will be woven behind them and can be seen a bit. Thanks for the great idea/pattern!
Thanks for sharing your method. Sounds like a great idea!
Heidi- Thanks for sharing! I am just statring out as a quilter, this looks so easy, and just the project I can do with my 8 yr old granddaughter who will be staying with us in FL for the summer. I’ll let her pick the colors and away we’ll go…What a GREAT time we will have! Thanks again!
The quilt looks great. I am a little confused as to how you removed the freezer paper. If you sewed the perimeter-all four sides. How did you carefully remove the freezer paper? I am definately going to make this quilt.
You can just rip it off. It will rip despite the stitching and won’t mess anything up.
I just made this and it was great. What I did is ate down my backing and put the batting on as if to baste and then I wove right on top of that and pin basted so it was all one step. After cutting the strips, it took about 75 minutes to do all that, and now it’s ready to be quilted. Thanks for the tutorial!
I love people who think outside the box, will try this out next time, awesome!
This is great. We are searching for quick and easy quilts for kids.Tired of the Rail Fence and Four Patch. We are doing a 12 hr Quilt-a-Thon in Nov. and would love to be able to print off these instructions. All our quilt go to our local, 5-county, chapter of the national organization Project Linus (for traumatized children). How might I obtain these printed instructions?
Sorry, I don’t have printable instructions for this unless you print directly off the blog.
think I will try this as a table runner or place mats first to get the hang of it. I am afraid it would be rather “squirrely” to try something that big my first time… thanks for the great idea
this looks awesome! i really want to give it a try!!
Hi there, I’ve never made a quilt before, so was just wondering…instead of using freezer paper, could I use a very lightweight fusible interfacing? I understand that will be permanent but will that be a problem?? Thanks so much 🙂 Excited to try to make this for my fiance and I!
One other reader did this project with fusible interfacing and it worked perfectly. I haven’t tried it but I’d like to. I simply didn’t think of it when I made this quilt!
I made it! I love it! I used wonder under and just cut the wonder under in 1″ strips then pressed it down the middle of the 2″ white strips. I after I wove a line I just pressed it into place. It worked great!
What a great idea! Glad it worked out so well for you!
This is a beautiful quilt. Love the colors. I am a beginner and will be giving it a try. thanks
What a cute idea. I’m new to quilting (this will be my second) and need a baby gift in February and I think this might be just the one! I want my gift to be something that is used and loved, not just for looks. How well do you think the raw edges will hold up with multiple washings?
Thanks for this great tutorial! I followed it and made a baby quilt for my son (due in 2 weeks!) I blogged about it here: http://mengalings.blogspot.com/2012/09/sewing-for-silas-woven-baby-quilt.html
Very cute! Great job!
What a neat technique! Quite ingenious.
Just saw this! I LOVE this- looking for a baby shower gift for my niece’s baby. However- have another shower next weekend and you said it was so quick-can’t cost much with so little fabric. I’m going to town now and buying the supplies- making this for the friend’s shower and worry about the niece later! Love the directions too. Nice job.
My daughter and I both are making this quilt at the same time. We used a jelly roll for one and made our own jelly roll
for the other one which is bigger! It has been a lot of fun weaving. I love the non traditional quilts!
How fun! Thanks for sharing!
Will wax or parchment paper work as well as the freezer paper?
No, the freezer paper only works because when you iron it on it sticks to the fabric. That doesn’t happen with wax or parchment paper.
I tried to click on the tutorial that was on the last comment where it says “here” but it wont open anything. Its not highlighted.
I’m late to the party, as usual, but I was enchanted by this method! I chose a batik roll and added a couple of Moda strips to expand the palette more toward the spectrum I was imagining. I ended up weaving the strips on top of the batting and backing and pinning in place before stitching. So easy!
Anyhow, thanks for the tutorial, and here’s a link to a photo of my finished product:
http://www.flickr.com/photos/k8izgr8/8515560513/in/photostream
I love the look of this but Im afraid the amount of fraying that is clear in the picture referring to quilting the piece makes me feel this isnt an ideal option for a baby quilt that will get so much laundering.
This is WAY cool! I love to quilt and this looks so easy! I’m going to have to try making this! Thanks for sharing!
Just finished a ‘woven’ quilt in Pinks & Purples. 14 year old Grand daughter helped make it and it is a gift for her half sister age 3. Thank you for a great tutorial. http://pinterest.com/pin/130182245451904973/
Beautiful! Great job!
Great idea. I haven’t read thru ALL of the comments so forgive the possible repeat, but I would suggest you do your weaving on top of a fusible batting, then once all strips are arranged, you could LIGHTLY fuse them into place, add the backing and do your quilting. Your quilting on the back looks great, too. Thanks!
Just found out that we are expecting Grandbaby # 2. So excited! I will be making this next week. Thank you for sharing!
im making a quilt like this now,cant wait to see it finished
I am definitely going to do this. Somebody is always having a baby and rag quilts are the best! Thank you. You are so creative!!
What a great Idea. Always on the lookout for something innovative and this fit the bill. Congratulations and thank you for sharing
I am a little confused. I am in the process of making a rag quilt, so I am familiar with the concept. My question is:
When you sew the 1/4″ seam up ad down each row, when it rags, won’t you be able to see the batting?
It’s actually a 3/8th seam and you don’t clip it all the way past the seam, otherwise the puff will open up and the batting will escape.
I love this quilt, however I am a little confused. When you cut the colored fabrics into 2″ strips, are you cutting them on the long side or short side of the fabric? Thanks!!!
Usually you cut strips the width of the fabric (WOF). That’s normally around 44″
I am curious as to how to remove the freezer paper for the basket weaving quilt. What a nice way to use up your stash! I read the idea with the light weight interface instead of freezer paper. Appreciate your guidance on how to remove the freezer paper if the outer edge of the weaves top quilt is to be stitched.
You literally just rip it off. It will rip off even though it’s sewn in.
I love this quilt. I will definitely try it. Awesome ideal on the freezer paper. It just so happens I have everything I need right here at home. Thanks for shareing
Wow! And here I’ve been sweat in’ ALL the small stuff, like neat, even seams and clipping all those tiny frayed threads. This quilt really is freeing to those of us with OCD! Thanks. This is a keeper!
This is so nice ! It’s bound to become someone’s favorite thing to cuddle with. I think I would attempt putting it together right on top of the backing and batting using the 505 spray as you go along and pinning also. Why not ?
You could try but the freezer paper really is easy!
I don’t understand what happens to raw edges of the strips.
They actually stay raw but since you stitch so close to them they don’t unravel hardly. It’s a bit more of a rough look but then it is a cheater quilt!
I think I’ll do this for a couple of throws for our basement.
I bet this would be great with homespuns!
Thank you! I am a beginner quilter. I love the instructions and the quilt. I can’t wait to try it out!
I can’t for the life of me get to the instructions for this quilt. I have a good idea how it works but I would love to see the actual instructions.
I’m sorry about that! Once upon a time I added some page breaks in this post and they have screwed it up. I just removed them and now you should be able to view the whole post.
1/24/2018
I am a beginner and would love to try to make this quilt “Raggedy Basket Weave” quilt. Unfortunately I have not been able to find the pattern/ tutoral
I’m sorry about that! Once upon a time I added some page breaks in this post and they have screwed it up. I just removed them and now you should be able to view the whole post.
This is great. Did something similar, made bias tape, weaved and backed it with an old bath towel.
Great bathroom rug!
Simply desire to say your article is as surprising.
The clarity in your post is just nice and i could assume you’re an expert
on this subject. Well with your permission allow me to grab your
RSS feed to keep up to date with forthcoming post.
Thanks a million and please keep up the enjoyable work.
If some one wishes expert view regarding running a blog after that i propose him/her to visit this blog, Keep up
the pleasant work.
My brother suggested I might like this website.
He was entirely right. This post actually made
my day. You cann’t imagine simply how much time I had spent for this information!
Thanks!
I have been exploring for a bit for any high quality articles or blog posts on this sort of house
. Exploring in Yahoo I finally stumbled upon this website.
Reading this information So i am satisfied to express that I have a very
good uncanny feeling I came upon just what I needed. I
most indisputably will make sure to don?t omit this site and provides it a glance
on a constant basis.
I have never quilted before, but this is something I think I would like to try. My question to you is when pinning your quilt you used safety pins. Would iit be possible for me to use regular long quilting stick pins instead of the safety pins? Thank you very much for sharing your pattern for everyone.
so nice in this year and beautful