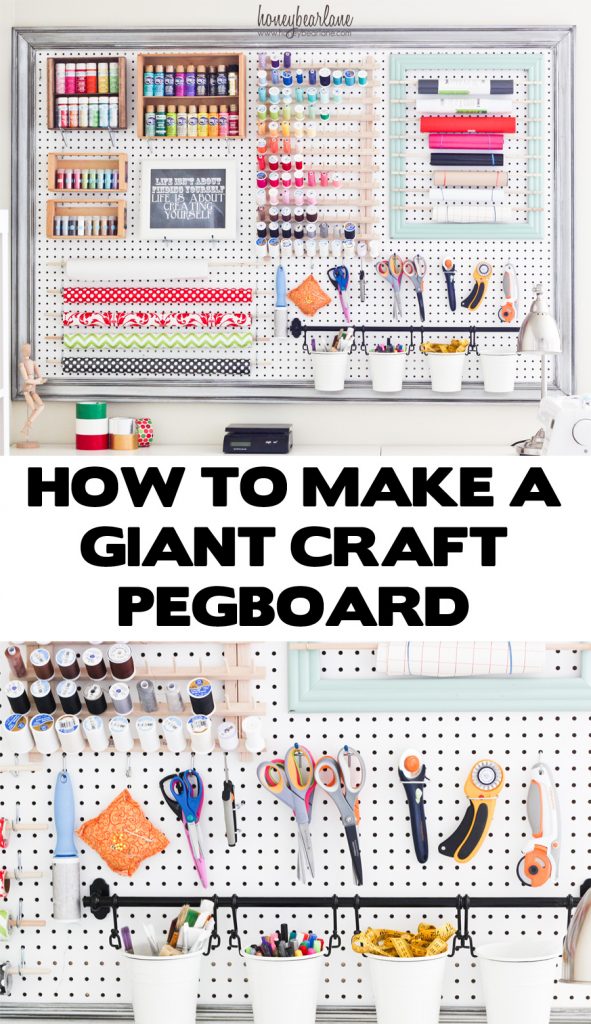
Extra Large Pegboard for Craft Room Organization
If you’re looking for the most excellent craft room organization item ever, look no further! I’m so excited to share this project with you–this ginormous framed pegboard! I was a little relieved to have the holidays overwith so I could start working on projects I’ve put off since August. One project that was a necessity to complete first was this extra large pegboard I made for my craft room organization. This is more of a ‘reveal’ picture-type post, but if you want to make your own (which you will!) read the Framed Pegboard Tutorial post.
But first, all the amazing products I used on this pegboard can be purchased here: (affiliate links, see disclosure)
- Hanging Bucket System
- Pegboard Hardware
- Thread Rack
- Wine Crates (for holding the paint and/or glitter)
- Dowels for wrapping paper and vinyl

I don’t have a dedicated room for my craft stuff right now but what we do have is an enormous living room. It’s wonderful and big and open but since all the other rooms are being used, I had to utilize the room and divide it up into working sections. there is a small little area in one corner of the living room just for my studio space. And even though everyone who comes over can see everything I’m working on (and the subsequent mess–although it does encourage me to keep it a little tidier) I really like it. I’m not ready to do a full reveal of the entire space but this pegboard is all ready to go. And oh.my.gursh….I LOVE this thing. Don’t you????

Here are a few close up shots. I will show you how to make the frame and hang it but that will be for another day. I have so many pictures in this post that there’s no room for a tutorial. THAT’s craft room organization, baby!

Before all of my scissors and things were in this small toolbox. Every time I needed something I would rummage around, pull things out, make a giant mess and man, what a hassle! But now they are all neatly hanging from hooks so I can grab them quickly. And there are separate scissors for fabric and for everything else…you know the importance of that right??? My kids sure don’t!
✅ Be sure to purchase:

I also love this wrapping paper storage. I had them shoved in a tall vase before and it never had a place, it always threatened to topple over and it didn’t fit right anyway. Now all my cute paper can be displayed and functional. If you’re going to do this for your wrapping paper, make sure you find several rolls before you cut the dowels because I’ve learned that most wrapping paper tubes are actually longer than these ones I have shown.

I used this extra large thrift store frame spray painted (Krylon Catalina Mist) and drilled some holes to screw in some hooks and used dowels to hang the vinyl–secured with rubber bands. Now I can remember that I have it, which colors I have, how much I have. Before it was tucked away in a magazine box and you know that saying–out of sight, out of mind? It’s true.
Confession: I pretty much never use vinyl or craft cutters. I just have not used them enough to ever get the hang of it and when I go to do it, I always have to download the latest software, etc…it just takes forever!

I think my favorite part is this large thread holder. Before, my thread was in this awful awful hard plastic container that the lid never fit on right and I never knew where to put it. My thread was such a pain to get to that half the time I would sew with whatever was on the machine even if it clashed horribly. Now it is all right in front of me, arranged according to color and I know exactly how much I have of each color, each shade…I can’t even begin to describe how convenient and helpful this is.

For the paint, I had these old thrifted wine crates that I collected but never knew what to use them for…but they seem to have been made for craft paint storage! I double layered because I have multiple of each color…one crate for Americana and Plaid paints and one crate for Martha Stewart brand paints. And the colors are so glorious. I just love having the colors right out in front of me so I know what I have.

One thing I HAD to display was my glitter. I HEART Martha Stewart brand glitter and I love every little color it comes in. So I used more wine crates to put them in…so fun.

The bucket system I got from IKEA. I’m not gotta lie, it was splurge when I knew I could just get dollar store buckets to hang from the regular pegboard things. But I just love the clean and professional look of the buckets on the rod–so polished and pretty. I put my paintbrushes in one, markers and pens in another, all my sewing feet and measuring tape in one, and my labels and bobbins in the last.

Last thing I put up was this framed quoted “Life isn’t about finding yourself, Life is about Creating Yourself.” I love this quote because it reminds me of the me I am now and the me I was as a lost college student. I remember how important it was to me to “Find Myself”…and yet the person I am now is definitely someone I have created. And my creativity and need to create is a HUGE part of me. I’m never content if I couldn’t be creating something.

This pegboard is 6 feet by 4 feet and framed with crown molding. It’s hung in a way that allows me to remove whatever I want with ease or rearrange or whatever. It takes up nearly the entire wall and I actually really like what it brings to the whole living space. Why should I hide such a big part of my life? Um, because it’s seriously messy most of the time?
Want to make your own? Check out my tutorial here
I LOVE your pegboard! I’ve been wanting pegboard in my sewing room, but I never thought of making it so pretty! I also love the way you “framed” your rolls of vinyl. Such great ideas! Thank you!!
Thanks–it really has made my life so much easier.
I knew this would be up on the wall for all to see so I wanted to make it as attractive as possible. Thanks!
This was the largest project I have ever attempted. I have to say the manual mitre saw about killed me. It turned out pretty good. I was a little off on placing the crown molding on the peg board. It was not lined up exactly but it’s good enough. I wasn’t sure from the instructions on where to mark the crown molding but I figured it out. 1st I tried to glue the frame and then place it on top of the peg board but when I tried to lift the frame it came apart. I did have fun playing around with the color and antiquing. I also used Martha Stewart paint. My next attempt is hanging it on the wall.
I had originally bought $300 worth of Elfa (I’m a big fan) but after seeing your peg board I liked it a lot better, returned the Elfa, went to Home Depot and spent about $60. Your has a more homey feeling. It took a lot of arm strength sawing. Later I found out my dad had an electric saw. I’m excited to get it hung and display all of my stuff. I do need to make a trip to Ikea for the buckets. Thanks for the inspiration. I thought I would take the 2×4 piece and frame it but I’m not sure after my sore shoulders!
I loved reading about your project! It is super hard to cut that by hand. I just made another one this week and my hand is still sore haha. I can’t wait till I buy my power miter saw! Glad you saved the money and have a custom piece now!
Would love to see a picture of yours!!
good morning, we need to know where we can buy the pegboard in Spain, if there is any wholesaler or distributor ??
thx
I honestly do not know. Just go wherever you would go to buy lumber and they might be able to help you.
I work for Lowes and we do have overseas stores. Check online at Lowes.com
Looks great! I just hung a giant pegboard in my brand new basement craft corner.
Yay for pegboards!
Heidi, this is such a beautiful craft area! I love that you’re not hiding it away, you’re using the space you have. It’s gorgeous. And you have so much great crafting stuff. You’ve done such a nice job with it. Makes me want to go work on my “space”.
Thank you! I have SO much more stuff than this but at least some of it is neatly displayed instead of shoved away in a plastic bin.
This looks SO pretty! I’m loving that vinyl storage frame, and that glitter display is beautiful!
Glitter doesn’t take much to be beautiful!
AWESOME! Pinned for when I create more wall space in my quilting room…
Thanks! You don’t have to make it THIS big haha
Wow that is so great Heidi!! Everything is so organized and cute all at the same time!! 🙂
Thanks Bev! Just left a comment on your cute TV console redo!
This is fabulous. Can I ask how you hung the Ikea buckets? I can see that most of the other pieces are hung using s-hooks or hooks specifically made for the pegboard, but I can’t tell about the rail for the buckets. Thanks.
Same question–how did you hang the rail? I have some Ikea rails I’d like to mount on my pegboard, but the hole spacing is all wrong 🙂
I just drilled the screws right in the space between the holes and hung the bar up that way!
Hi Heidi love this peg board and want to do 2 of them 1 for me and 1 for my son. I love the buckets however can’t seem to find them or the bar holding them. If you happen to have a link to buy them, would greatly appreciate it. 🙂 Also instead of framing my sons like yours was planing on either wrapping material with his favorite anime on it or something like that
They are from IKEA but you can find them on Amazon too, here.
LOVE this! I’ve been wanting/needing to do some organization in the craft corner of my office. This inspires me!
Thanks! Hope you can get it like you want!
Best use and prettiest peg board I’ve ever seen. This is great and framing it out is perfect. I should configure something like this for all “my Stuff” Thanks!
Heidi, This is beautiful! I have seen LOTS of pegboards because I am in the process of cleaning out/rearranging my craft room that was my home office for a business. I retired from that business last July. I am glad I waited to hang a pegboard so I can do THIS! Can’t wait to see how you made it! Thanks for sharing!
I have a pegboard just that size that stretches across our dining room, giant thread rack and all! Though mine is far less organized. My favorite additions have been a mail box (the ones that hang on the house) to hold all my bias tape and ric rac packages, and a screwdriver holder that corrals all my different scissors. You’re definitely right about not knowing what you have until it is all out in the open…I never knew I had so much “stuff”!
Wow! That is beautiful! Are you serious? Your kids stay out of that?
Haha yes! I think since they grow up seeing all my crafting stuff every day it’s not as mysterious and exciting. I also put the paint up high.
This is fabulous! Cute, organized, functional… everything in one! I need some crafty supply organization desperately! Thanks so much for the inspiration! Have a great day!
What a fabulous idea for organizing a craft area. This will be great when I get my craft room back. It will be great to have it all up on the wall instead of in boxes and drawers.
I’m currently looking for ideas to organize my craft stuff. This looks great!
LOVE your craft pegboard organization! Love everything about it. You’ve inspired my to cleanup my craft space (again) 🙂 I’m featuring your pegboard at the PoPP Spotlight this week. Thanks for joining the party.
Thank you so much!!
I have been collecting items for a craft room for the last 6-7 yrs. Due to an illness, i was put way behind! Anyway, i am thinking that i might be able to tackle this project this yr. So, i will keep my fingers & toes crossed . This would look great & make a great ‘WOW’ starting point.
Wow, I hope you can get to this project this year too! Best of luck!
I love this! Where did you get those wine boxes from?
It’s the mother of all pegboards! i love it. I’m building my own craft room and am planning a pegboard organizer over one of the desks. I’ll definitely be taking some pointers from this one! I love the use of crates and the picture frame vinyl holder. Those Ikea buckets are awesome too. I’d love it if you linked this to my new linky party!
Have a great weekend!
Deborah
I just found your blog from a friend’s pin on Pintrest, and I am so glad that I did. I absolutely LOVE the pegboard storage idea! I have to wait to move this summer before I make one of my own, but I can’t wait, and I look forward to seeing what other ideas you have to share in your blog. 🙂
Welcome to my blog Becky! I hope that you can be inspired by some of my projects.
I too have a peg board in my stamp room and I love it, but it’s not as put together as yours!! I love how you organized your things!! Thanks for sharing!!
This is absolutely amazing!! I have serious organization envy right now. All of my supplies are in boxes all over the house.
Just got my pegboard! I have molding left over from when we re-did the house, so it can match the door frames. 🙂 can’t wait. thanks for sharing your great idea.
I love this! I am repurposing an old armoire for my craft/sewing storage and i am using this for my inspiration. Did you purchase the thread holder or make it? If you did purchase it….where?
Heidi,
I just found your blog at “I’m an Organizing Junkie” and I LOVE this peg board for the craft room. I am working on re-doing my Craft room walls and this is GREAT inspiration.
Please consider linking this up at my new Link Party at http:/thepatrioticpam.blogspot.com
Thanks for sharing!
Pam
Thank you so much! I love the pegboard as well. 🙂
pure awesomness!
This is looks amazing Heidi! LOVE it!
Thank you Tonya! Your spring stuff is all amazing!
I absolutely love this and totally need this! My problem would be that I couldn’t keep it organized hah! I would love if you would share this over at our blog hop http://www.ablossominglife.com/2013/03/frugal-crafty-blog-hop-15.html
This is amazing! You are so good at being crafty!
I have an empty peg board already hung…waiting to be useful.. Thanks for ideas on what and how to hang!
Oh do it! This pegboard has changed my life!
Does your blog have a contact page? I’m having problems locating it but, I’d like
to shoot you an e-mail. I’ve got some creative ideas for your blog you might be interested in hearing. Either way, great website and I look forward to seeing it grow over time.
Hi! I ran across your post while searching craft storage for small spaces, when I saw your board I knew I had to have one of my own! I went to lower yesterday and bought the supplies (including the saw! ) I think I ran into a problem with the building of the frame, I used too much gorilla glue but I’m gonna give it another try. Can’t wait for the results 🙂 thanks for the inspiration!
Hi Heidi,
I seen your blog address on the Quilting Board, its nice to meet you, I love your peg board. I just rearranged my sewing room & I was thinking on how to make the best use of it, as I want to hang my scissors etc, and my interfacing & stabilizers. What did you use to hang the rod & buckets on, and rolls of paper in that picture frame, I only have the straight hooks to put the scissors on. I am hoping to hear from you so I can go shopping. I did not paint the small one I have hanging, my DH screwed it into my wall, so I hate to take it down, but when I put up the larger one, I am thinking of painting it a pale yellow, as my wall are white. I look forward to hearing from you.
Linda
The details are all in the post but I got the buckets at IKEA.
wow this is so clever! I really really want to do this like now! lol
Hi! I found your pegboard through a web search while looking up ideas for my craft room. I love it, my husband is working on it as we speak!! I know you’ve said you got he buckets at ikea but do you by any chance know the name they go by? Or even the department they are in? I have been looking all over their website trying to find them and I can’t. Any information would be appreciated. I’d hate to walk the 47 hours it takes to get through the store and not find them. The professional look they have is what made me click on your picture. Thanks in advance!
I don’t know their name but they are in the kitchen section of the display area–not the marketplace.
Hi! I just looking for black polka dots wrapping paper do you know where i can buy it?
thanks!
I bought mine at Tai Pan Trading.
how did you hang your wine crates? im looking to do the same thing with some square shelves i picked up at a thrift store
Two of them were hung with a specific pegboard hardware that sticks out about 6 inches so the box can rest. The glitter ones have slits in the back that the shorter pegboard hardware holds them up. If you purchase a pegboard hardware kit you should be able to find something that works!
Can you PLEASE tell me where you got the thread holder for the pegboard? I am going to make this for my mom for Christmas!!
I just got it at JoAnns–they sell various sizes. Good luck!
I love this idea! I have a million questions to help myself get started. I am wondering how you managed you get the crown molding attached to the pegboards and where you got this crown molding. I am thinking it might be easier for myself to get a frame fitted around it at michaels. (although maybe more expensive?)
Also, how did you mount this whole board on your wall? Our condo walls are thin and stud less and I am worried something like this wouldn’t hold.
Did you paint your pegboard white or did it come like that? I have seen only wood colored ones at home depot.
Thank you so much!!
There is a full tutorial on how I did everything, just click the link at the top of the post.
WOW!! I am 11 years old and I have so much art supplies because I love art SO much. I have my own art room and I am not very fond of keeping all of my supplies in tubs and bins! This is a fun, cute, and easy way to make it all look awesome!! I will have my dad get all of this stuff right away!
Cool! You’re gonna love it!
I love this!! Everything is neat and tidy but visible! Lovely design! Thanks for sharing this 😀
Thank you!
I found you via Jen at IHO. Can you tell me where you found the quote in the frame? I love everything about this!!
I think I just found it on pinterest–sorry not much help!
I’m in love with this! I can’t wait until I have my own dedicated craft room and I can put up something similar… for now, my craft supplies are sharing a kitchen cupboard with the cat food 🙁
The Ikea rail and buckets are called FINTORP . . . I am in the process of doing a craftroom redo as well, but I am unable to attach anything to the walls because of the finishing system we used in our basement, so your pegboard idea actually helped me realize that I could do the pegboard if I used a stand set-up at the bottom . . . will let you know how it turns out!
Hi. I love this board and am working on my own. How did you attach the Ikea system to the peg board? I just bought it today. Thanks!
I LOVE this peg board and am working on one of my own. How did you get the Ikea bucket system to stay on the board?? Thanks so much!!
I think I just acted like the pegboard was the wall for the screws and screwed it into the pegboard.
Hi there! I rarely comment on blog posts but I must comment….I LOVE YOUR PEGBOARD! You did an amazing job! it’s absolutely perfect! The placement of all of your items – great eye! I love how you did the molding for the frame & how you “framed in” your rolls of paper & vinyl. Looks great! I’ve had your pegboard pinned on my “Craft Room Ideas” Pinterest board for almost a year now & I constantly come back to it. I am finally in the process of making it. I think the splurge on the Ikea buckets & rod system is so beautiful & it really stands out. I am heading to their site now to order. I really wanted to just say THANK YOU for an awesome pegboard project – it is by far the BEST one online! Thanks again 🙂
Thanks so much! What a great compliment! I love my pegboard and it has seriously changed my life.
I found your blog from Pinterest. My husband helped me to make this yesterday though mine is not exactly the same. I was wondering which hooks you used to hang the thread holder and the dowels for the wrapping paper? I can’t see them very well in the photo. I have many of my things hung up but not these two as I was not sure which hooks to buy.
thanks! You have a lovely blog by the way and I will be stopping by often.
Denise
I just bought the pegboard hardware kit from Home Depot. It comes with a ton of hooks and other pieces. To hang the thread holder and wrapping paper I used the large L shaped hooks.
Would you be able to share a link for what ikea product you used for the bar and buckets?
It’s this: http://www.ikea.com/us/en/catalog/categories/departments/kitchen/20676/
Good Morning Heidi, I have just discovered your blog after visiting some one else and I am so pleased I did because I am looking for ideas to use in my sewing room. I had thought about using a peg board, but I love how you have framed yours. I am so excited to start this project….. well perhaps not me…. my husband. I just know it will look fabulous when completed.
Have a lovely day.
Best Wishes
Daphne
Thank you! I adore my pegboard as it is literally the only thing that is consistently organized in my house! Good luck with yours!
Love this board!!! I want to make one for my sewing room, and when I showed this post to my husband he said he want one too, for his bike lab! Great idea, thanks for sharing!
I will just like to join to what Maryann (@ Domestically Speaking) says: .. about this Extra Large Pegboard for Craft Room Organization… It is a great idee … it is an art :))))))) LOVE IT!
Thank you!
i
This is exactly what I need to do. I have a small craft room and like many, I have stored items I can’t locate. Thank you thank you for your awesome idea!!
Julie
Hepa Vacuum Buying Quick guide – The best ways to choose a hepa vacuum cleaner, and a helpful vacuum function checklist.
What did you use to hang the thread thing and the frame? Love this!
Thanks! I used a hardware kit specifically for pegboards.
Love you peg board! Where did you get the box that holds your glitter? Also, how did you get the glue gun to stay on the board?
The box is just an old wine box I found at a thrift store. And I’m not sure what you mean by glue gun…I don’t have my glue gun on the peg board.
I do so many crafts I find it very hard to keep all my different things organised, this is such a wonderful idea that I’d certainly love to do it, my problem would be the size since the only place I can put it is my bedroom which isn’t large and already has more than enough crammed into it.
Love this though, alot.
It would be easy to customize the size, just have the store cut the pegboard down for you!
This is exactly what I need in my craft room/office. I just do happen to have a great big frame I diy’ed into a chalkboard but I never use it. Storage is what I need. Thank you for this post!
Sure thing! This craft pegboard has been immensely helpful in helping me access all my major craft supplies easily. Good luck!
Im going to do this.. Thanks with great directions. One questions… How do you attach shelving to the peg board – like your wine crates. Are the peg board hardware hooks work or you screw them all the way through peg board.. Their is a etsy store that has some pine floating craft paint shelves or spice racks? Advice on this… Wont use sewing thread or wrapping paper. Vinyl rolls and paper towel holder.
The peg board hardware kits come with large brackets that I just rested the wine crates on. The hardware is very easy to use, just poke the hardware through the hole and it rests there.
Great idea! I am sharing this on Pinterest.
could you please give us the detail of the thread holder?
I’m gonna make something like that bcause i can’t find in store in Indonesia.
thankyou
I’m sorry, I didn’t make it. You could probably order one online though.
I’ve been wanting to make one of these for SOOOO long. I think this finally inspired me to do it!! Thanks for sharing!
Hi, how did you attach the thread racks to the peg board. I think I might do that if I can figure out how to attach them. THX
They are simply resting on a couple of L shaped hooks!
This is fabulous! I just found your blog and what a great way to meet you. I am currently looking for ways to extend my workspace in my office/craft room and this is a perfect idea. I’m sure I’ll be back often. 🙂
There is clearly a bundle to know about this. I feel you made some good pointrs in features also.
Hot galleries, thousands new daily.
http://dating.online.bloglag.com/?jamie
1 porn finder search xxx mag porn monky streaming porn old fart asslick all nicole oring porn movies gay nigger porn
Amazing Idea about this extra large board, all stuff in one place. well organized Idea. Thanks for sharing with us.
LOVE THIS EXTRA LARGE PEGBOARD FOR CRAFT ROOM ORGANIZATION, WILL DEFINITELY GONNA TRY THIS ONE
Love this Extra Large Pegboard For Craft Room Organization Idea, kind of creative and unique stuff, thanks for sharing this all in one organization Idea
Love this Extra Large Pegboard For craft Room Organization, super amazing . Thanks for sharing this one with us . Will definitely gonna try this one
Love this amazing Extra Large Pegboard for Craft room organization, amazing one . Thanks for sharing this craft room organization.