How to Use Vasoline to Distress Wood
Okay WAAAAY back when I made my living room plans, I wanted to do a planked monogram artwork type thing. I’ve been thinking about this project forever so I was super excited to finally make it happen this weekend!
But it was a fail…somewhat.
Here’s how I started:
I bought cull wood (that cheapie or free wood at the back of the store) and had them cut them to the right size. And a nice old man even did the diagonal cuts for my center brace piece. Someday I will have a large collection of power tools, but that day is not today. Then I sanded them and painted them all black and my sweet hubby screwed the whole thing together from the back. I’m not afraid of tools, but the hubby likes to put his hand in my projects every now and then.

So this is how it was looking so far. Then I had this huge stencil that was like a year old that I’d never used. I wanted to use it on this though, so I carefully applied it. And then I spray painted the whole thing so that when I removed the stencil, the monogram would be black still.

Here it is!! It’s pretty cute, right? I actually really liked it like this. But there was a very huge problem. It was completely the wrong shade of aqua. It’s a lovely color but clashed horribly with my other decor, especially my precious zig zag couch quilt!
After much debating, I decided to just paint over it. A little sad to have wasted that stencil that I saved for so long, but I’m over it now. So I painted the whole thing black again.
I loved the rustic look, especially the chippy paint look. And I wanted this to look like I’d rescued an old gate or something (maybe from that French farmhouse?) Sausha from Show & Tell has this awesome chippy paint method using Vasoline which I wanted to try.
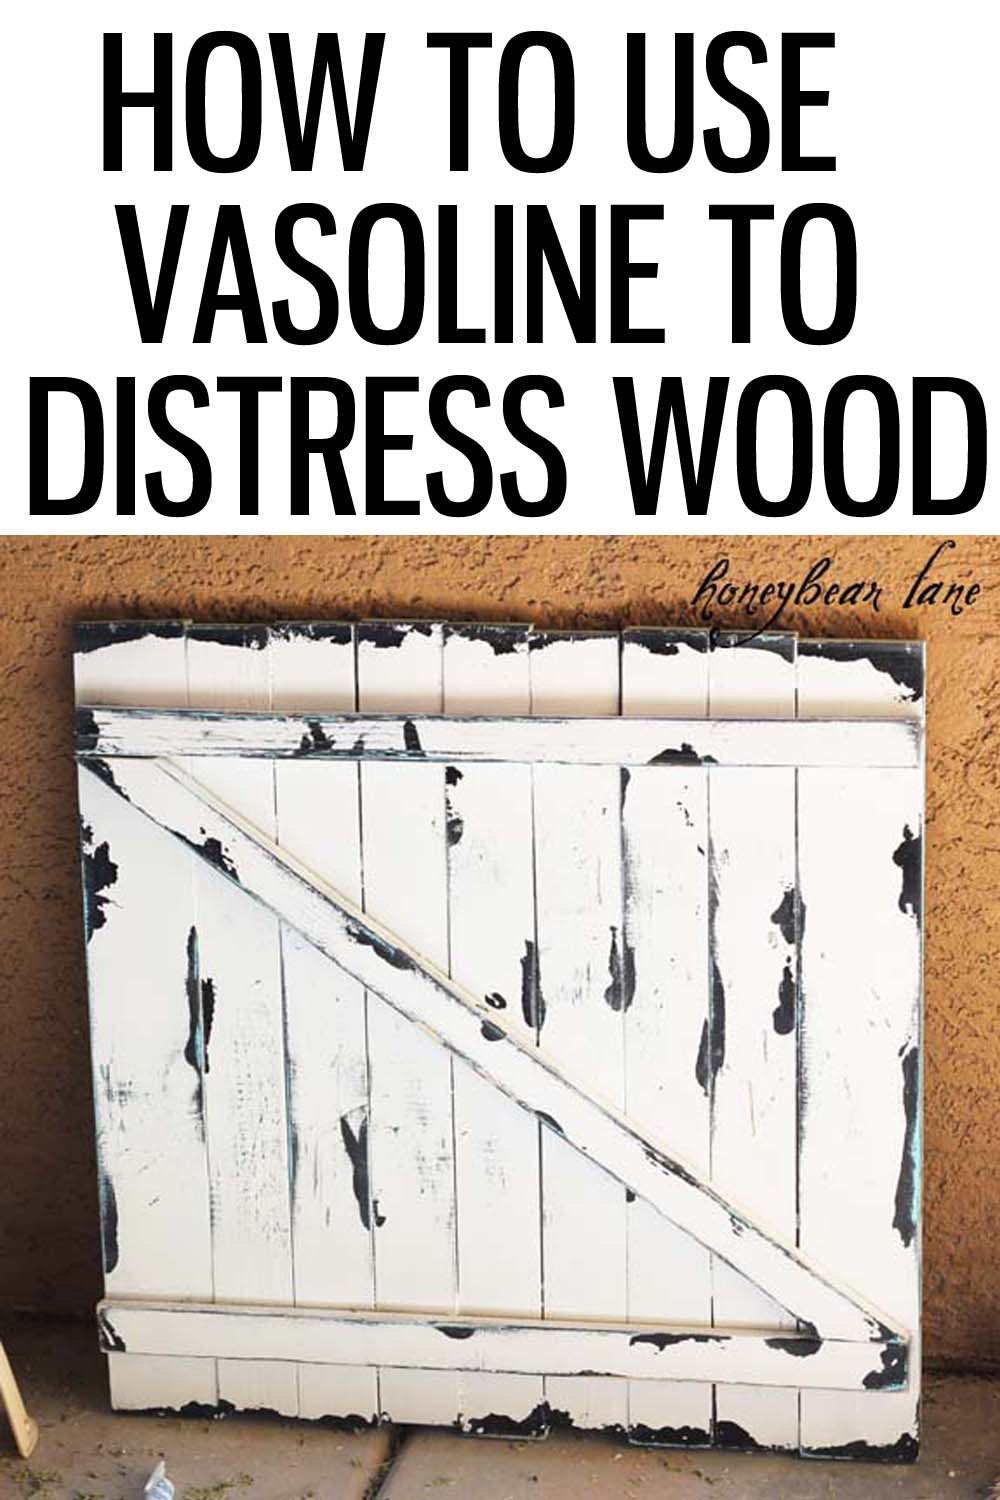
So this is how to use vasoline to distress wood. I actually used Vicks Vaporub because my Vasoline was in my son’s room and he was sleeping. So my sinuses were all clear after doing this step, haha!

Basically what you do is smear a little bit of Vasoline where you want it to look chippy. If you are doing this to a piece of old furniture with dark wood underneath, just do it straight on the wood. If you want an underneath color to show, like this black, do it on top of the paint. And don’t do it as thickly as I did here…I totally got carried away.

Then I spray painted it white, even though this looks kinda blue, it’s white. I am not sure how this would work if you brushed on the paint, so if in doubt, just spray. And you can clearly see the spots where I put the goop. After it was dry, I literally just took a rag and wiped it off…that was it!
Okay not really.
 After I wiped off the Vasoline I still did quite a bit of sanding and distressing. I used a scraper to put some more dings, dents, and scratches in the wood, making it look more forlorn. I am aware of the likeness of this to a Jersey cow, but like I said, I went a little overboard with the Vasoline. I still really like the final result though!
As for the monogram idea, I think I am going to abandon it and place a wreath over the top instead. I am also considering adding a tiny bit of glaze…what do you think?
Glaze or no?
I love it! Too bad about the monogram. I would leave the glaze off but that’s me.
I would leave the glaze off. It looks beautiful just like it is.
wow I think it looks ace! Cool idea. You’ve won an award over at my blog too 🙂 http://weightwars.co.uk/2011/06/07/squeeeeeeeeeeeeee-i-won-an-award/
Thanks so much!
I love it. Especially the white.
This is amazing! Thanks for sharing so others can learn 🙂
LOOOOOOOOVE it!!! I’ve never glazed…but I think I would like it glazed…IDK. I just revampped our living room, too…so much fun!!!!
Thanks! I am loving it all too, despite the somewhat eclectic look. I hope I can tie it all together in the end!
I just found you on Pinterest and this idea is GENIUS!!! Love your blog!
Thank you so much Kari!!
This looks incredible! Thanks for the vaseline tip!
what a clever idea. love all u pinsters!
I am so doing this to my dining room talbe n chairs! A big project but, LOVE the old rustic look which will match rest of my decor! Thank you so much for this idea! If I can do half as well as you did I will be happy! Awesome!
Thanks! I actually think I went overboard on my chippy-ness so I would do less than you think! Good luck!
What a great idea! I will be using this on my next project thanks!
I am going to try this on a bench today. I am am so excited for this tip. Just pinned it also:>
I think you should glaze….:)
I also use wax to do this same treatment. You just use paraffin wax bars and rub where you want the paint to come off and then you paint. Let it sit in the sun for a bit and then just wipe the paint off…I guess you could use candle or bee’s wax as well…paraffin is just what I had on hand…the heat from the sun is what makes it so easy…lol
Love how this turned out…
Charlene
Is this a special type of Vasoline, or did you mean Vaseline? Either way, it looks great!
Love the tip! What did you end up doing with this piece? Reason I am asking is that I have 2 pieces of an old barn dutch door with chipped red paint. They’re obviously the size of a half door which seems big for a coffee table. They are heavy too- ideas? I have been holding on to them and think something where I could put glass over the top would be good. Thx
This is a smaller piece that used to hang above my couch, then got moved around from place to place as a backdrop. Right now it doesn’t have a home and I might sell it. You could use them to cover a TV–make a sliding barn door type thing.
Hi there just wanted to give you a quick heads up. The
text in your post seem to be running off the screen in Firefox.
I’m not sure if this is a format issue or something
to do with web browser compatibility but I thought I’d post
to let you know. The design look great though!
Hope you get the issue fixed soon. Thanks
What a great idea I just love it to pieces. I would leave it the it is.