How to Make a Flower Tower
This is a sponsored post written by me on behalf of The Home Depot; however all opinions are my own.
Remember my Project: Outdoor Living plans? Well I’ve already gotten started and made my first Flower Tower! And vertical gardening is not as intimidating as it looks! I’ve actually now made two and each one gets a little better and a little easier. And I’ve gotta say, these are awesome statement pieces for my patio! My backyard is VERY plain but with the addition of my flower towers, it looks SO much prettier!! These are horticultural masterpieces that I think would probably cost at LEAST $300 if you bought them pre-made.
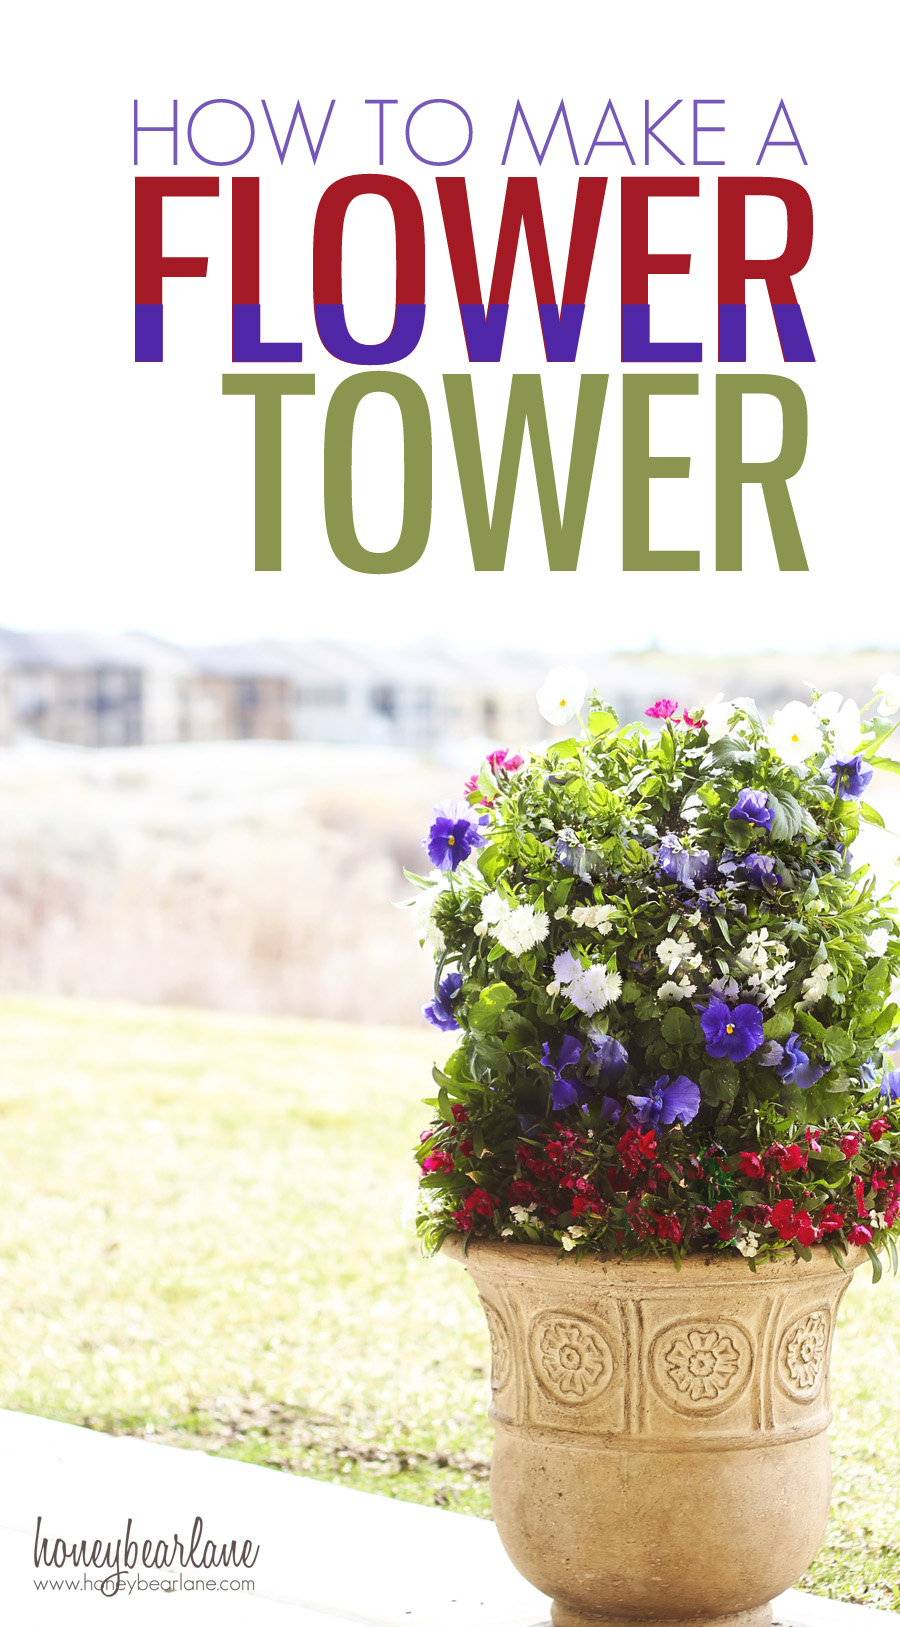
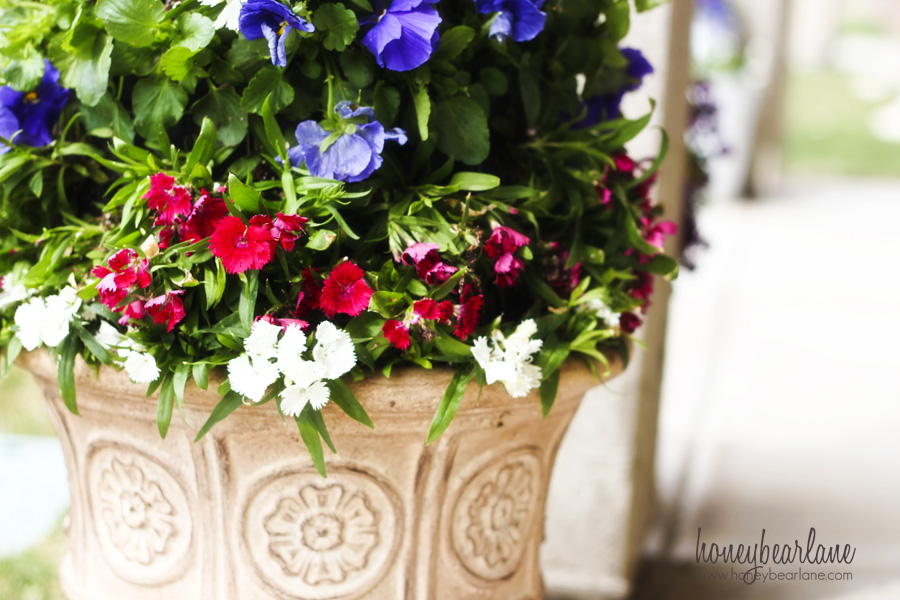
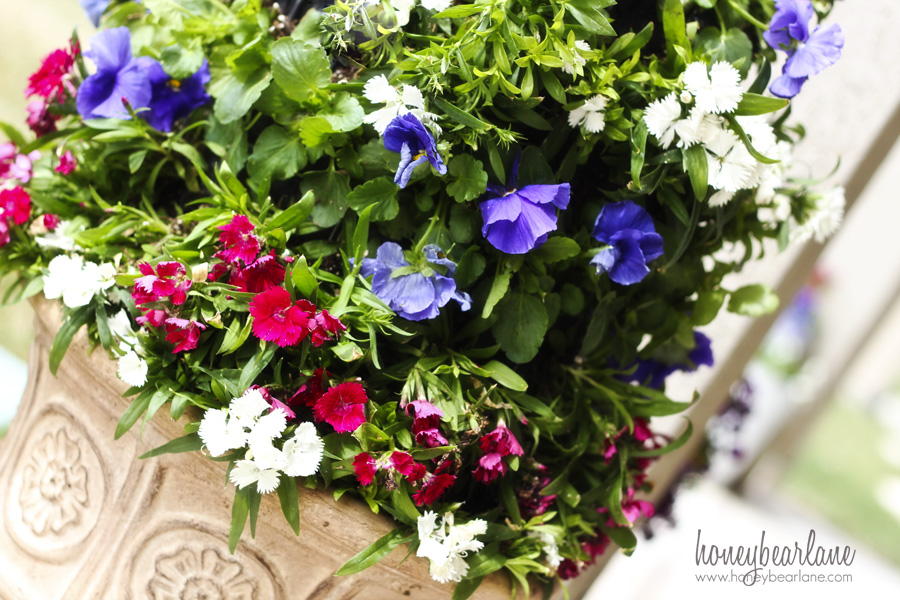
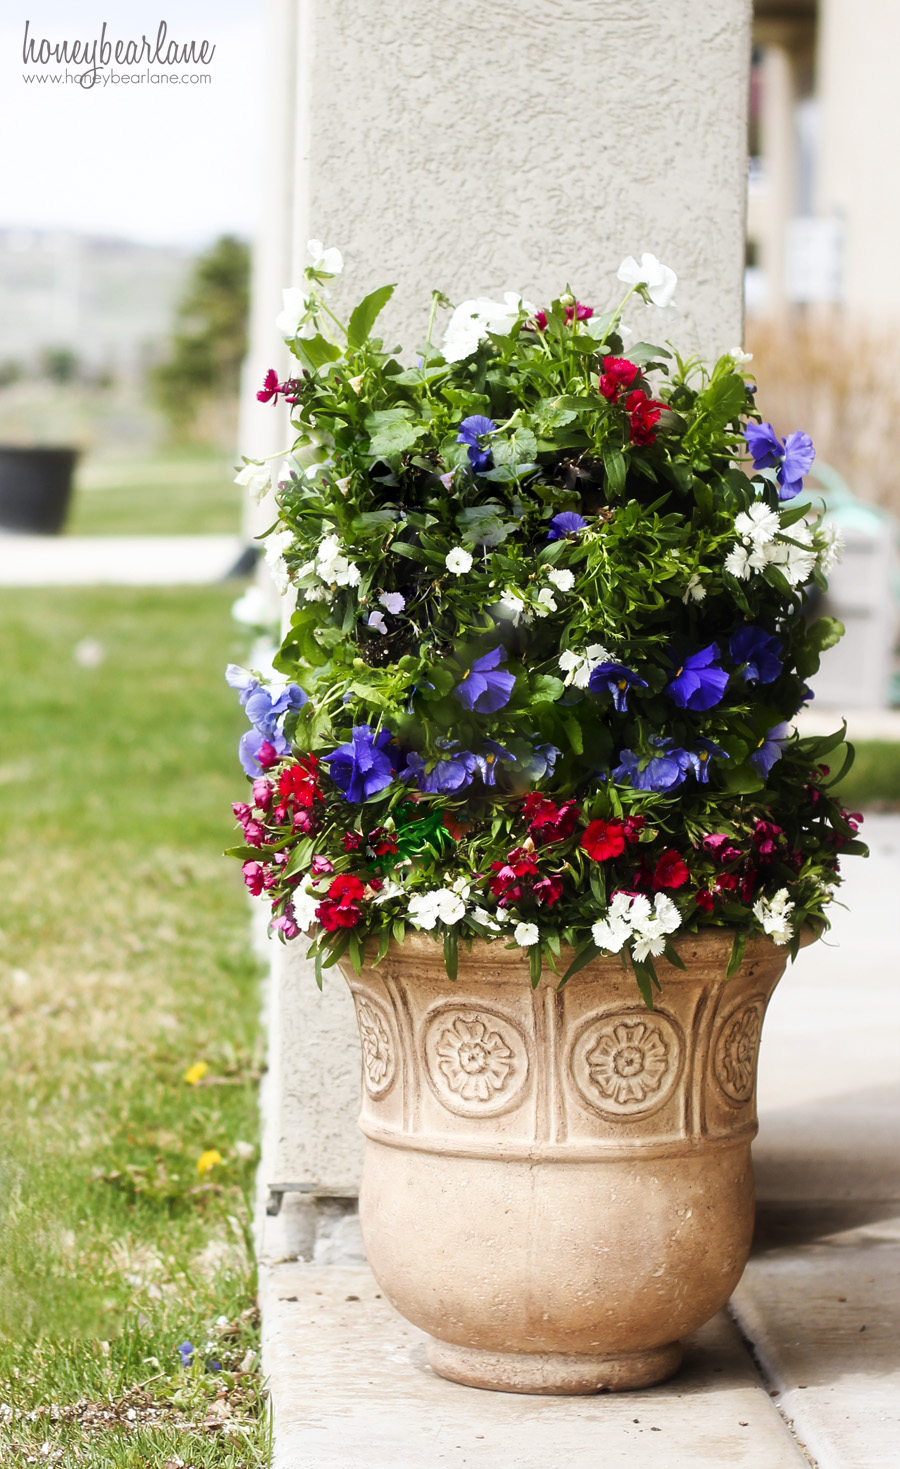
Beautiful right? I wanted to use petunias for this project, but they aren’t quite in season yet. So I bought pansies and dianthus in red, white, and blue. I am hoping that by the time the 4th of July comes around, this flower tower will have reached mature age and the tower will be full and heavy with flowers and greenery.
I’m going to be honest here and say that this wasn’t the easiest project. I followed the instructions given on the Home Depot’s Garden Club page and struggled quite a bit (Watch their video.) I felt like I was forcing the flowers in the little holes so much that I damaged some of the stems. After I was done, I spent some time thinking and came up with an alternative method of putting this together. I tried the new method on another tower and it was indeed a lot easier. I’m going to share both methods with you, but my own method I will share in a few days.
Here is how I made the tower:
Preparation
I first visited my local Home Depot where I got all my stuff. (I’m going to talk about that in more detail in my next post.)
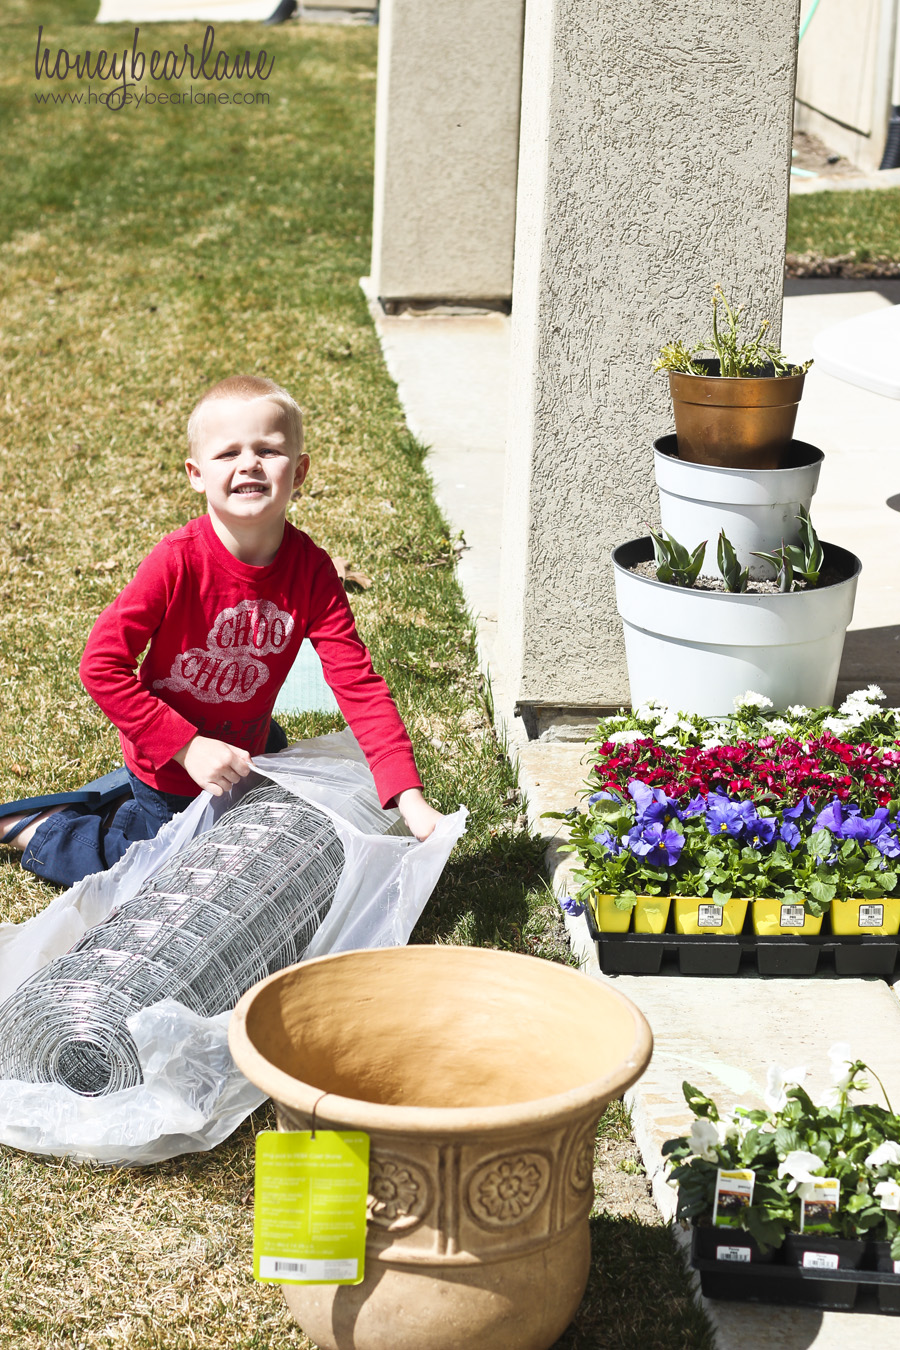
Here is the list of supplies:
- Large Flower Pot, at least 13″ wide
- Potting Soil
- Flowers
- Galvanized Wire Fencing with 4″ openings
- Landscape Fabric
- Utility Knife
- Tin Snips
- Zip ties
You can also use gardening gloves, a trowel, and a watering can. I am an earthy girl so I never use gloves (although I did buy them). I didn’t use the trowel that much with this method but I did with the next one.
Step 1:
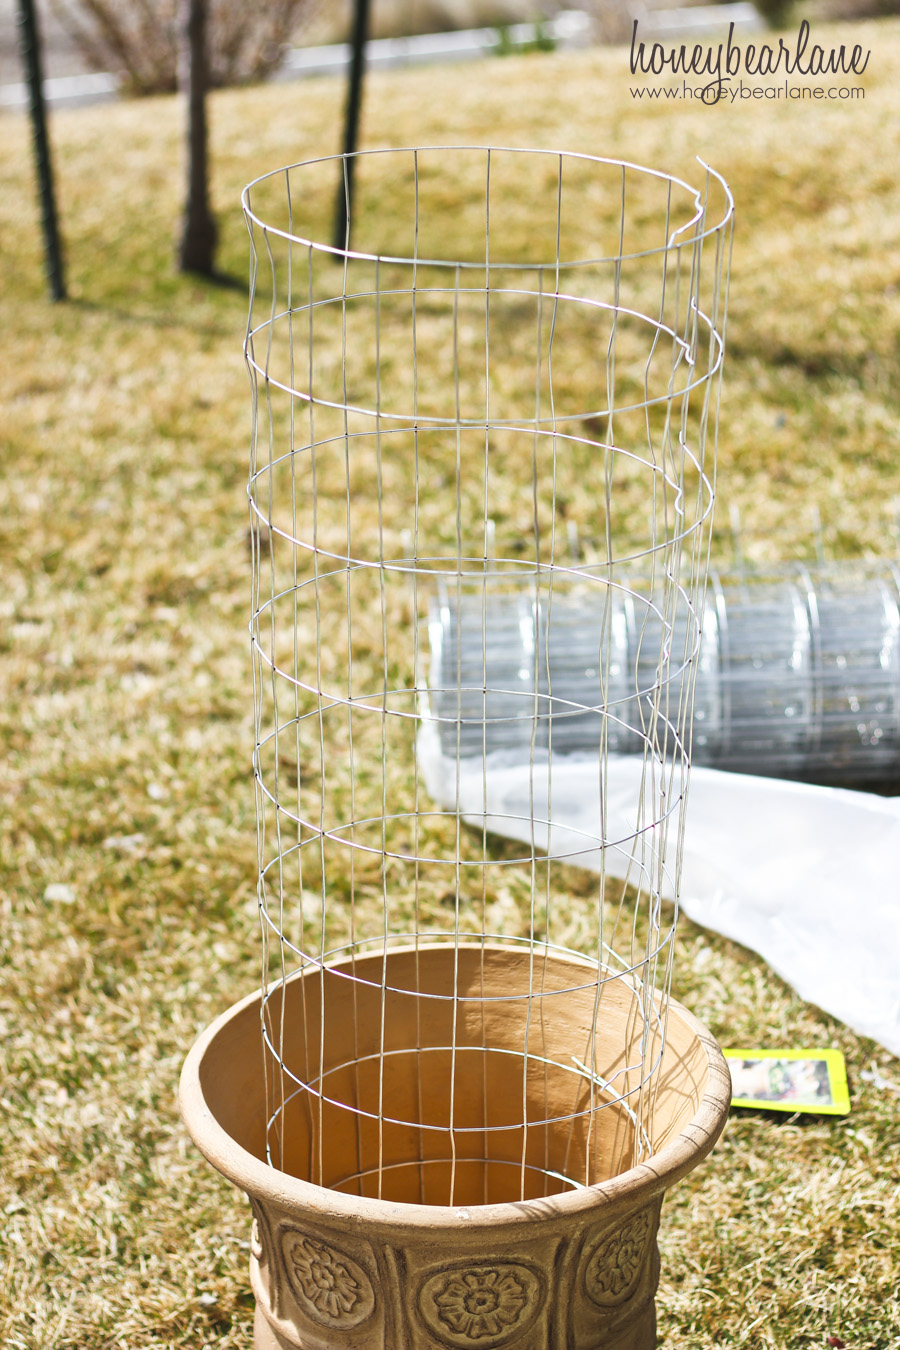
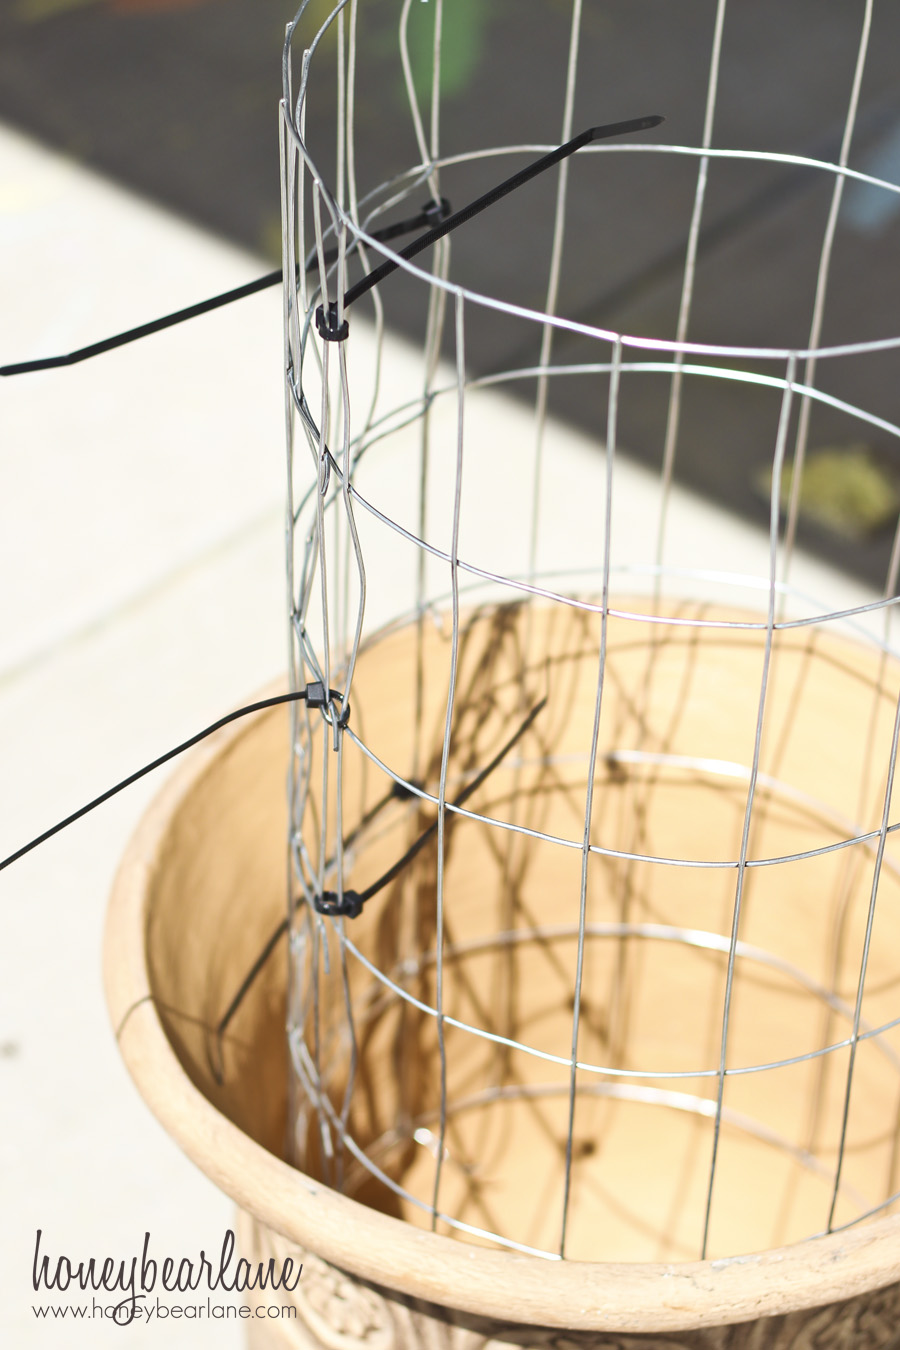
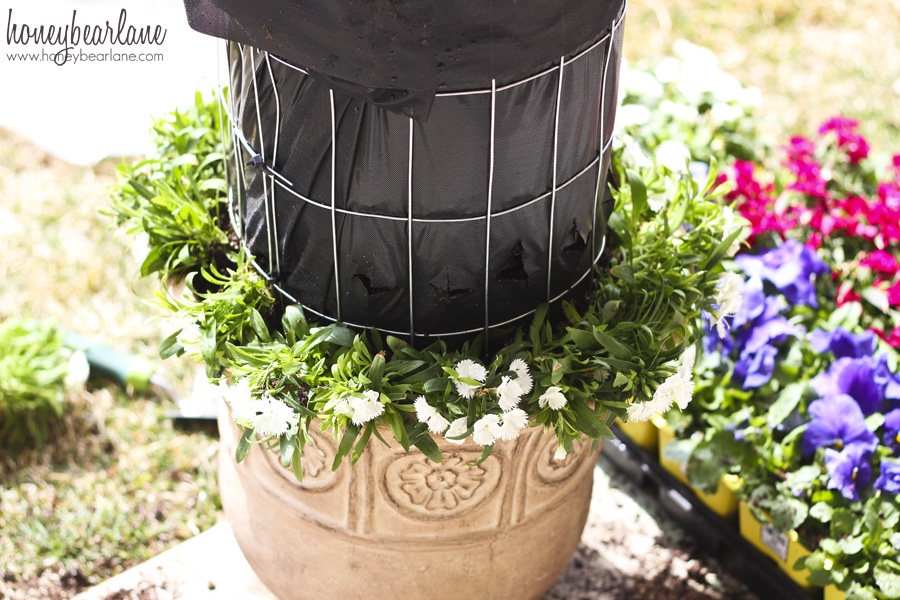
Open up your wire fencing and unroll it about 3 feet. Snip it apart and form a cylinder that will fit in your container. It should fit inside the container and go almost to the bottom. The fencing should overlap a little so you have a nice secure cylinder. And then use the zip ties to hold it together. Then cut off the remaining tail. I actually trimmed the height of my cylinder a little bit because I knew I didn’t have enough flowers and it looked very high.
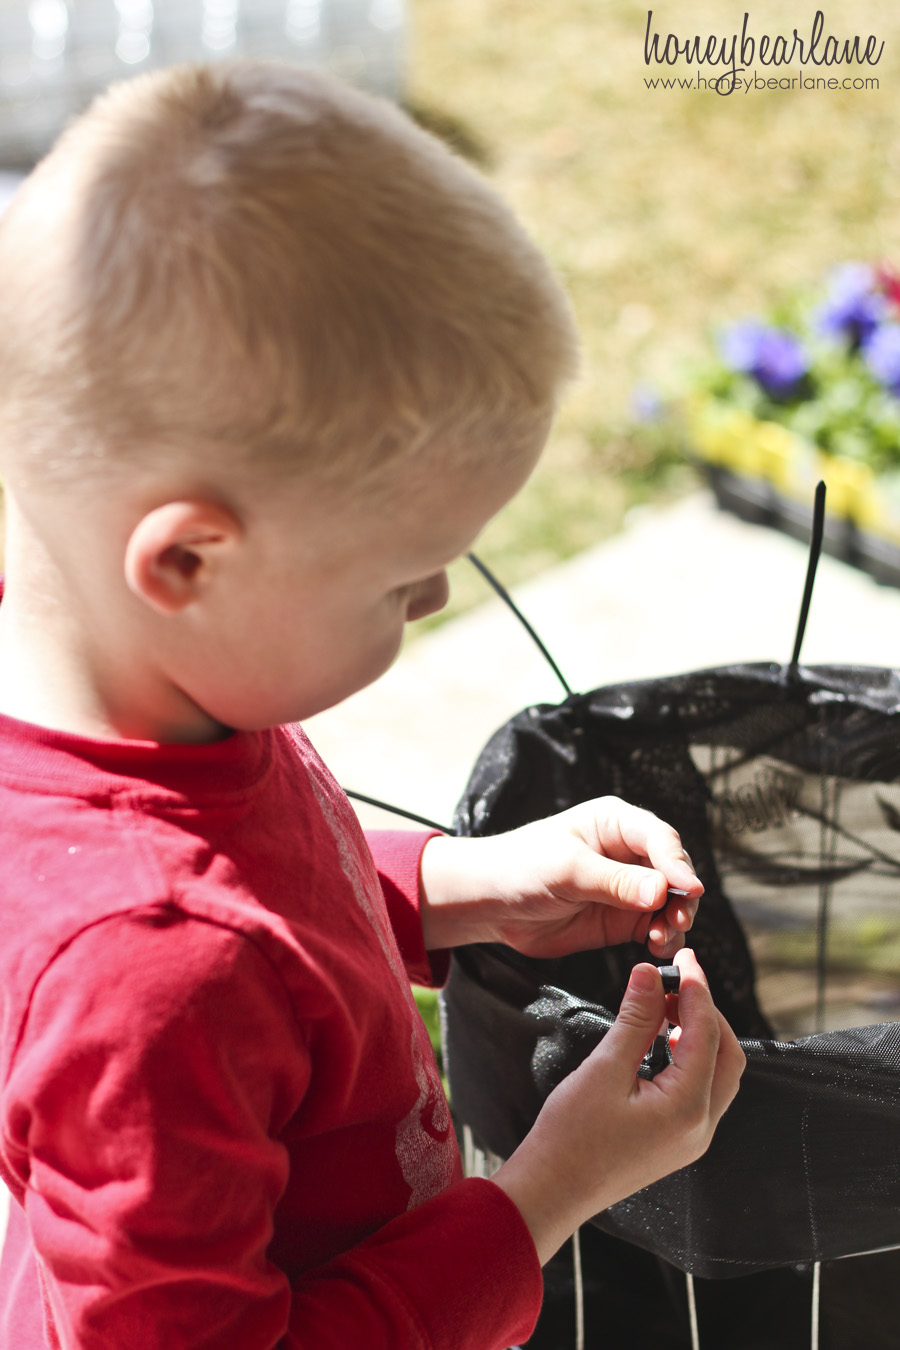
I was excited to do this project and have my kids help me. I have three little kids under the age of 5 and they are basically my shadows all day long. Anytime I can get them involved in a project, it’s great. It sometimes tries my patience, but it’s rewarding to both of us to have them participate. This was definitely one where they participated. My 4-year-old helped with the zip ties, my two-year-old drew with sidewalk chalk, and my baby played in the dirt.
Step 2:
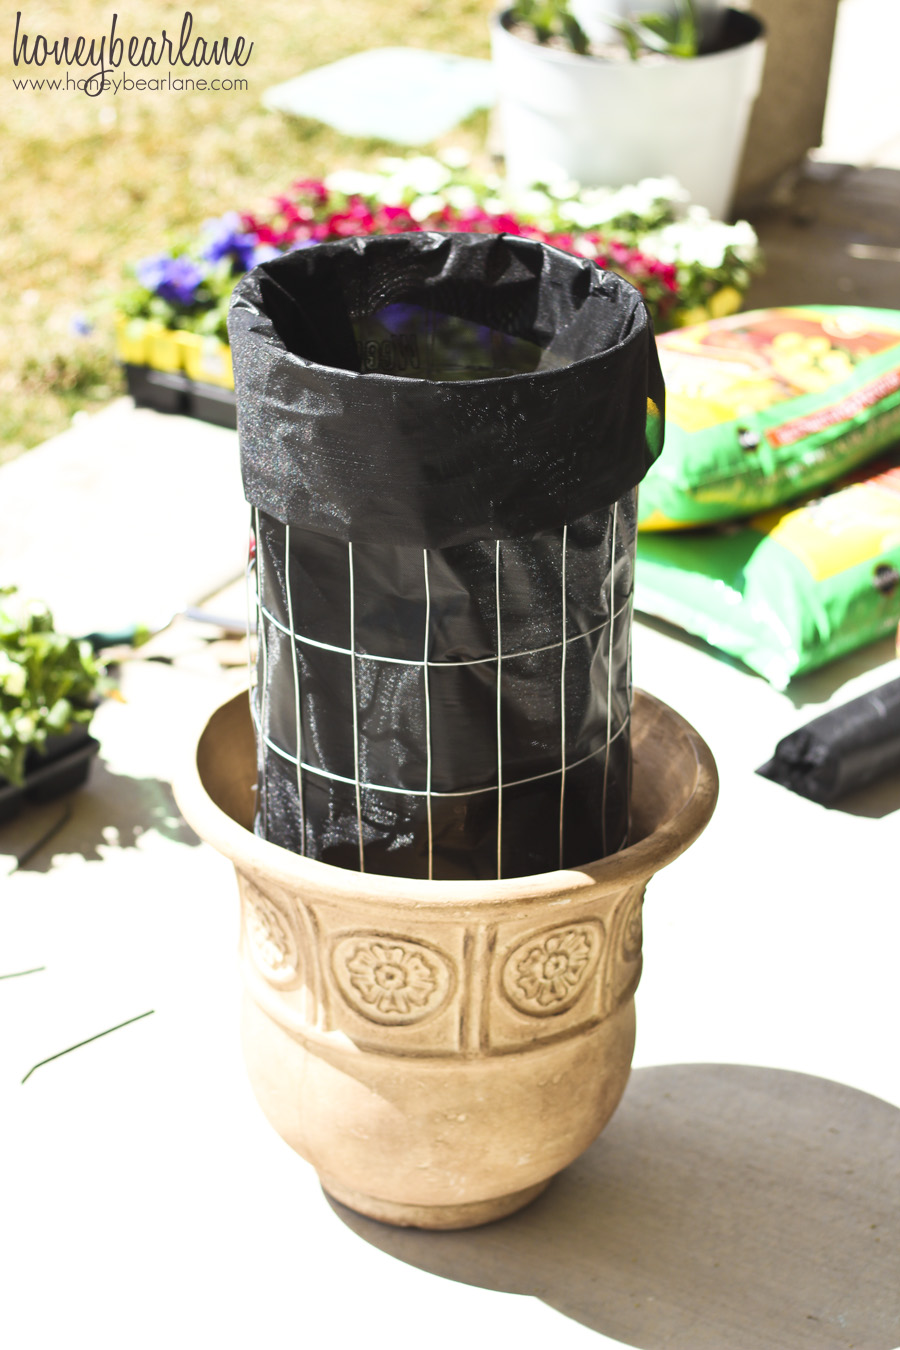
Cut a length of landscape fabric by measuring it around your container and cutting it to size. Then put the landscape fabric inside the cylinder and fold over a few inches. Also make sure the fabric overlaps so no dirt can escape. Then cut a slit in the top fabric and use a zip tie to hold it in place (trim the tails off.)
Step 3: Fill the cylinder with dirt about 1/3rd up, add water. Then fill another 1/3rd, add water. Then fill to about 1″ from the top and add a little more water. The water will help the dirt compact down and will also help it to stay in place when adding the flowers. Add a little dirt in the container on the outside of the cylinder to fill in the gaps.
Here is a video of this step with my kids helping me.
And the second video of filling the dirt around the sides.
I started on the bottom row and moved around and up. The middle row I put two seedlings in each spot since it was a large area. But the top row I could only put one because I knew I needed to save room for my top flowers. After all the flowers were in place, I watered it thoroughly. You can see here that it’s looking very droopy. I took this picture below right after finishing the planting and the other pictures above were a couple days later. You can see that it takes a few days for them to re-hydrate and for the roots to start forming again. The flowers perk up more and more each day. And it will take time for the flowers to really strengthen and cover all the bald spots. You can’t see it that well in the picture but there are a few bald spots that I hope will get covered up in time.
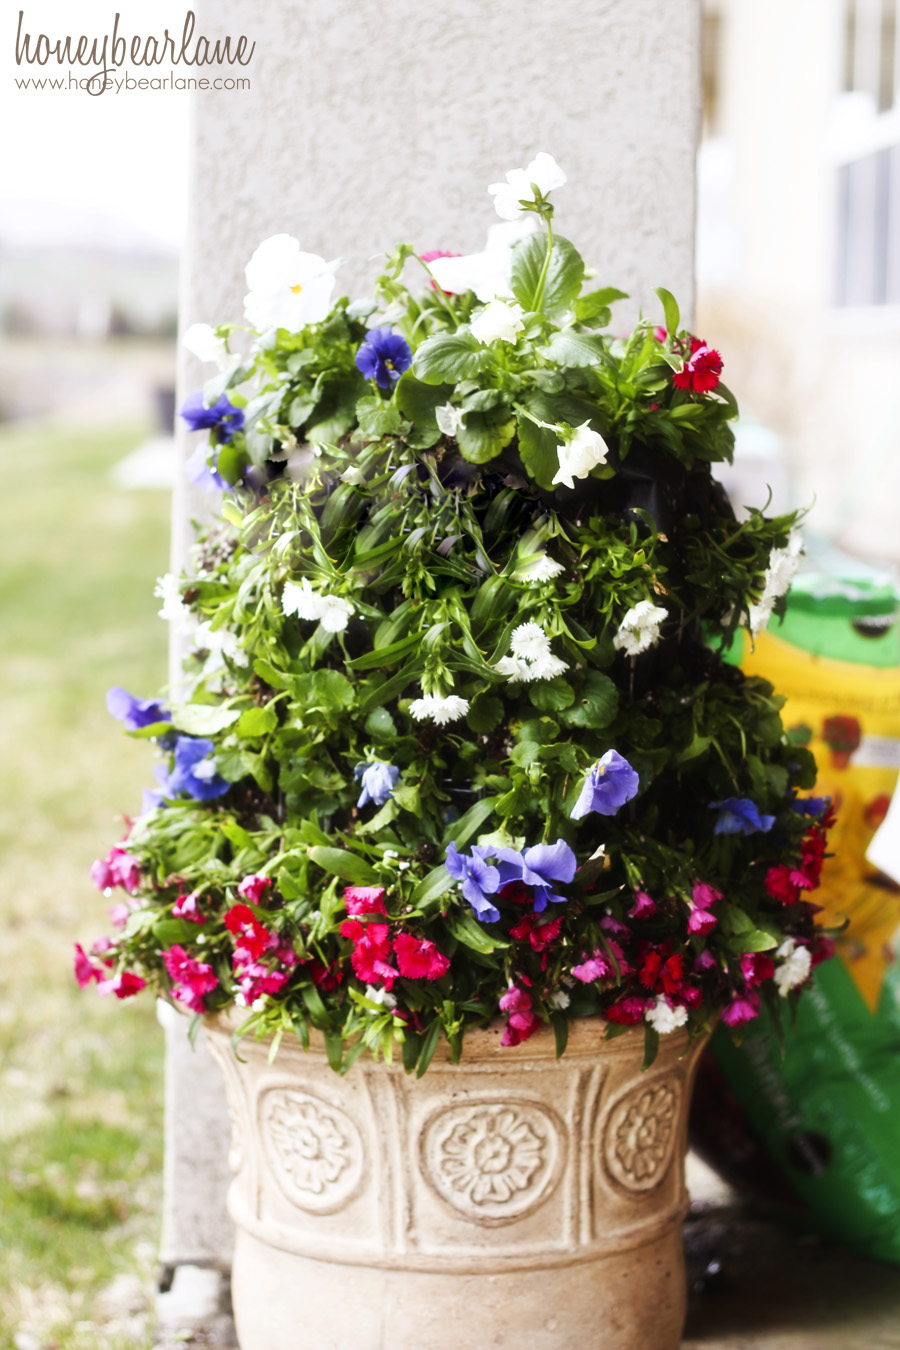
This is also where experience and time will tell me if I did this in the best way. As the summer goes on, I will care for my flower tower and see how much the flowers grow and cover the ‘scaffolding’ of my tower. I was afraid that the particular varieties of flowers I chose would not grow that much more and spread out, so I wanted to make sure there were enough flowers in my tower to start with. This is where Petunias would come in handy because they definitely grow and spread out. If I had used Petunias, I probably wouldn’t have worried. I probably would have put a flower in every other space. As it was, I put two flowers in each space, except the bottom and the top rows. I may have used too many flowers. But like I said—time will tell. I think it’s off to a promising start. I will amend this post in a few months to show you the progress.
It’s home improvement time, and The Home Depot has everything you need to #DigIn for Spring. No matter what projects you want to tackle, they have great values on all you need. They’re ready to help you with renovation ideas and expert advice, too.
Get over $300 in email exclusive savings each year, sneak peeks on new products, monthly lawn & garden ideas for your region and access to The Home Depot’s gardening experts. Click here (http://thd.co/ZNbhDj) to join the world’s largest garden community today! Or go to homedepot.com/gardenclub to see some of the many benefits of membership.
Click on this picture to see lots of other amazing garden ideas!

This is a sponsored post written by me on behalf of The Home Depot.
This is SO super cool! I’ve seen these before, but never with such clear directions on how to do it yourself. Thank you! Definitely going on my to-do list!
I had never seen it until I saw it on the Home Depot’s Garden Club site…they are actually very easy and fun to make!
This looks fantastic!
Thanks Megan!
What a fantastic project. I’m adding this to my to-do list!
Thanks Carolyn! It’s a summer must!
Yours turned out BEAUTIFUL! And I love your choice of flowers! It is so pretty!!
Ashley
Thanks Ashley! I think we chose similar flowers 🙂 I want to try another one with petunias and do it more like you did.
Love this Heidi!!
Thanks Angie!
This is such a cool concept, Heidi! Love it!
Thanks Michele!
Stunning – love the height of the flowers that is made with the wire!! Pretty!
Thank you! I actually made it a little shorter but I want to make a taller one!
So pretty! I need one for my porch!!
You definitely do! And then you’ll want to make a bunch!
So pretty! Great idea to brighten the patio!
Thanks! I can see it through the glass door and it makes me happy. 🙂
Do you remember about how much this whole project cost? I live in an 2 unit apartment so I share my front yard with others but I would love to put two of these flower towers in front to spice it up a bit and they look so nice! I am really limited on finances right now though so I wondered if you had a cost estimate. Thanks!
It kind of depends on how many flowers you get and how much they cost. The cost of the other supplies was about $40-$50, and once you have the supplies, you can make a bunch.
I think it might be easier to fill the “fabric-wrapped tower” slowly, adding the flowers in each row, and then putting in potting mix to cover each row. Start at the bottom, fill with potting mix as far as first row of flowers should go. Cut holes in fabric and push flower roots though the cut hole, continue doing same all around the tower. Fill with potting mix just to cover the flower roots, add water, add more potting mix if needed. Sprinkle potting mix with flower bloom fertilizer. Then cut holes in fabric again all around the tower, making another level; insert roots of flowers, cover roots with potting mix, water, fertilizer, etc.. Repeat until all the tower rows are completed.
By making tower using this method, you don’t have to “fight” with the potting mix coming out. It would be easier because the potting mix isn’t packed down with water.
I you want to make this tower using flowers that are “already bigger” and really pretty, you would have to use the above method. This is more difficult because the root ball is larger, along with the green foliage, and flowers. Here is the tip for larger ones: To insert flowers though fabric, gently wrap wax paper around the green foliage and flowers (not around potting mix). Place plant inside the tower, and push/pull gently the wax paper through the cut hole. As soon as the “green foliage & flower” are pulled through to the outside of tower, gently peel off the wax paper. Continue same step all around tower, then cover roots balls with potting mix, add water, fertilizer, etc.. Continue for each level of flower needed on tower. I have done this on flowers baskets, and it works great.
What if you add the dirt as you add in the flowers that way you don’t damage the roots and you don’t have to fight all the extra dirt. then you can add dirt flowers more dirt and water then add dirt flowers and more dirt. Im making this tomorrow and I think that I will try it that way at first and see how that goes and will let you know!
I just built one of these about a month ago. I too felt like I was damaging the flowers as I forced them in. I used petunias and ended up topping the whole thing with an established basket. None of the flowers have died, and while they’ve grown some, they aren’t really filling in like they should.
I like the idea of starting from the bottom and covering with dirt as I work my way up. I’ll try that next year.
Hi ladies! I made this tower recently..the taller version, and I’m not happy with how the flowers are turning out. i too feel like I’m damaging them trying to push the flowers through. I’ve tried with petunias first..which promptly died except for the very top. Then this passed week, vincas. The leaves are quite droopy. And I cut them back so they could reblossum after they “focus” on establishing and getting nutrients. Some of you all mentioned an alternative method..layering so to speak, the flowers and dirt from bottom to top. Also, do any of you have an idea of getting the tower watered? I have water pouring out of the holes. I’m half temped to start over….
I just thought of something for the watering problem. Drilling holes itno some PVC piping and putting it down the center of the tower. You could then run the water in be it straight from the hose..or place a funnel on the top to pour water in.
PVC plastic with holes punctured all around inserted in the middle of the pot water from the top should work.
This is gorgeous! There’s only one thing that I love more than crafting, and that’s FLOWERS!!!