• Home
  • About
  • Contact
  • Shop
    • Patterns

Honeybear Lane

DIY Decorating

  • DIY Tutorials
    • Projects
    • Building
    • Sewing
    • Quilting
    • Crafts
  • Home Decor
    • Home Decorating
    • Honeybear House
    • Organization
    • DIY home decor
  • My Home Tour
  • Recipes
  • Holiday
    • Valentines
    • St Patricks Day
    • Easter
    • Spring
    • Summer
    • July 4th
    • Fall
    • Halloween
    • Thanksgiving
    • Christmas
  • Entertaining
    • Printables
    • Parties
  • Wellness
    • Essential Oils
    • Health and Wellness
    • Weight loss
Catablog· Christmas· crafts

How to Make an Easy Christmas Ornament

November 3, 2011

Sharing is caring!

502 shares
  • Share

One of the easiest holiday crafts you can do is make Christmas ornaments for your tree.  And if you’re anything like my mom, you have about 40 boxes of ancient glass colored balls of all colors.  What to do with those old ornaments?

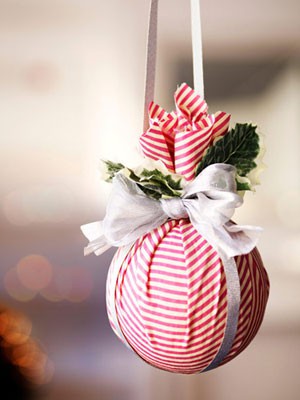
How about this?

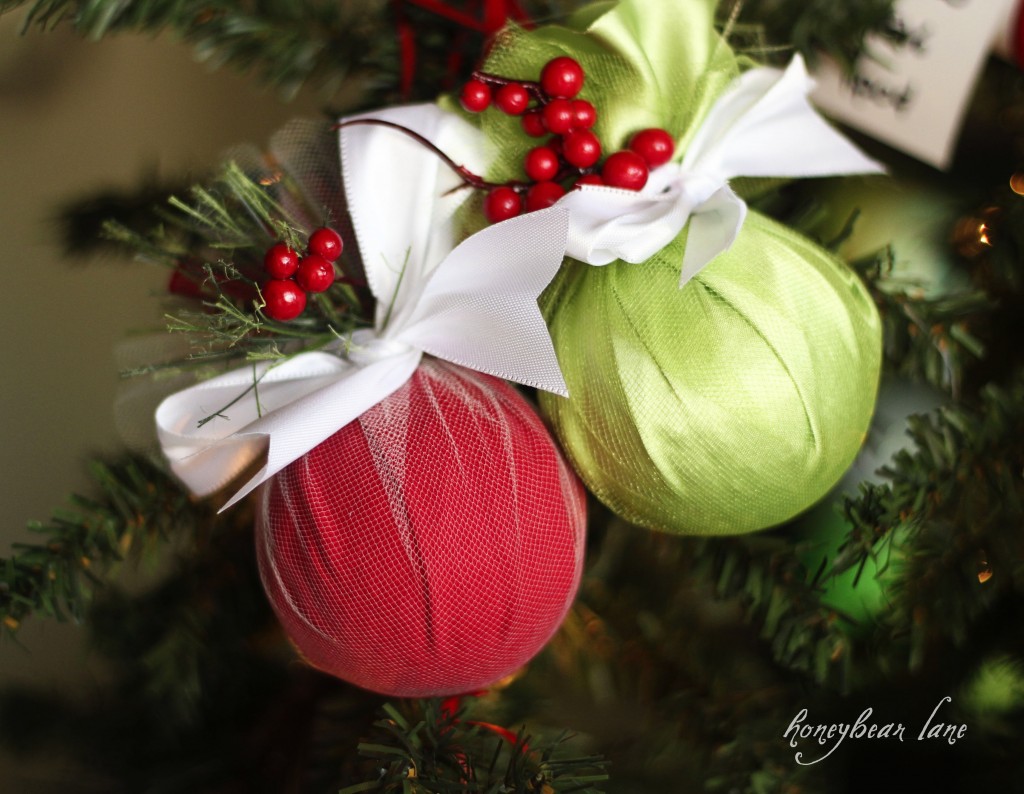
I found this ornament on Pinterest and thought this was super cute and a very easy fix for old ornaments.  So here’s my version!  I actually don’t have old ornaments, so I used styrofoam balls.  (Nevertheless, they turned out the same.)   

How to make this?  Easy Peasy.

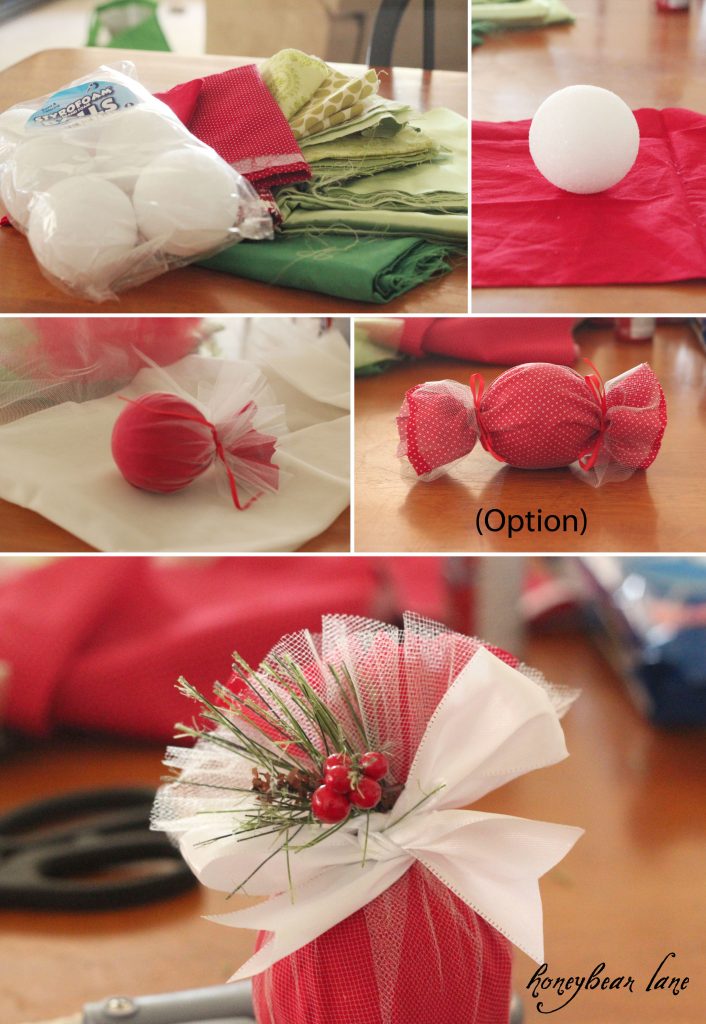
  1. Cut out a scrap of fabric about 10×10″ or so and lay your ball on top of it.  I double layered with tulle for a fun effect.
  2. Gather up the fabric and tie it closed with ribbon, tying it tight.  Then I trimmed off the top and poofed it out.  To create a ‘hard candy’ look, bunch up and tie both ends.
  3. Add in a sprig of evergreen (this is fake evergreen I bought at Hobby Lobby) and a pretty bow.
  4. To add a hanger, you can put ribbon around the ball like the Pinterest picture, but I just snipped a little hole in the bunched up top and poked more ribbon through it.

See?  Easy.

For more easy ornament ideas, check out my “Ornaments” Pinterest board!

Linking up to:
Tatertots and Jello
I Heart Naptime
Flamingo Toes

Filed Under: Catablog, Christmas, crafts 32 Comments

Comments

  1. Rebecca says

    November 3, 2011 at 3:29 pm

    I said “duh, why didn’t I think of that” while reading this. Yesterday I was bummed because our Christmas budget is going to be uber tight and I won’t have much (if any) for new decor or supplies. I really dislike my old bulbs and they’re all scratched up. I was sad to have to use them again. You just made my day.

    Reply
    • Heidi @ Honeybear Lane says

      November 3, 2011 at 3:31 pm

      That’s great! It’s a super easy fix! There are also tons of cheap and free ornament ideas on Pinterest–go check it out! 🙂

      Reply
      • Rebecca says

        November 4, 2011 at 11:15 pm

        Checking out your board now. =]

        Reply
  2. Rachel says

    November 3, 2011 at 3:31 pm

    That is really cute! What a great idea. Easy and it looks great! Thanks for sharing. I may have to do this. It would even look cute hanging from a fire place or something, with varying lengths

    Reply
    • Heidi @ Honeybear Lane says

      November 3, 2011 at 3:33 pm

      That’s a great idea–hanging in varying lengths! See? This is why I love my readers. 🙂

      Reply
  3. Hannah says

    November 3, 2011 at 7:08 pm

    How cute!! I have aimed to have a handmande christmas, So this will be perfect.

    Reply
  4. Jamie Lee says

    November 3, 2011 at 7:29 pm

    Thanks, I plan to make these with my kids the day after Thanksgiving…perfect craft for little ones. Thanks so much!!!

    Reply
  5. Natalie says

    November 3, 2011 at 8:21 pm

    Oh my goodness, these are just delightful! I love love love these and want to make them now! I will totally be doing this! Thanx for sharing!

    Natalie
    http://www.projectdowhatyoulove.wordpress.com

    Reply
  6. D @ The Shady Porch says

    November 5, 2011 at 3:46 am

    Found you via Tatertots & Jello and I’m glad I did! I love these ornaments…what a wonderful way to revamp old ornaments or to switch to color-themed decorations for low cost! I would love for you to share this project at my party too!

    http://theshadyporch.blogspot.com/2011/11/rock-n-share-blog-party.html

    Reply
    • Heidi @ Honeybear Lane says

      November 5, 2011 at 8:59 pm

      Thanks for coming by! I’ll try to link up!

      Reply
  7. Amy@One Artsy Mama says

    November 5, 2011 at 3:03 pm

    WOW! I love those…they’re so simple and yet so attractive! I’d be thrilled for you to share here:

    http://oneartmama.blogspot.com/2011/11/our-home-for-holidays-party.html

    Reply
    • Heidi @ Honeybear Lane says

      November 5, 2011 at 8:59 pm

      Thanks! I’ll link up!

      Reply
  8. MGB says

    November 5, 2011 at 6:39 pm

    What a amazing great idea!
    Thanks for sharing.

    Reply
    • Heidi @ Honeybear Lane says

      November 5, 2011 at 8:57 pm

      Thanks so much!

      Reply
  9. Mandy says

    November 6, 2011 at 6:08 am

    These are adorable and so easy! I’d love it if you shared them at my Christmas Craft Tutorial Party that is going on through the month of November at Project Queen! Here is the link:
    http://projectqueen.org/christmas-craft-tutorial-link-up-party.

    Reply
    • Heidi @ Honeybear Lane says

      November 6, 2011 at 6:46 am

      Thanks for visiting and letting me know about your linky party!

      Reply
  10. Mary at Sweetwater Style says

    November 6, 2011 at 12:32 pm

    Shame on you….now I have yet another project on my todo list! Am pinning this right now!

    Reply
  11. Becca says

    November 6, 2011 at 1:51 pm

    These are so lovely! What a great idea! Thank you for sharing.

    Reply
  12. Emily says

    November 6, 2011 at 3:58 pm

    I love these!! Great idea and they look like a project I could complete during a naptime. My kind of project!! 🙂

    Thanks for stopping by my blog and leaving me a sweet comment!

    Reply
  13. breanna says

    November 7, 2011 at 9:42 pm

    so cute, and a great craft the kids can help out with! hooray!

    Reply
  14. Heather - Dollar Store Crafts says

    November 8, 2011 at 6:02 am

    Cool project! We’re linking up tomorrow on dollar store crafts: http://dollarstorecrafts.com/2011/11/make-a-fabric-wrapped-ornament/

    Reply
  15. Shari says

    November 19, 2011 at 11:10 pm

    Thanks for reminding me about the possibilities of this. When I worked at a newspaper, I was in charge of decorating our tree at work one year for the annual departmental contest. Since we worked in the classified advertising department, we went with a them of Black, White, & “READ” all over. We had all white balls from previous years. I used inexpensive black jaquard polyester satin, and covered about half of the white balls and tied them with red satin ribbon. With white lights, it was a very elegant tree, if I do say so myself. We didn’t win, but it was still beautiful.

    Reply
  16. Lisa says

    November 14, 2012 at 4:23 am

    Great idea, can’t wait to try this with my girls.

    Reply

Trackbacks

  1. Christmas Crafts: Make Christmas Balls! | HoneyBear Lane says:
    November 16, 2011 at 5:36 pm

    […] all of the decorative balls in this basket (all except the rustic bells.)  You’ve seen the wrapped ornaments already, so today I’ll show you how to make the Mod Podged […]

    Reply
  2. Crafty Christmas Ornaments | Just Julie says:
    November 4, 2012 at 4:11 pm

    […] cover glass ornaments with fabric. Whatever fabric you want! Change them every year if you prefer! These ornaments are fun and easy to make. Best of all… who doesn’t have boxes of random colored […]

    Reply
  3. Fru Thoresen » Litt jule-inspirasjon fra Pinterest :) says:
    November 7, 2012 at 7:54 pm

    […] Honeybearlane […]

    Reply
  4. Decorazioni per l’albero di Natale : OVS Kids says:
    December 4, 2012 at 6:10 am

    […] che mi piace particolarmente è quella di Honey Bear Lane che ci propone palline semplici ma bellissime in stoffa bianca e rossa. Sono davvero […]

    Reply
  5. 25 Beautiful DIY Ornaments - HoneyBear Lane says:
    December 3, 2014 at 9:43 pm

    […] 19. Easy Christmas Ornament […]

    Reply
  6. Toddler Blog says:
    July 13, 2016 at 11:47 am

    All Wrapped Up Christmas

    […] e anything like my mom, you have about 40 boxes of ancient glass colored balls o […]

    Reply
  7. Day 16: – All Things Overman says:
    December 16, 2016 at 11:20 am

    […] Sources: HoneyBear Lane  […]

    Reply
  8. Petite Blog says:
    April 16, 2017 at 3:17 am

    Love Layered Holiday Ornament

    […] a. Easy and it looks great! Thanks for sharing. I may have to do this. It would […]

    Reply
  9. Lovely As Blog says:
    May 20, 2017 at 8:24 pm

    About The Wonderful Christmas Theme Polyester

    […] haring. I may have to do this. It would even look cute hanging from a fire place […]

    Reply

Leave a Reply Cancel reply

Your email address will not be published. Required fields are marked *

Popular Posts

  • DIY Farmhouse Table and Bench
  • 20 Handmade Christmas Presents to Start Sewing Now
  • IKEA Hack: Expedit into Long Storage Unit
  • My Gorgeous DIY Office Built ins Reveal
  • 8 Steps to an Epic Halloween Party
  • DIY Mudroom Bench
  • Build Your Own DIY Outdoor Furniture
  • Tips for Painting Stair Balusters
Welcome

Hey there--I'm Heidi! I teach women how to decorate, DIY, and design so that they can love the home they live in.

  • Facebook
  • Google+
  • Instagram
  • Pinterest
  • Twitter

Creative Commons License
This work is licensed under a Creative Commons Attribution-NonCommercial-ShareAlike 3.0 Unported License

Privacy Policy

Copyright © 2022 Honey Bear Lane. Custom site by Moonsteam Design.
502 shares