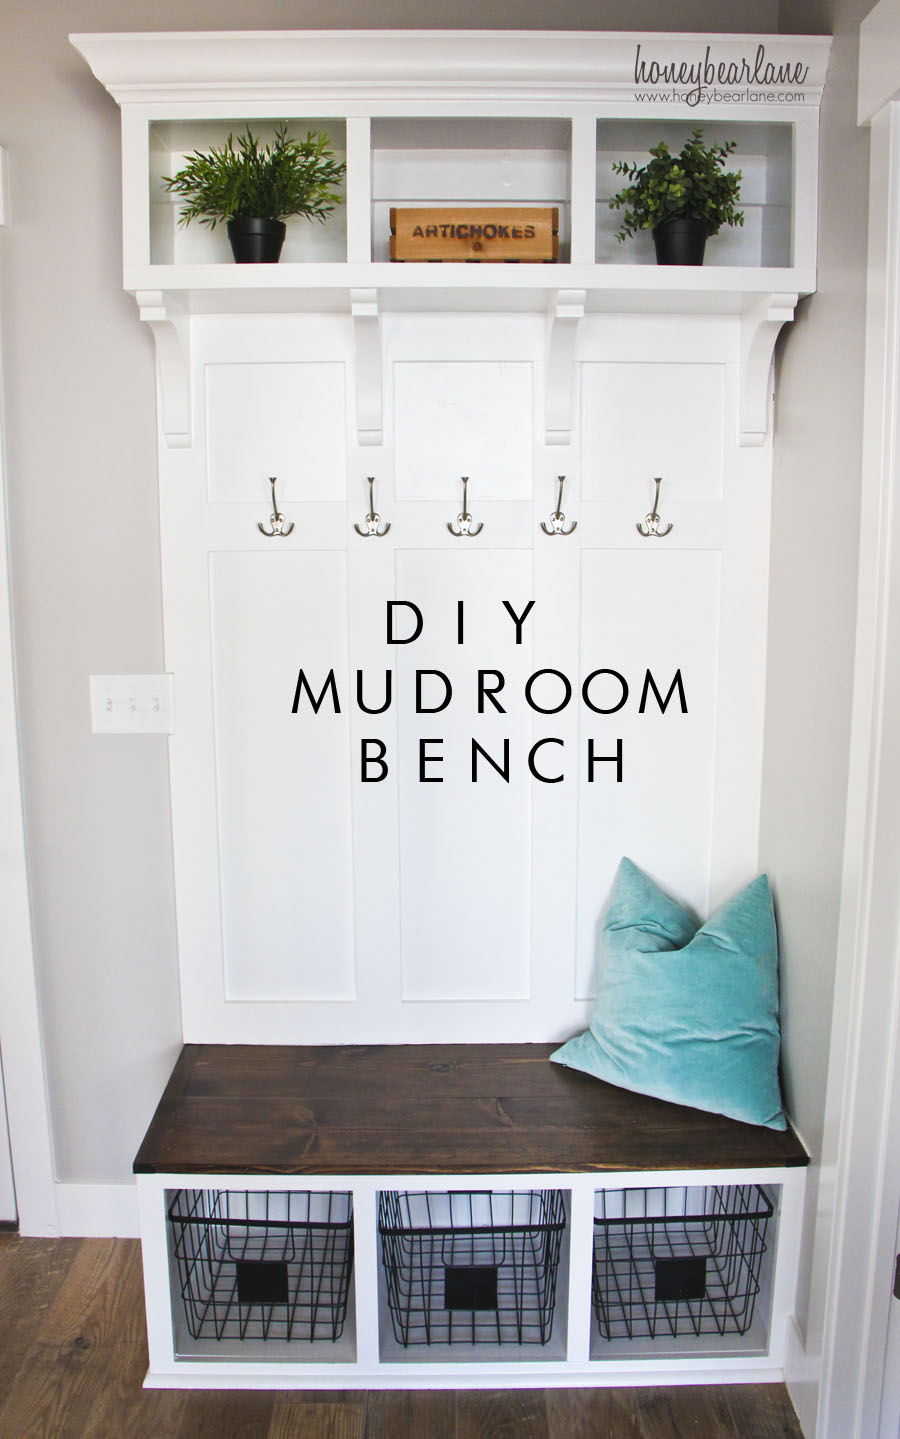
DIY Mudroom Bench
One of my first projects in my new house was a DIY mudroom bench. We desperately needed a place to put our coats and boots, especially since we moved in during the winter. I was feeling a little intimidated by a project of this caliber, since the only wood working projects I’d done up until now have been small tables. For some reason the idea of building cubes terrified the heck out of me! I turned to the internet to help give me the confidence I needed to start this project.
I completed this 100% by myself, no help from any other person. I took the time and care to try and make it look as professional as possible.
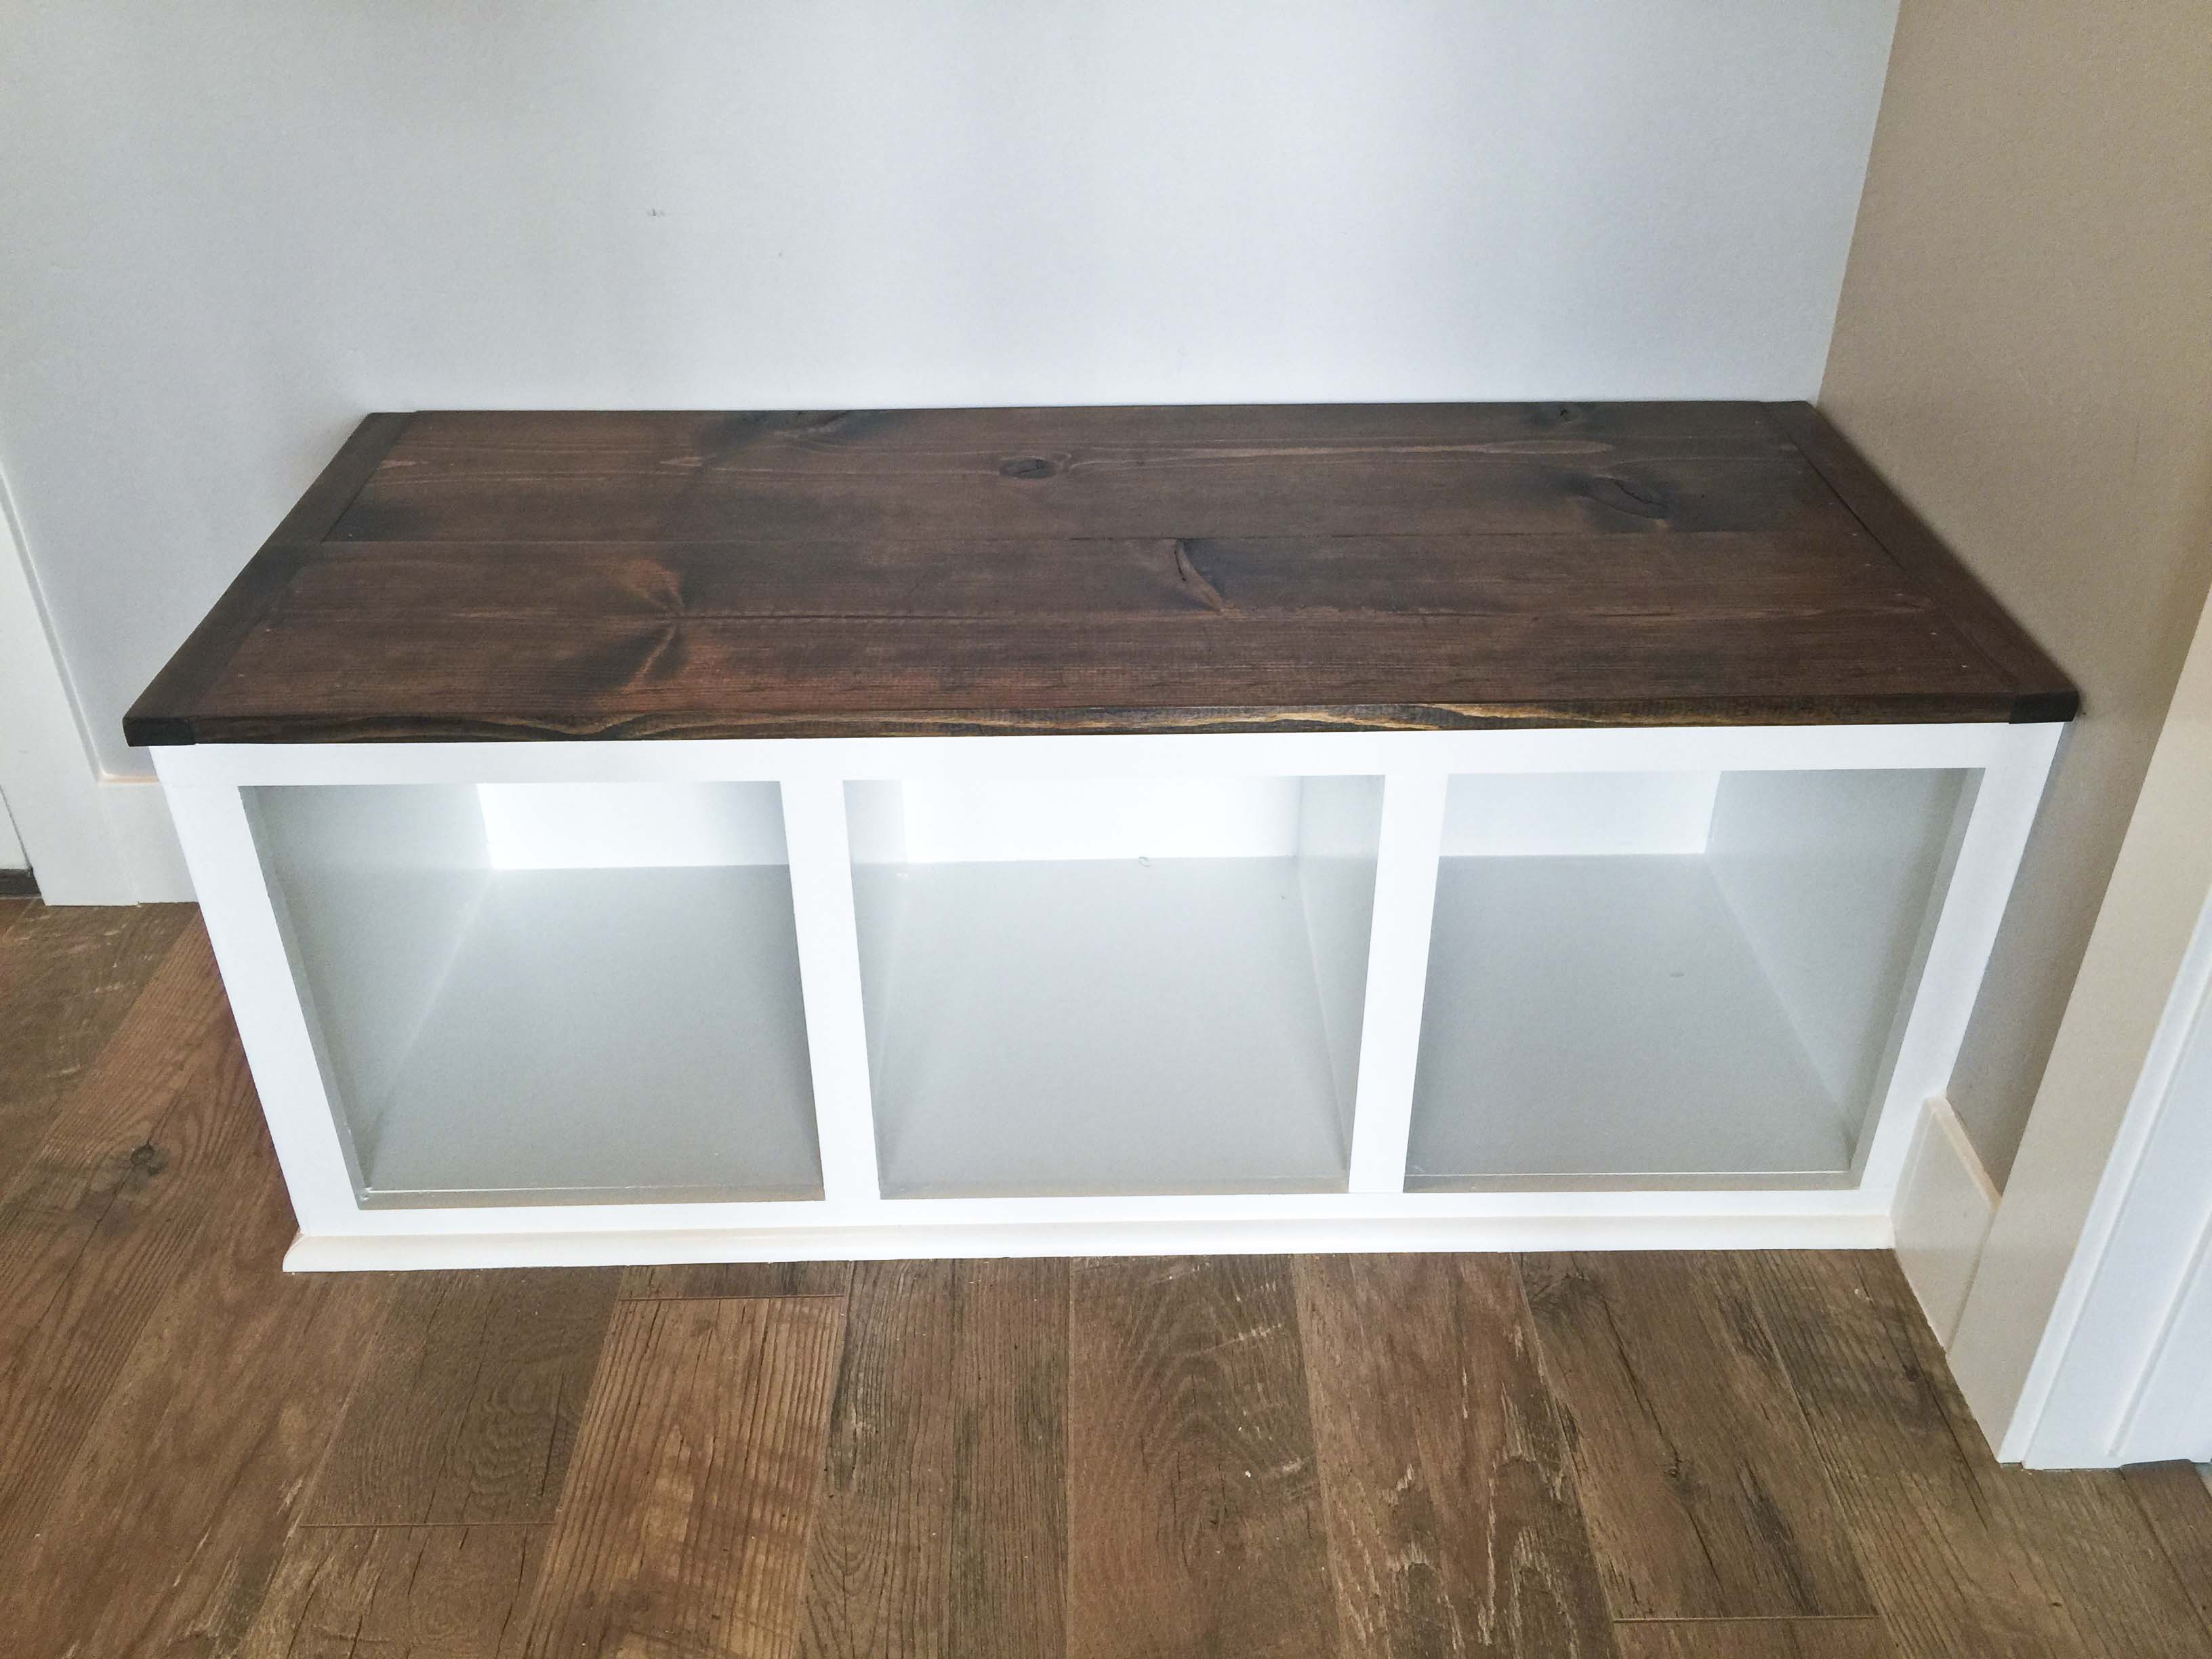
I think it turned out awesome and I love, love, love it! I love the way it turned out but I also love the practicality of it, it is so helpful for all our coats and backpacks which had been living on the coat closet floor along with the vacuum and other miscellaneous stuff. It was starting to smell like wet boots. Blech.
I took my inspiration from Beckie’s recent mudroom bench and this other blog called House Updated. I studied these two tutorials and devised my own bench based on the space I had and whatnot.
Determining what kind of DIY mudroom bench to make:
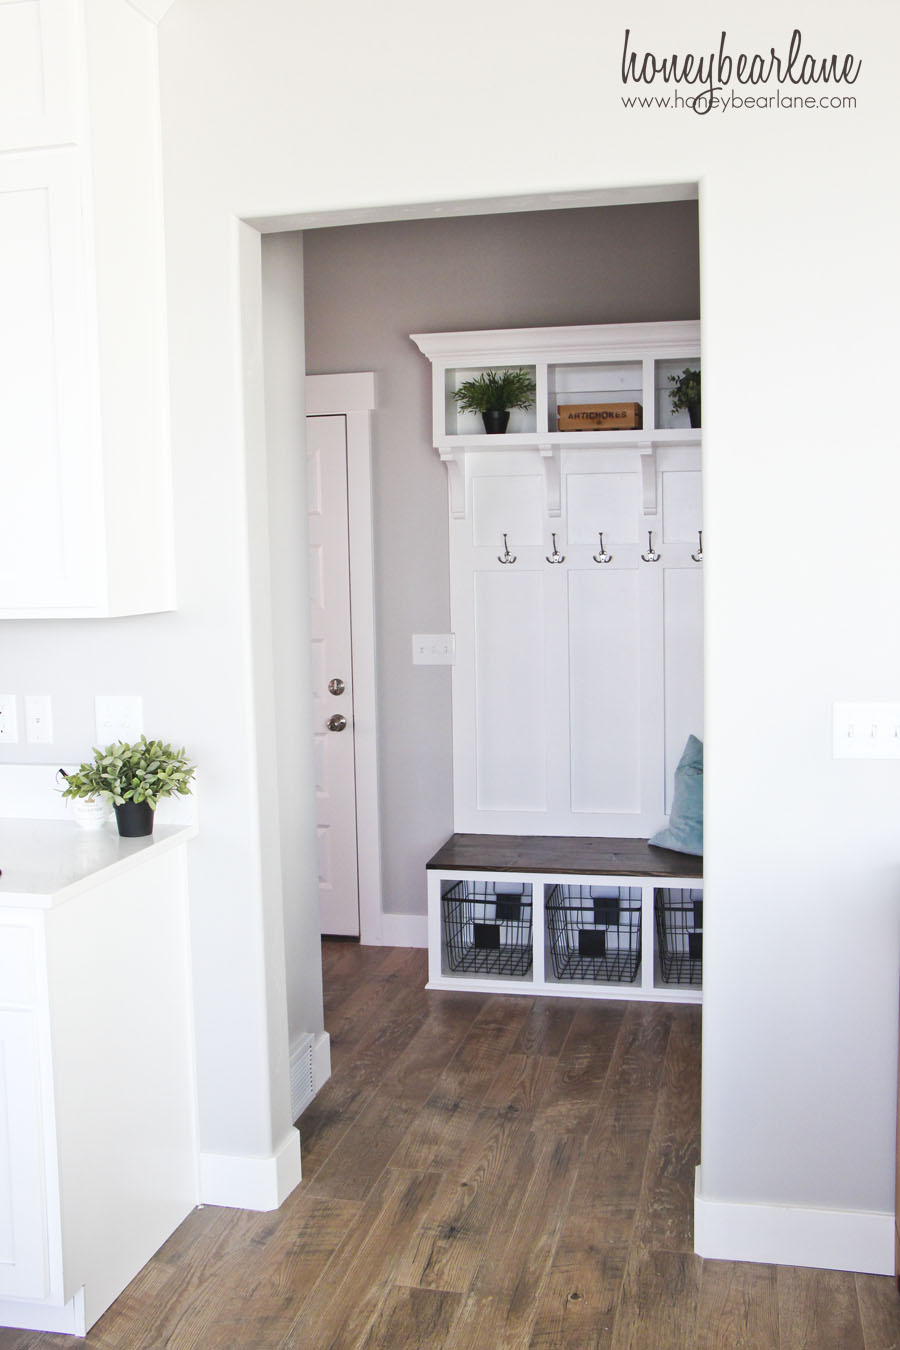
We have kind of a weird space for a mudroom. The door from our garage opens up into this small foyer which has doors to a laundry room, coat closet, and a powder room. Then there is a tiny little corner for a mudroom bench, which was an option when we built. But we wanted to save money when we knew we could do some things ourselves. The garage door opens up and you look straight at the coat closet door. You have to walk diagonally to the passthrough into the kitchen. So I couldn’t carry my bench all the way to the edge of the door because it would make walking the diagonal path more difficult, especially if you were carrying a large thing.
I first took lots of measurements. I found the basket I wanted to use for the bottom, which was 13″ wide, so I based my base measurements off that. I could tell you all the measurements but you’ll probably have to do your own anyway. Let me know if you want the exact measurements and I will add them later.
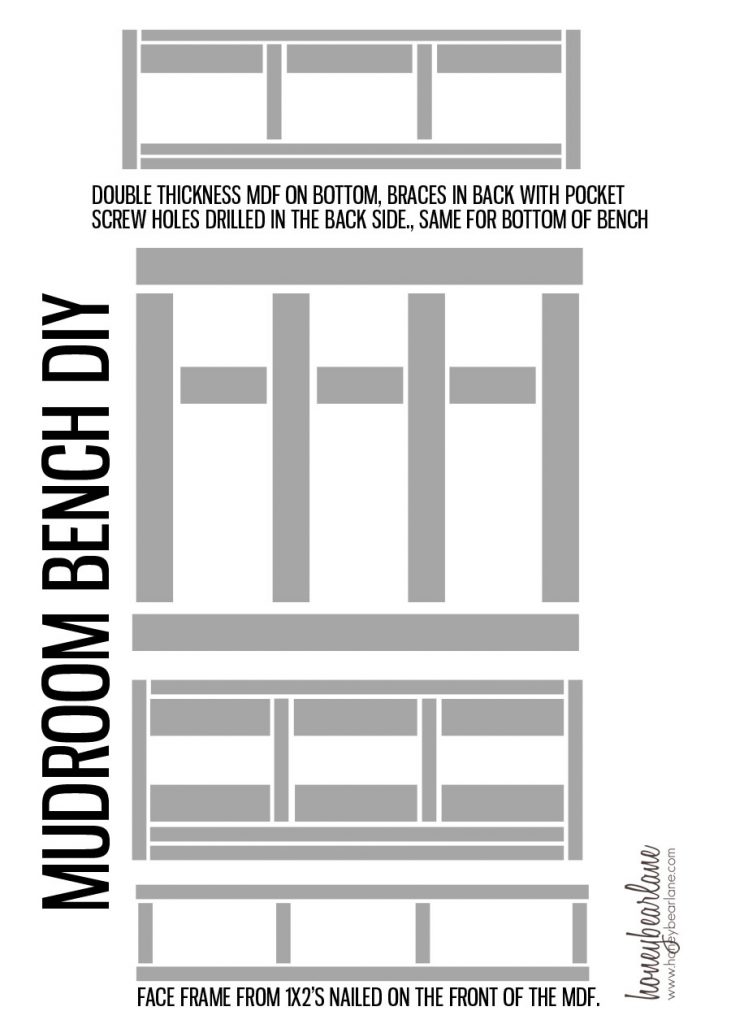
Here is a graphic to help you see what I did:
 For this DIY Mudroom Bench:

I had 3/4″ MDF for everything except the bench top, face frame, and corbels. I had Home Depot cut the 4×8′ boards into strips of 17 inches, 10 inches, and 3.5 inches. I could cut everything I needed from those sizes and it made it way easier to transport.
The best thing to do is to plan and draw everything out, down to the last detail and then draw a large rectangle and plan out your cuts as well. That way you can use your board the most efficiently. I also recommend leaving a little room for mistakes. It was really handy to have some extra stuff when I made some cuts a little too short or whatever.
Supply List
You will need the following:
(Some affiliate links below)
- 2 4×8′ sheets of 3/4″ MDF
- 4 Pine Corbels 9.5×9.5″
- 4 8′ Select Pine 1×2’s
- 1 8′ Lattice
- 1 8′ Crown Molding (MDF)
- 2 Pine 1×10’s
- 1 5′ quarter round
- Kreg 1-1/4-Inch Pocket Screws
- White paint (I matched to my trim) Make sure it’s satin finish
- Rust-Oleum Zinsser Bulls Eye 1-2-3 White Water-Based Primer
- Sanding bar
- Caulking
- Wood glue
- Screws for Corbels at least 1 1/4″ length
- Screws to screw unit to studs at least 2″ long
- Nail filler
- Painter’s tape
- 5 hooks with screws
Tools I used:
- 4 Saws: Large miter saw, circular saw with Kreg Rip-Cut
(I highly recommend one of these!), Dremel, and Jigsaw - 1 Nailgun (Ryobi Brad Nailer
with 1 1/4″ nails) - Mallet
- Kreg Jig
- Drill & Driver
- Razor blade
- Paint roller
Whew! Look at that list. I’m not gonna lie, this project cost me more than I projected, but I did have to purchase all the paint new. I think if I had more of the basic stuff on hand, it would have been closer to $200, but it was about $300. The corbels I got were kinda pricey. But I still saved money doing it myself.
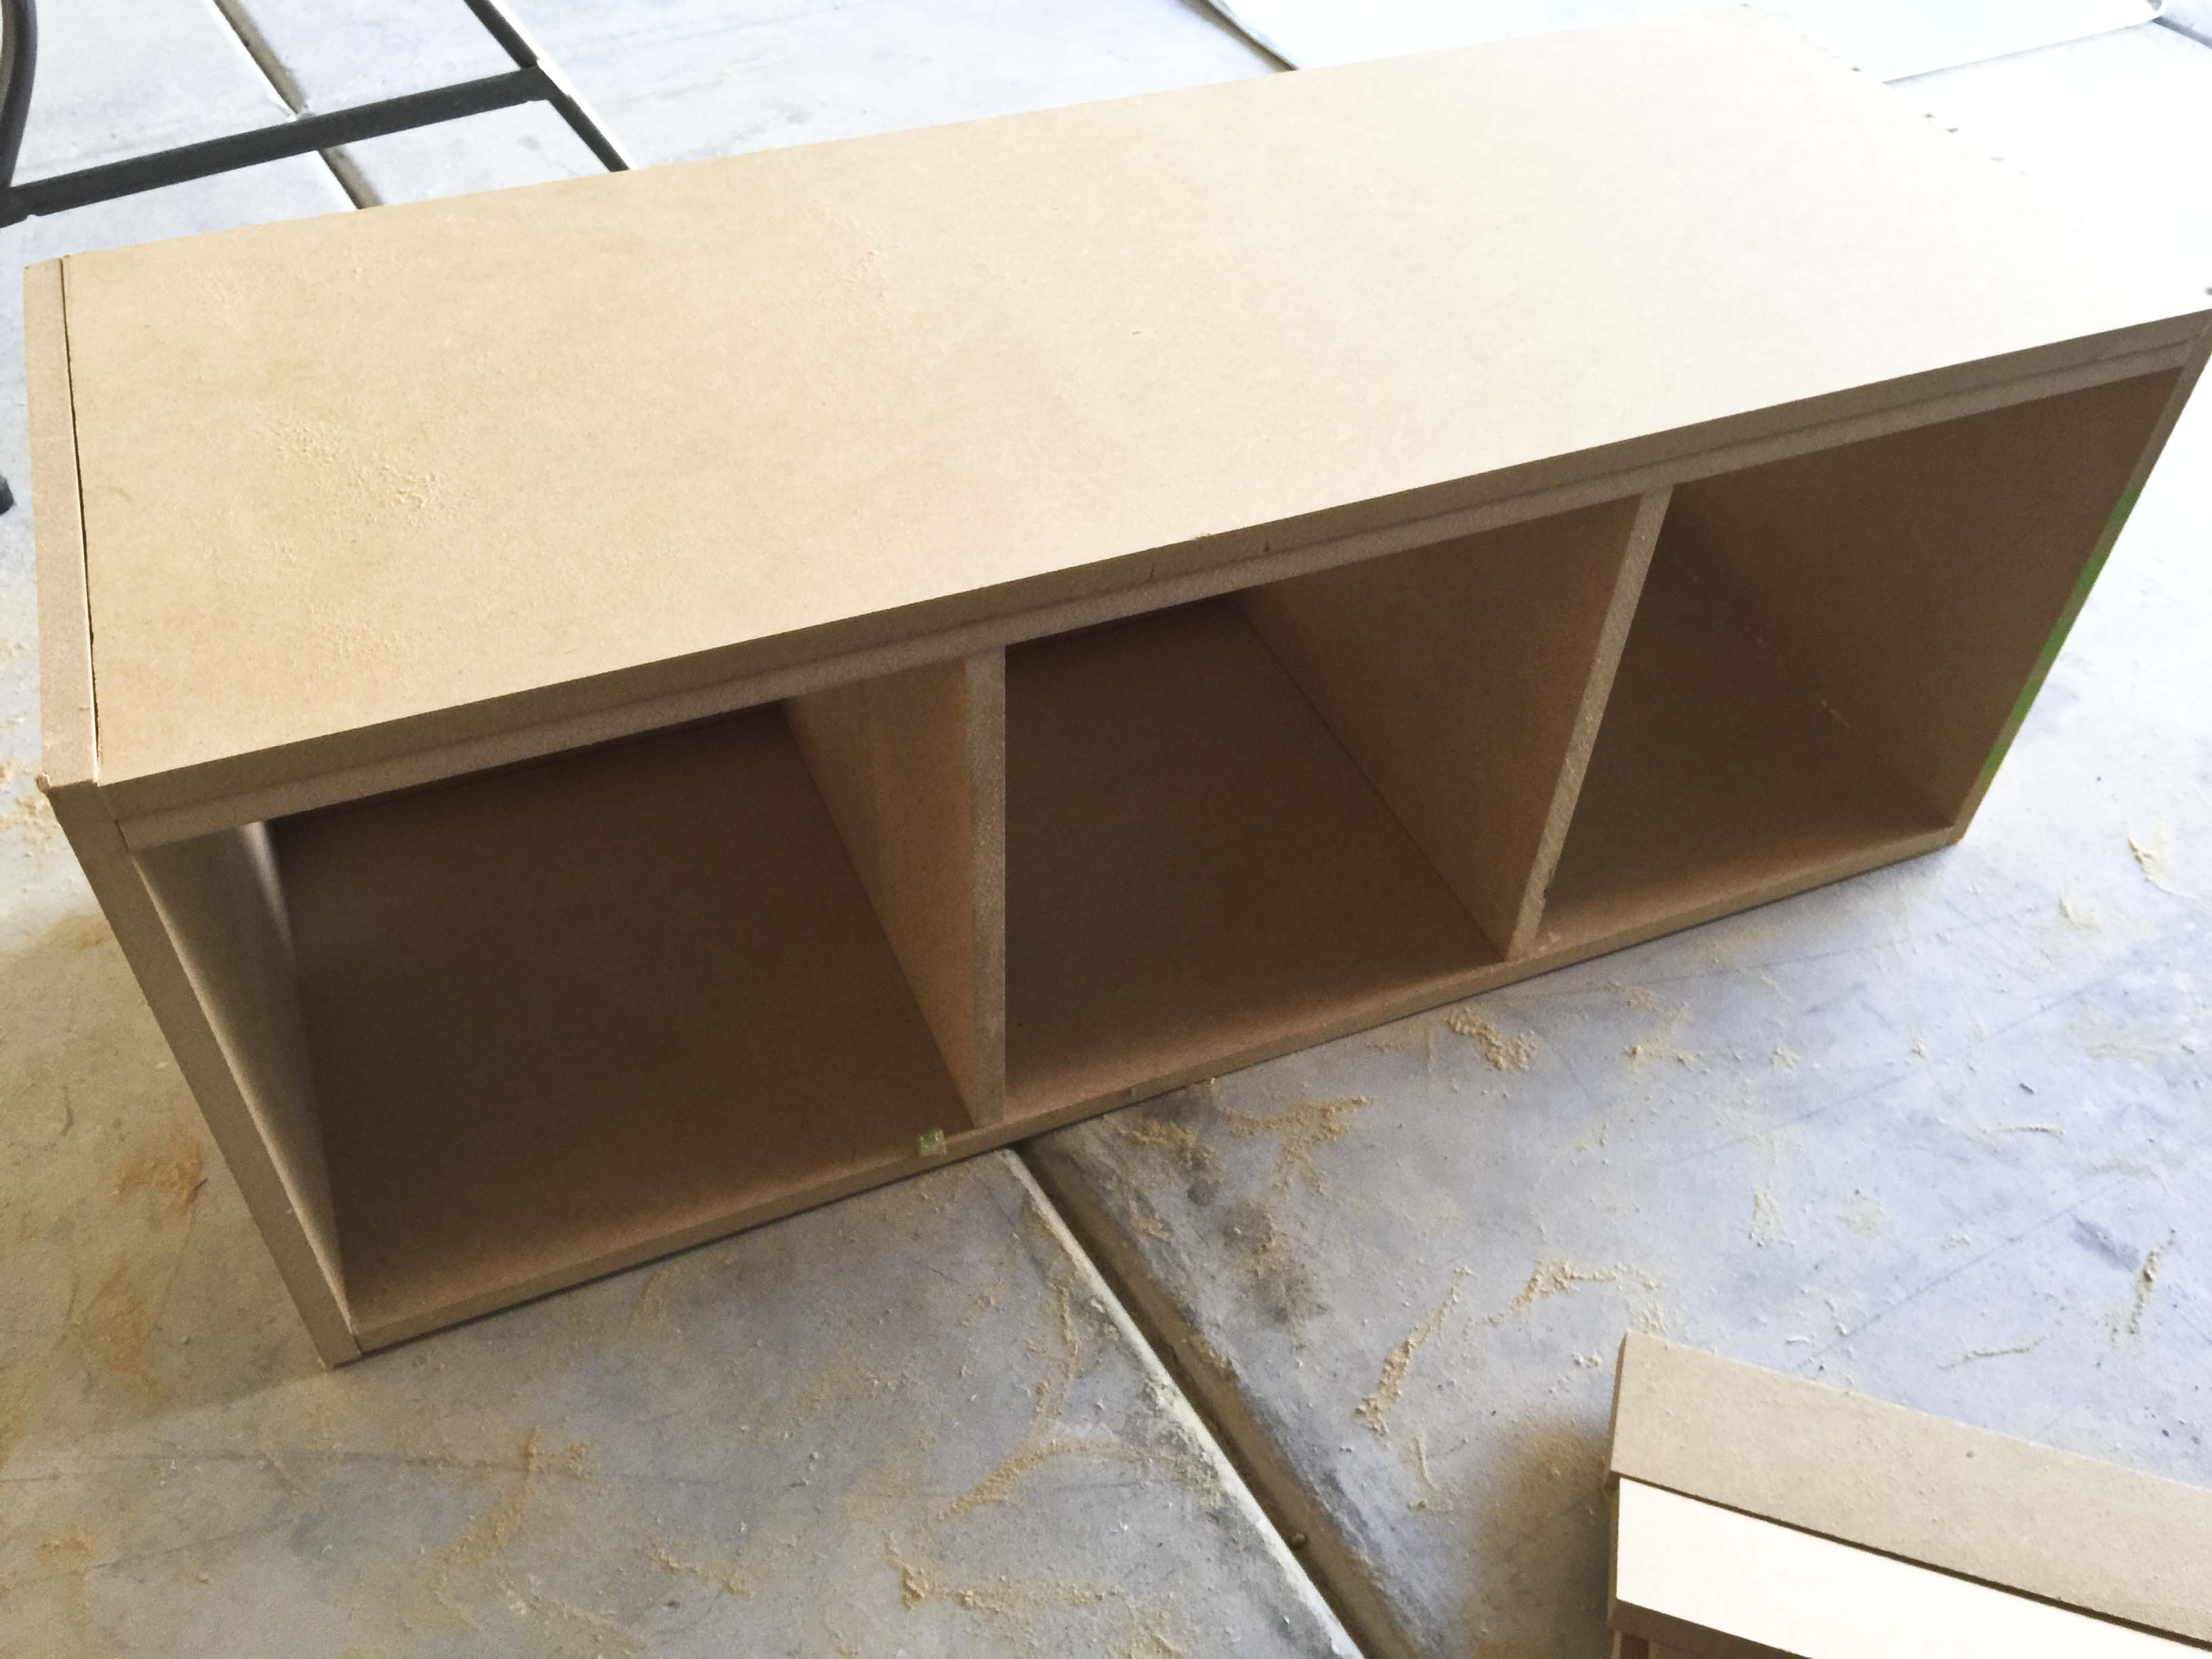
First you will assemble the bottom box. I cut my wood to the length I wanted, since it was already the right width. I cut the sides of the bottom box into a square and then subtracted 2.25″ from that length for the dividers so I could have room for the top and bottoms of the box (there is a double thickness on the bottom.) That’s 3/4″ x3.
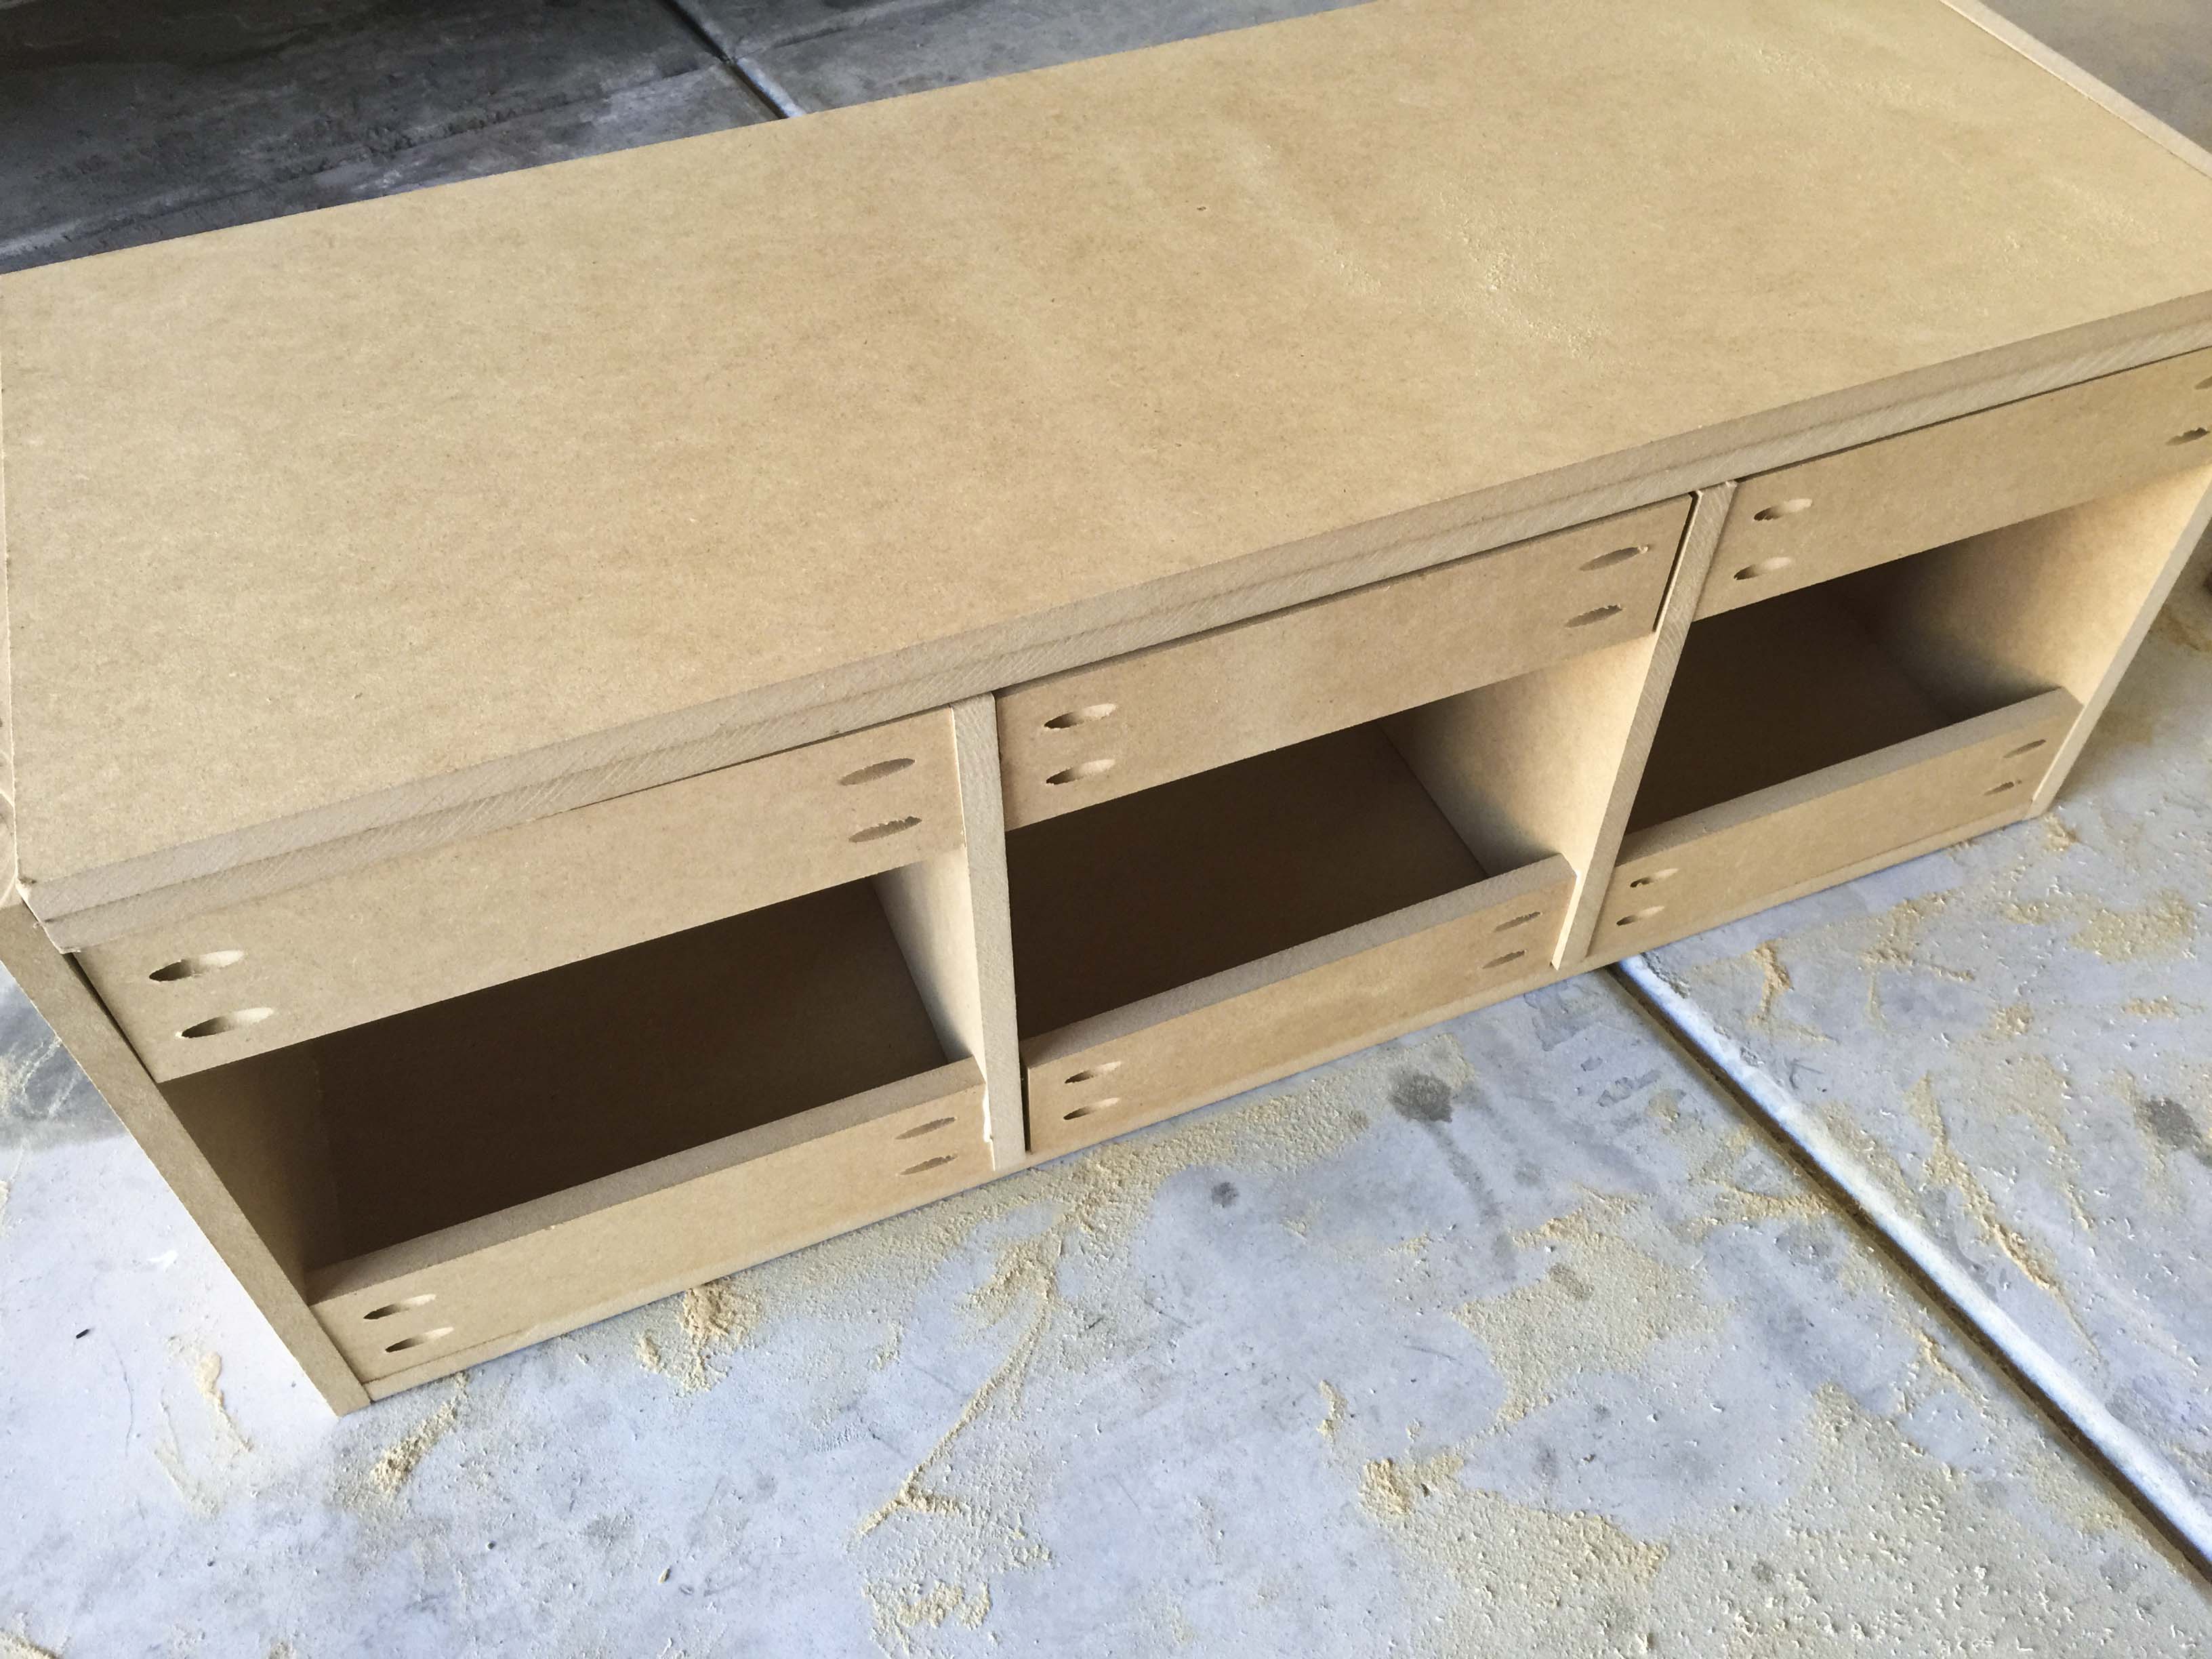
I drilled pocket holes on the top and bottom pieces and attached them to the sides so that the holes would not be visible on the sides. Then I added braces on either side (the braces are the same width as each cubby opening) and then a divider on the other side of the brace, and finally another set of braces in the middle. I attached these with pocket holes as well that are in the back, so also not visible.
I tipped it over and slid the extra bottom piece in the spot that fit perfectly. It was cut just so that I had to use a rubber mallet to pound it in place. Mallets are awesome. I dragged the whole thing inside the house and got it ready to put in place.
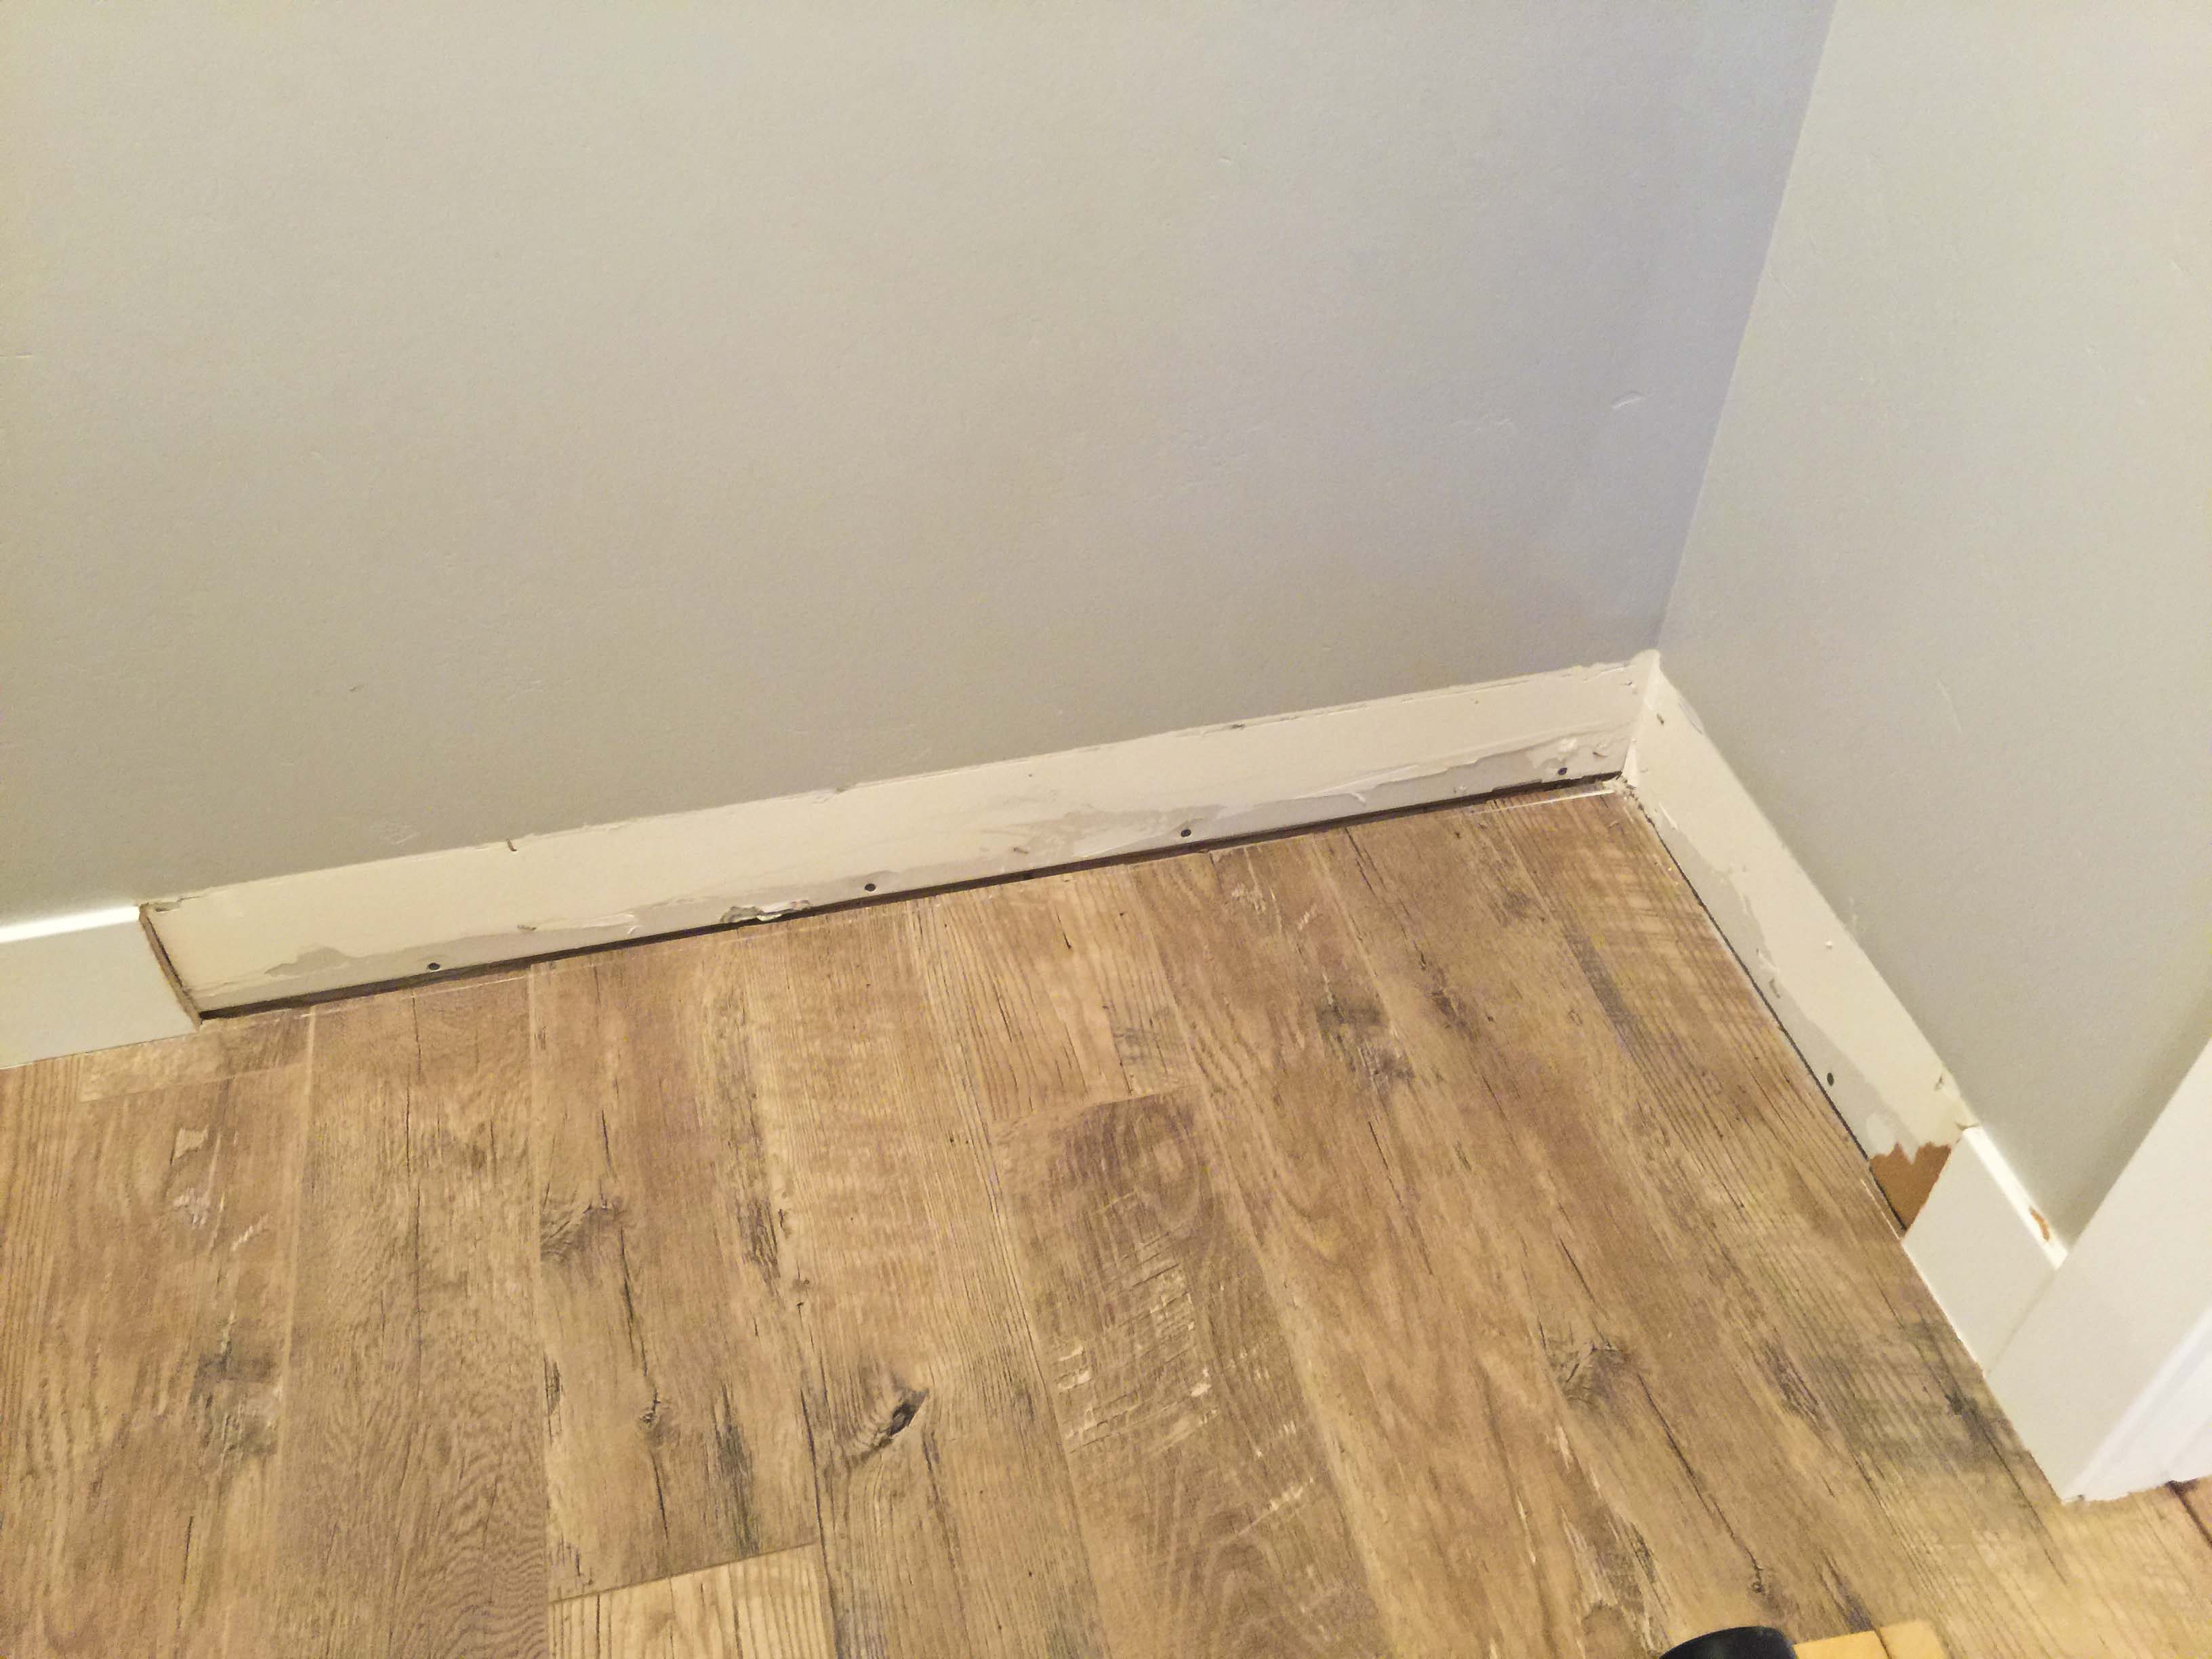
To put it in place, I had to use a Dremel saw to cut the baseboards. Mark where the baseboards meet up with the bench and then move that line in an extra 1/2″ where the baseboards will be removed so the bench fits perfectly in and looks built in. I had to also use a crowbar to pry the baseboards off.
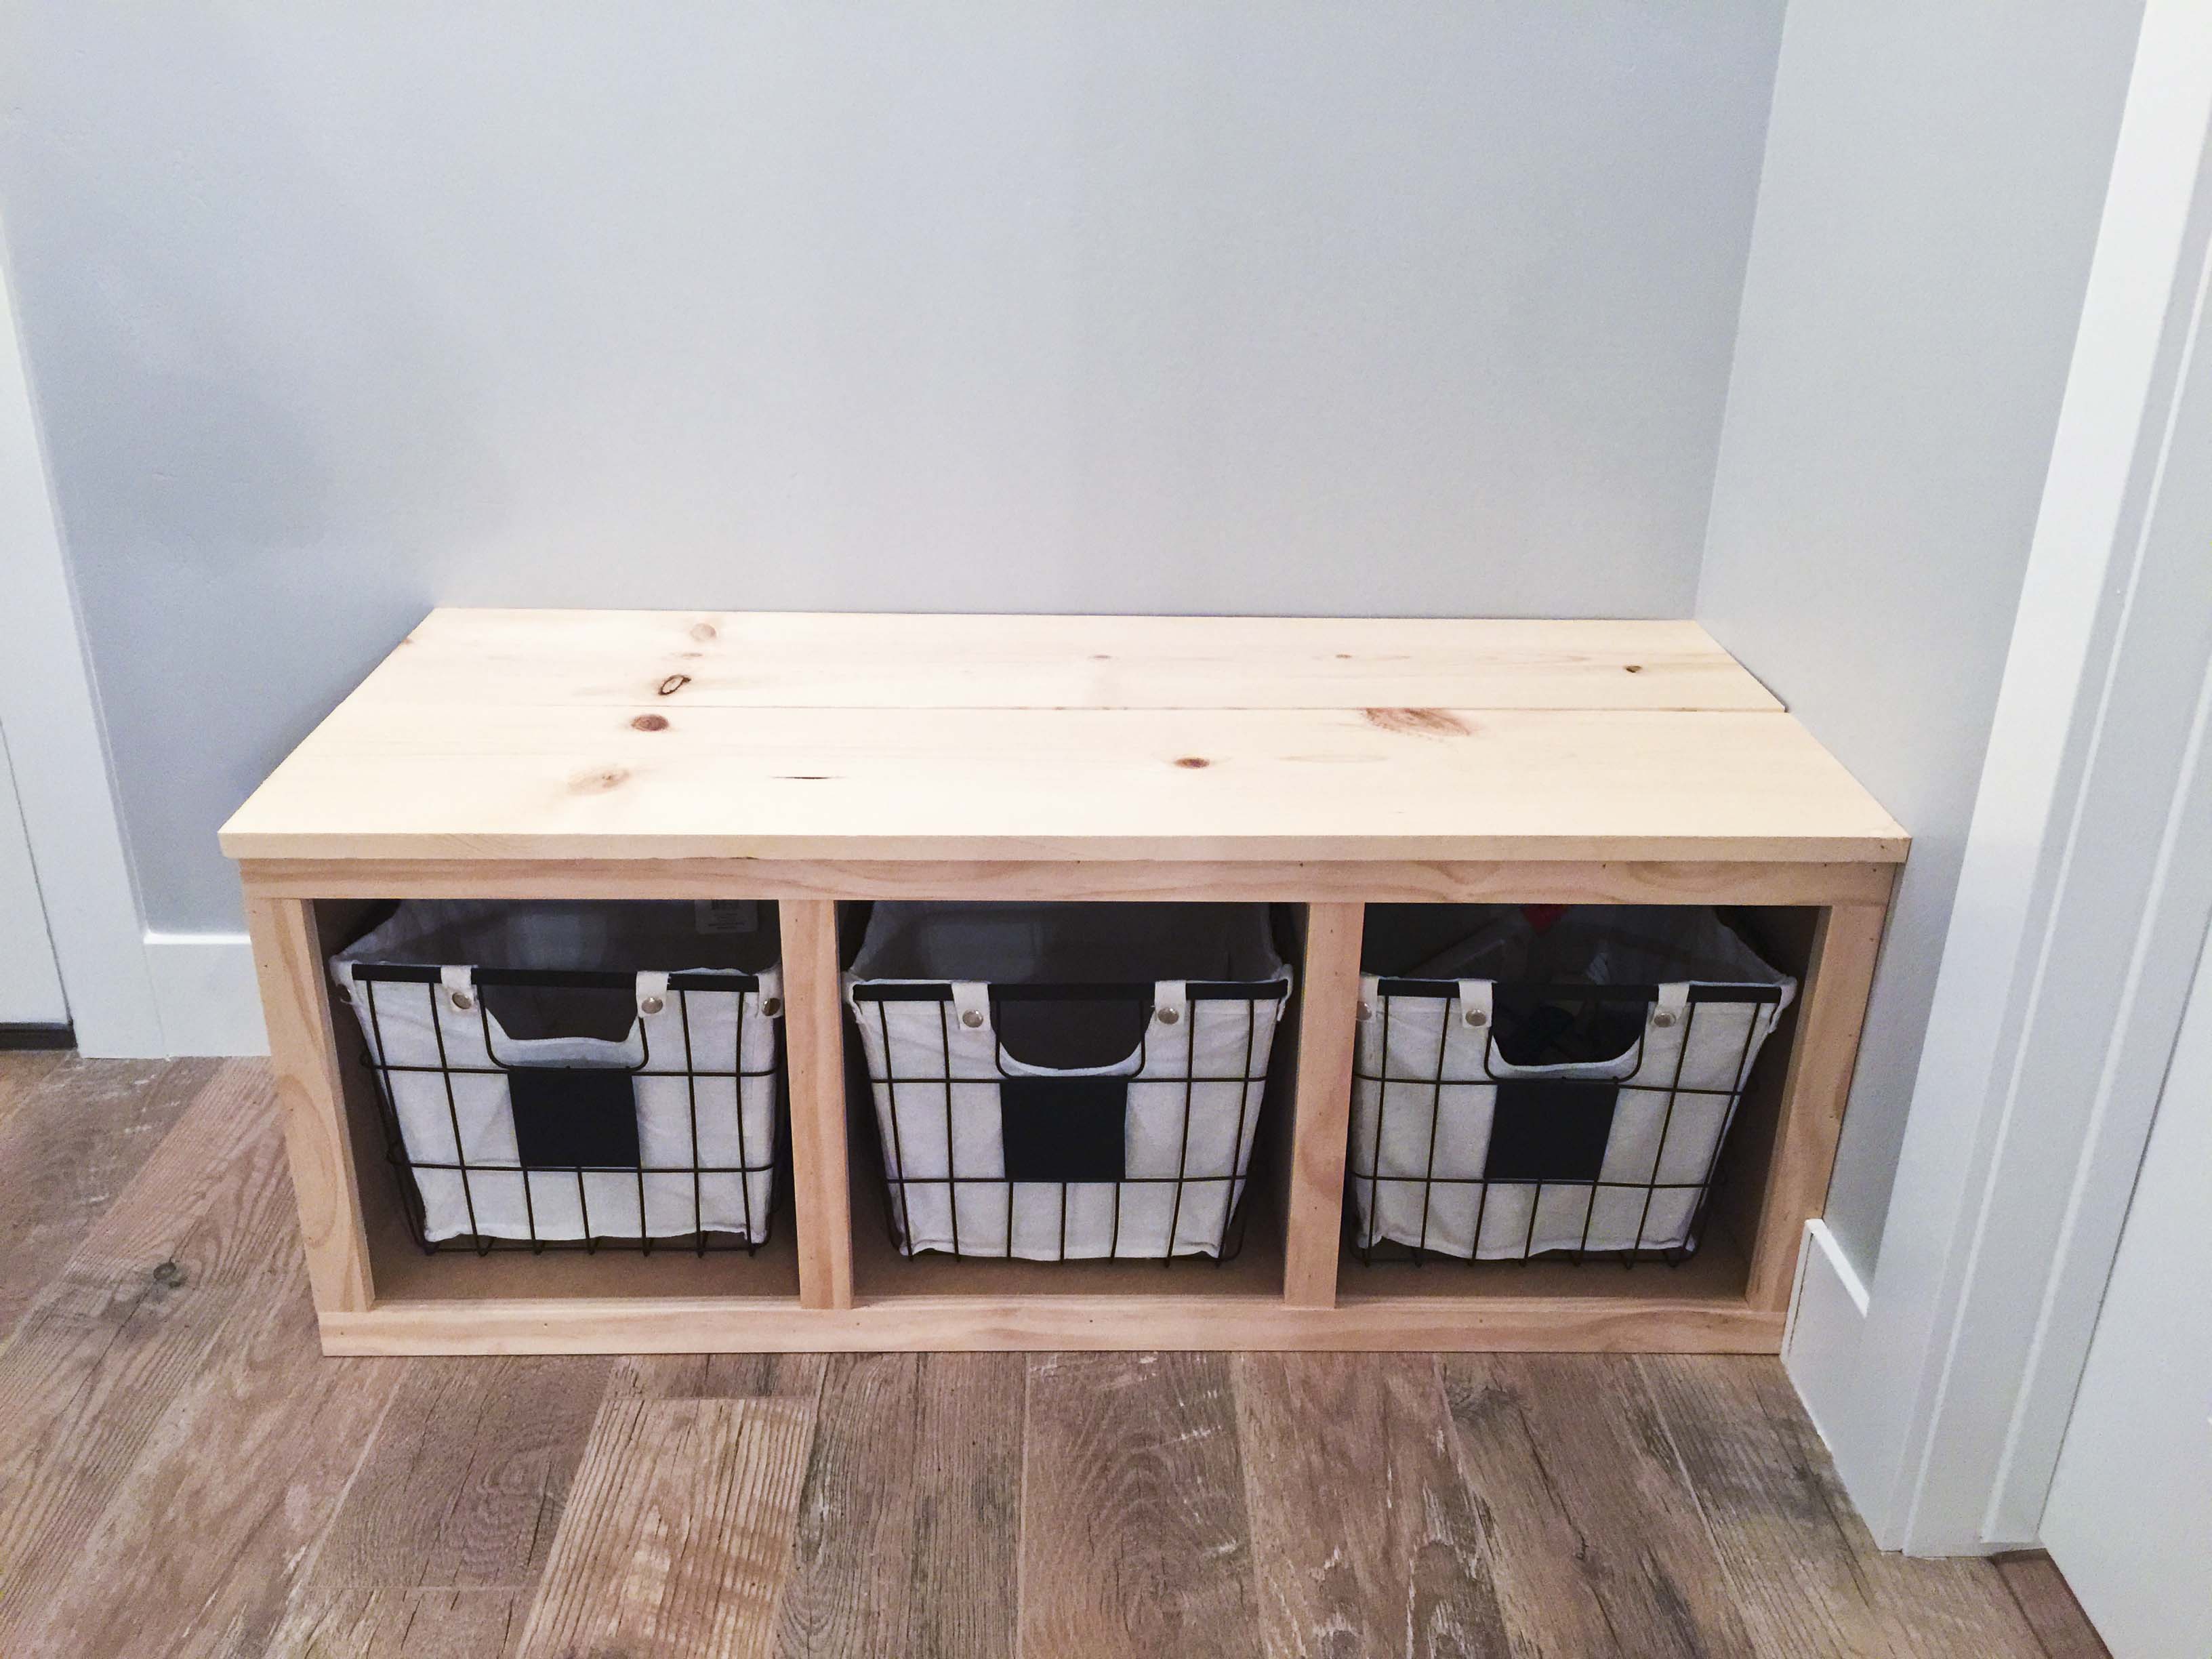
Once the bench was in place, I found the studs in the wall and screwed some long screws in from the braces so it would be really stuck to the wall. Then I cut and added the face frame and lattice (on the side where you can’t see), using glue and a nail gun. I also added a quarter round to the base. Make sure the the lattice on the side is above the quarter round (the quarter round isn’t shown in this pic.)
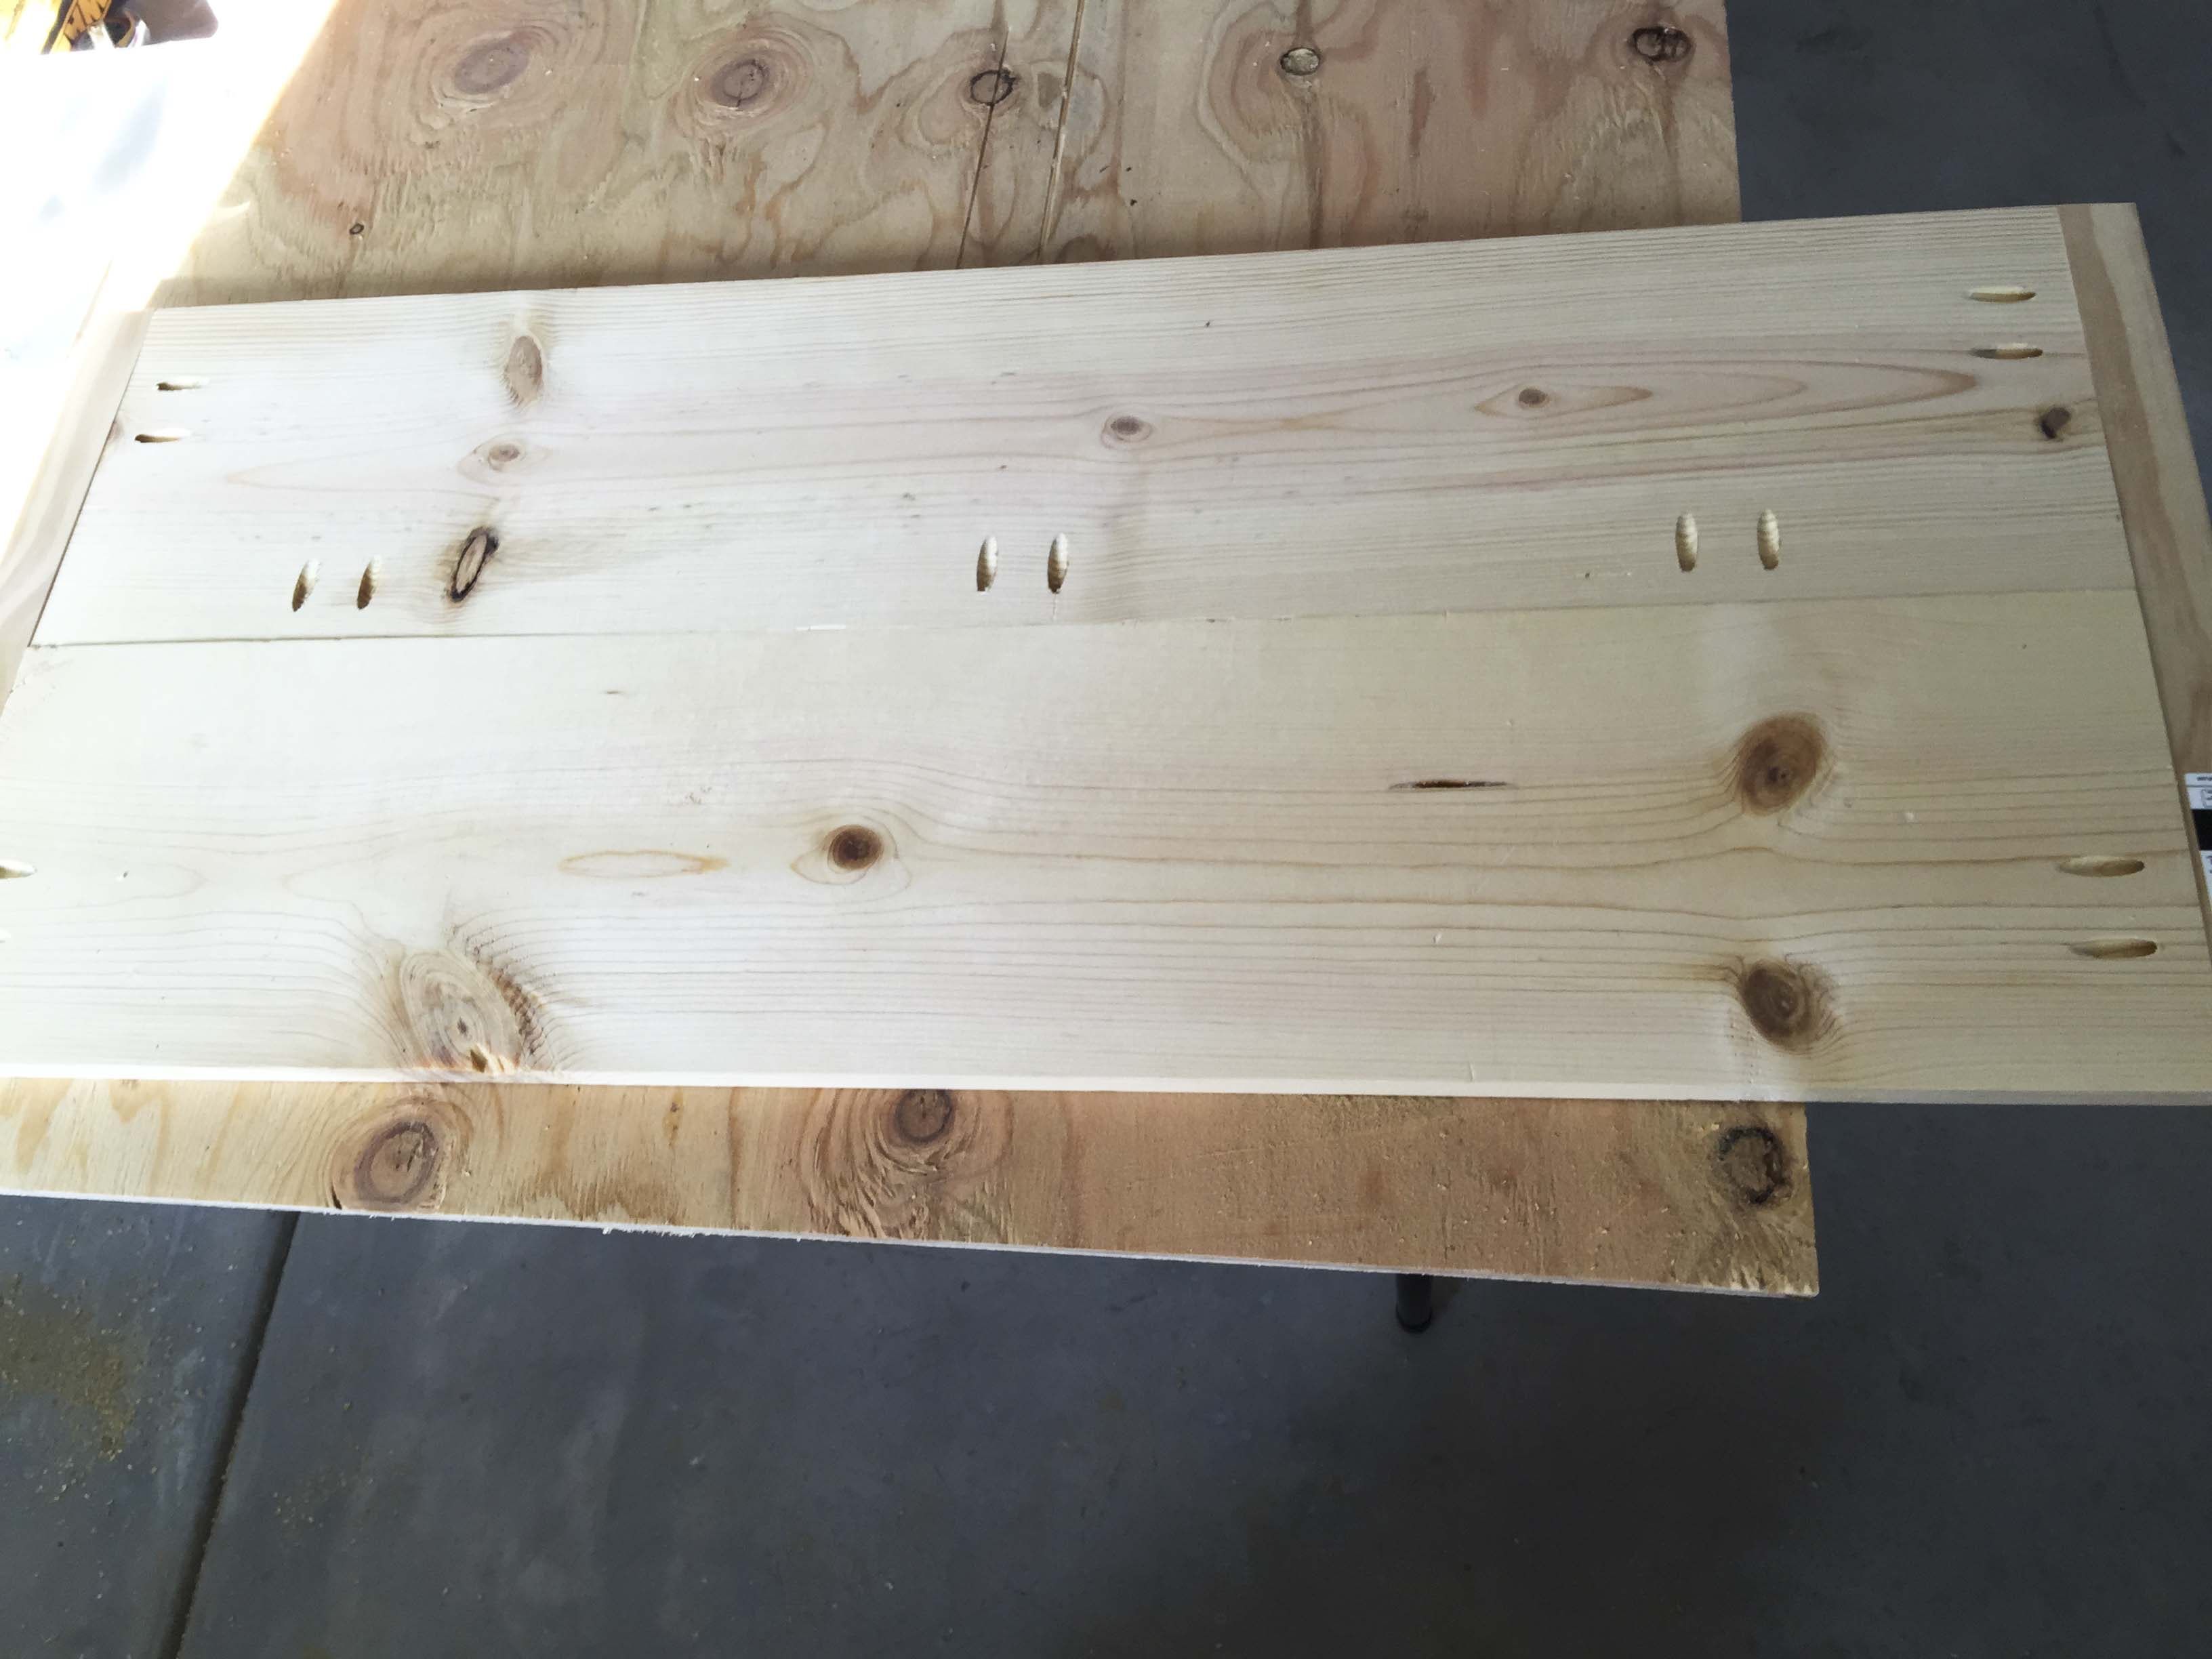
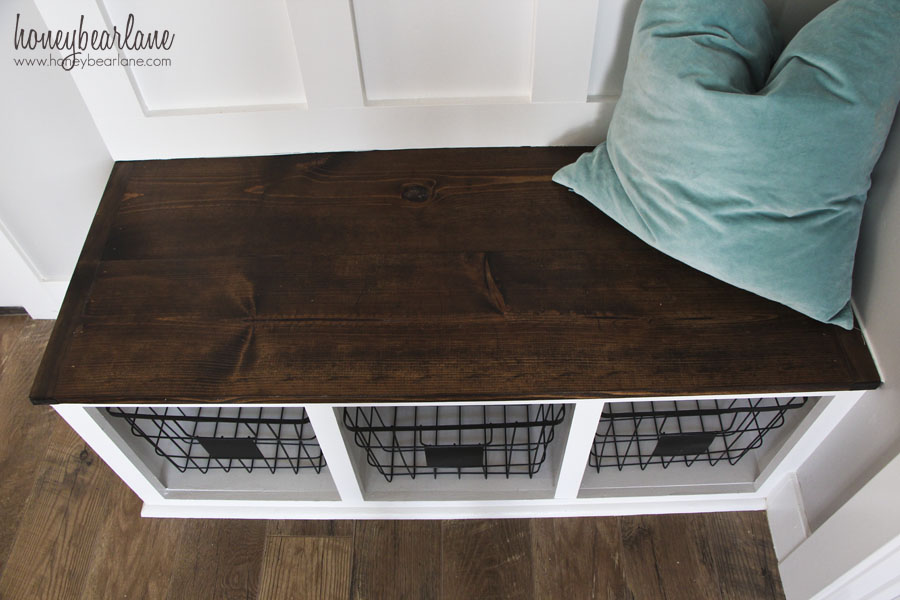
To make the bench top I took two 1x10s cut to size and trimmed the ends with more 1×2 wood. I put it all together with pocket holes and sanded it really well. I stained it with Minwax Dark Walnut (using pre conditioner first) and sealed it with polyurethane. I did about three coats of that and let it all cure for a couple of days. I stained it in the basement instead of the garage so that the wood had time to adjust to the new environment and not warp.
Finally it was time to caulk and paint! I used several coats of primer and then a Behr paint that was color matched to my trim.
Stay tuned for DIY Mudroom Bench Part 2–the top!
I personally think that you rocked this bench!!!!! It is so gorgeous, I wish I had a house to build on of these.
Thanks! I’m sure you could build it without making it too permanent. Just put a backing on the board and batten part and don’t take out the baseboards.
Are the plants in the pots in the top artificial? Would real ones survive there; if not, did you consider making those openings larger for holding something else or would that make it too top heavy? is it affixed to the wall so it will not tip over?
Yes, they are artificial and actually I only had them there for the pictures. You could probably make the top cubbies bigger…I didn’t feel the need. And yes the entire unit is affixed to the wall.
nice project. Where did u get the corbels? There are so many types. I looked at Ekena millwork but I could not find what you used. Thanks
I actually found these at Home Depot, but it was about five years ago.
How did you do the front, so that you can’t see the ridged plywood ends? I can’t seem to figure that part out.
It’s called a breadboard ending, a common element in farmhouse tables. You take a piece of wood and turn it perpendicular to the planks. I did a very narrow piece, like 1×2 I believe.
Are you kidding? That bench would be awesome to even a carpenter. You should be so proud. I would be. Great great job. I love it.
Thanks Debbie! I am a little proud of it too 🙂
This is wonderful! You did a great job. You are an inspiration.
Thanks Lisa! So nice to hear.
That is gorgeous! And so useful! It’s my favorite DIY one I have ever seen. Way to go!
Thank you so much! 🙂
You did such an awesome job Heidi- it’s gorgeous!
Can you share the exact measurements. I am building a similar locker and my baskets are 13″ as well with three. This turned out great! Also do you had part two posted.
Thanks!
I love this! Looking to build something similar, so thank you! Can you tell me where you found those baskets?
They are actually from Walmart! The Better Homes and Gardens brand.
Can you share your dimensions?
Where did you buy the corbels?
From Home Depot.
A mudroom or entryway bench like this is so functional while being beautiful and helping in organization at the same time. Your’s looks amazing.
Can you provide your cuts?
What color white did you use for your bench and trim?
It’s just Behr Ultra White in Semi-gloss (although I would do Satin if I were to do it again.)
How does that hold up without a clearcoat? I was thinking about making this for my wife and need to know if i should plan on clearcoating after painting (I should mention i have 2 small daughters who are…….active)
I need to add an addendum to this post because my clear coat I chose has actually not held up well. I’m going to have to refinish this sometime and I will be choosing a polyurethane or polycrilic.
The bench is gorgeous! It’s so nice that it’s both functional and adds something nice to the space. I would like something similar in my own home, but I haven’t quite figured out just how I want it and if I have the space for it to look nice. Thank you for sharing your prosess, this helps for sure 🙂
Thank you! It’s so helpful.
Love what you did with this mud room bench! We have a tiny place in a townhouse where we can potentially do something like this. Will be our future project.
Great! It’s been so nice to have.
Hi there,
I am interested to hear how you attached the top of the bench to the frame? wood glue, attach from bottom/up/
I don’t remember exactly but yes, that would be a great way to do it!
Looks great. However I am a little confused about the lattice. Not sure what or where you used it. Can you explain please. Again thanks
It’s just a small trim that I put on the outside of the bench.
Can you provide the measurements? I am designing mine right now and it would be great to know how tall the bench is, the height of the coat hooks, height of the shelf on top etc.
Beautiful bench! I love it all. We would love the dimensions too. We have an odd space where our door opens into the spot we will be building. I just want to make sure something like this could fit. Thanks for sharing your instructions as well as part 2.
Awesome bench! I may have missed this detail but what was the finish dimensions on this piece?
Do you have directions doe this one? I love this as I need to make a custom sized bench for the space I have and this would look perfect! TIA
I’m sorry but are there instructions on this mudrrom bench. It’s a mystery that they wouldn’t be an obvious part of this page.
What kind of wood did you use for the shelves on top and bottom?
I used MDF.
Hi!
I LOVE what you did here with the mudroom bench and it is EXACTLY what I was looking to do in my entryway! Do you have the step by step instructions and list of materials/tools used that you would be able to share?
I would appreciate it!!
Thanks!
Jillian
I’m sorry I didn’t realize it wasn’t posting entirely, I fixed it now though! Go back and check and all the instructions should be there.
I love this! I want to make something similar in my front entry. I do not see the steps or supply list in Part 1. Is there anyway I can get them?
So sorry, I didn’t realize the post wasn’t posting the full thing, so I just fixed it. It should work now!
your mudroom bench, after all these years of me pinning it, was saved from my *woodn’t ya know it* board in the past 24 hrs 100 times …
it’s been well loved since day 1 of my pinning!
thought you’d like to know … ♥️♥️♥️
Hi there, I know this post is from some time ago, but I am wondering if you still have the directions for it posted?
Thanks so much!
L
I’m so sorry, I didn’t realize this post was cutting off like it was. I fixed the post and now you can read it in full.
Hi. I have checked your honeybearlane.com and i see you’ve got some duplicate content so probably it is the reason that you don’t rank
hi in google. But you can fix this issue fast.
There is a tool that rewrites content like human, just
search in google: miftolo’s tools
womens nike air huarache run sd port winenike air max 90 se baby atmosphere greyguns 1610169adidas neo dino crib shoe aa sportsnikes air monarch iv comes in a brand new weekend campout colourway
air jordan 4 wmns singles day [url=http://www.nextstage-edu.com/billig/air-jordan-4-wmns-singles-day]air jordan 4 wmns singles day[/url]
nike air force 1 basse femme pas chernike original 1987 cortez damesnike air max tavas herren sneaker grau wei 705149 021nike 2015 air max 90 frauen nike air bw okazja hitr
mens nike free 5 0 bright crimson [url=http://www.diamondsanddudas.com/goedkoop/mens-nike-free-5-0-bright-crimson]mens nike free 5 0 bright crimson[/url]
a buon mercato uomini scarpe da donna nike air max scarpe 95 nike air max 2017ship hop nike jordan heels goedkope nike heels elite godo olo schoen ladiesoutlet nike kyrie 4 white blackscarpe calcetto nike gialle
nike cortez nylon schwarzwei脽 952 40580 [url=http://www.moravekarsudhir.com/schlussverkauf/nike-cortez-nylon-schwarzwei%c3%9f-952-40580]nike cortez nylon schwarzwei脽 952 40580[/url]
Heidi,
This is fantastic. Fortunately I’m just stumbling across this as I plan to build out something similar.
My question is (and I apologized if I’ve missed this somewhere) how did you afix the bench top to the box? I see the bench top was pieced together with pocket screws, but I don’t see where you mentioned how you actually attached the pine top to the MDF box.
Thanks for sharing all your cool projects with us and for any direction you might be able to offer o my question.
Thanks! I just nailed it in with the Nail gun. Easy!
Would you be willing to share dimensions? Height width and depth? Its beautiful, thansk!
Thank you! I have been asked this question so many times, I’m going to make an official plan for it! Check back!
Have you had a chance to do this yet? This is what my wife is wanting and she keeps pestering me to get it done before our big remodel in February. 🙂
Looks great, I’m doing one for my mudroom right now but stuck on how to decide at what height to the hooks. Any tips on how to decide?
Hooks are best at about chin height I think, although you need to consider the height of a child, if that’s who will be using the hook.
Really turned out great.
I love this! Would you please share your dimensions? I have this same layout coming in from my garage and knowing your dimensions would help in planning my layout. Thank you.
Thank you very much dear teacher for this nice sharing.
Would you be able to provide the materials you used just for the bench and not the whole project?