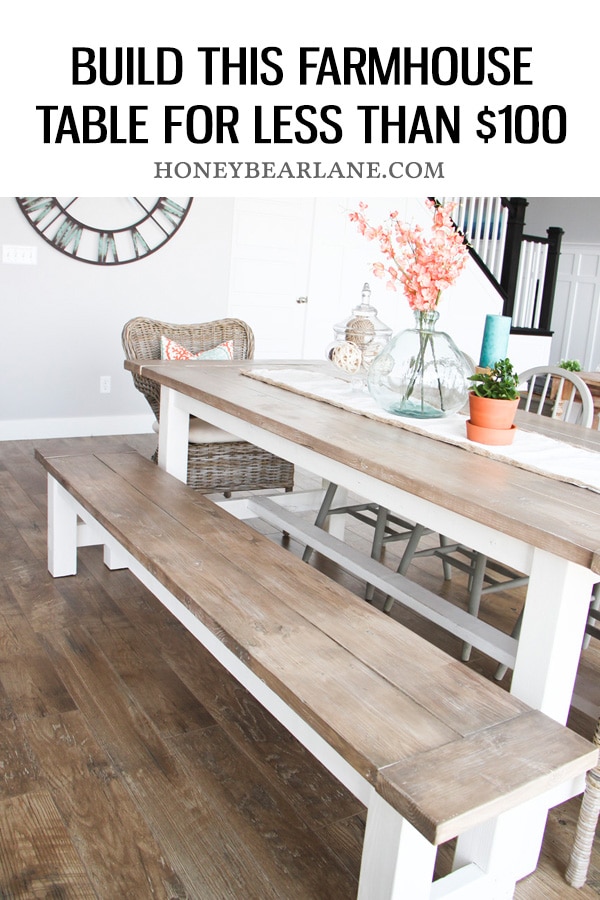
DIY Farmhouse Table and Bench
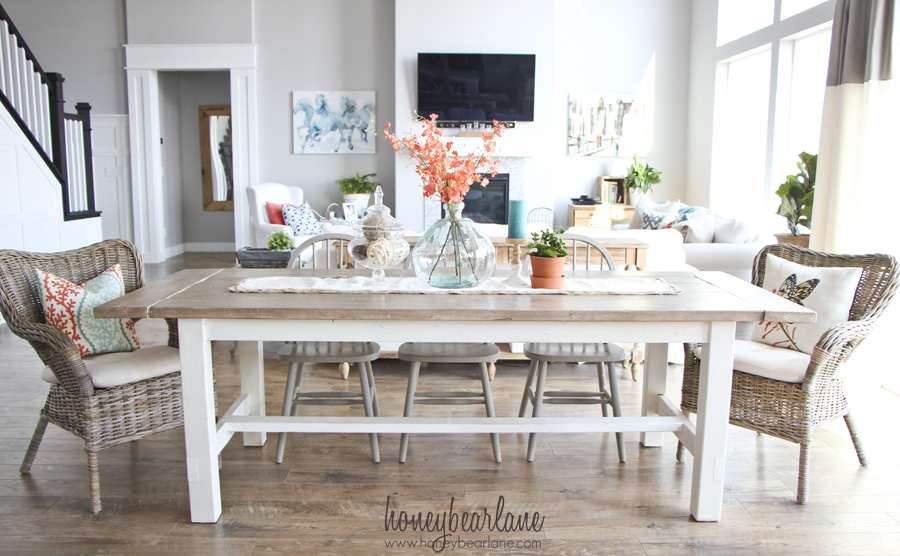
You want a farmhouse table. You want to save money. So the answer is obvious…build your own! You might think this is an impossible task, but guess what? I built this table. And I built the bench. And I was super proud of myself. What do you think? I love it! Here is how my DIY farmhouse table turned out:
Farmhouse Table and Bench Plans
Ever since I moved, I knew we needed a new dining room table–ours was too small for the space. So I searched for months for a dining table I liked but to no avail. When I focused on building a farmhouse table, I followed the Farmhouse Table Plans at Ana-White.com. This is where I found the best farmhouse table and bench plans; they were laid out so well and clear! It was pretty straight forward and easy to follow.
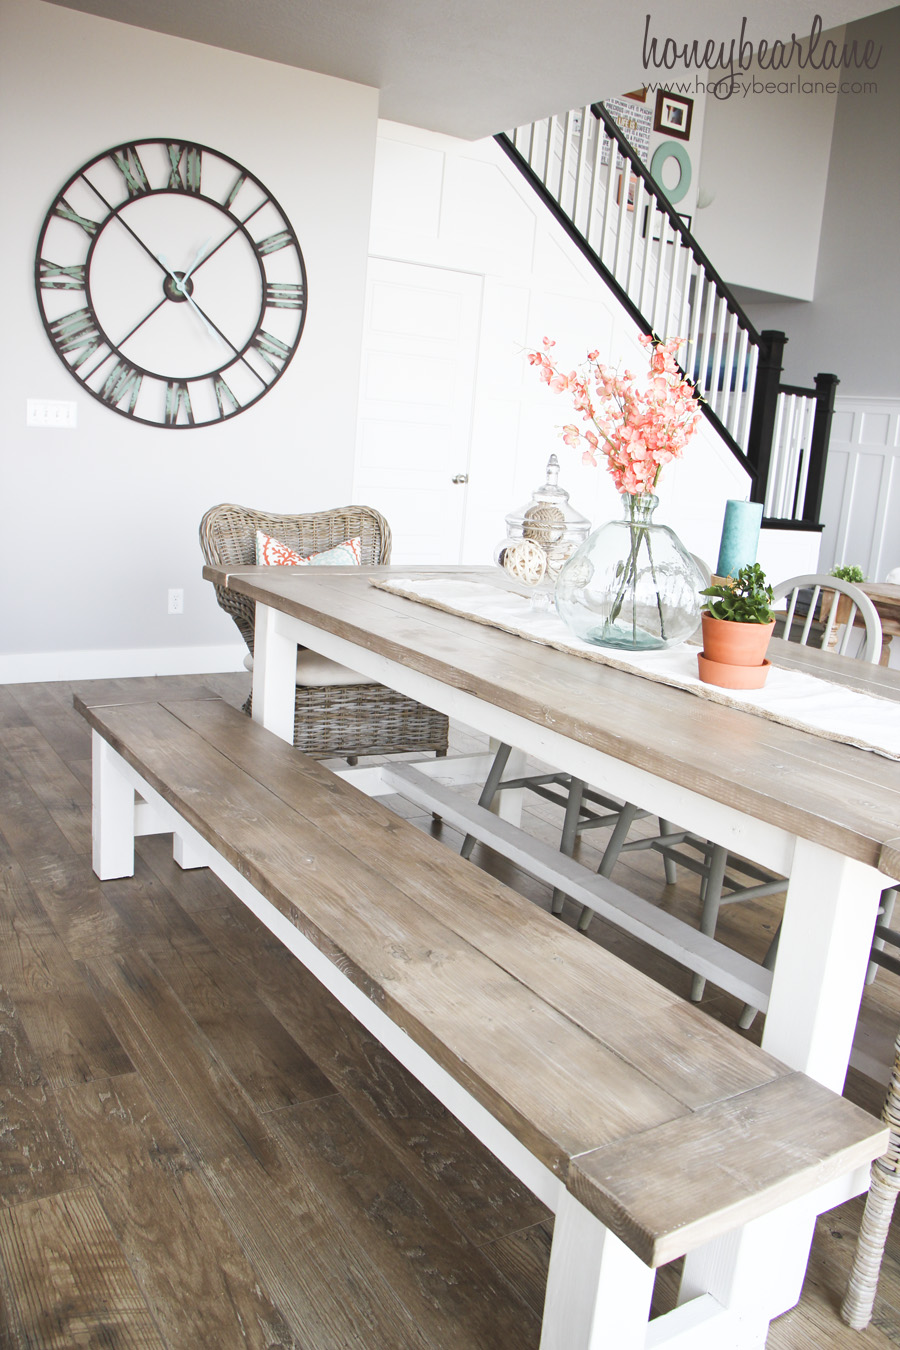
I also built a matching diy bench for the kitchen table and here’s the link to those plans. I altered my bench so it would only have two 2×8’s instead of 4 2×4’s. It seems to match the style better. The bench was a bit tricky because of the lack of space in between the legs to use the Kreg jig drive bit. I recommend you get the shorter Kreg Jig driving bit, it really comes in so handy in those tight spaces! (Affiliate link!)
Keep reading for all the juicy details on my diy farmhouse table!
Here’s some other farmhouse style projects I’ve done:
Supplies for Your DIY Farmhouse Table
Here’s a list of supplies and tools I used to make my table (some affiliate links, here is my disclosure):
- 5 2x6x8
- 1 2x8x8
- 2 4x4x8
- 5 2×4
- 2 1/2″ Pocket Screws
- 2 1/2″ Wood Screws
Helpful Tools
Assembling The Farm Table and Bench
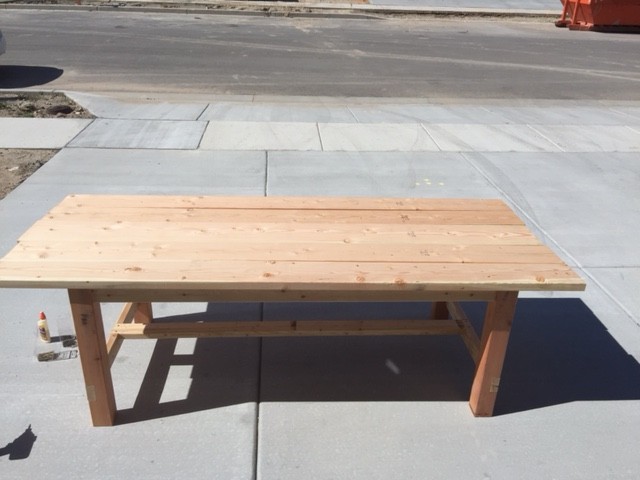
I just followed the instructions except for when I made the tabletop. I decided to keep it about a foot or two longer than called for, so my top is about 8 feet long. This is nice because it makes it easier to have people sit on the end and slide the chairs underneath. However, since the ends are breadboards (they are attached perpendicular to the other tabletop boards), they don’t have the greatest support. We ended up reinforcing the ends with some metal brackets. They have held well, although no one is jumping on the end of the table.
Before I brought the table inside, I finished the top and bottom and brought them inside separately. Then I assembled it inside upside-down. It’s a very heavy, solid piece so this really is a no-brainer.
Cutting Notches
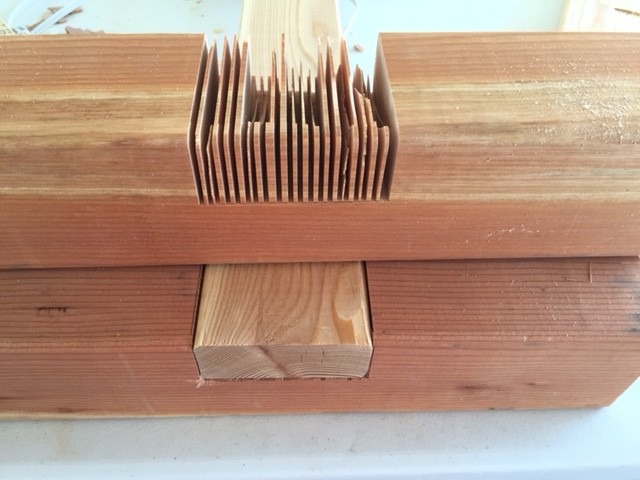
The most intimidating part for me was cutting the notches. But I practiced a few times on a scrap piece of wood and saw it wasn’t so hard. It was a little time consuming though. I was able to do it with my 10-inch sliding miter saw and a Dremel Multi-Max with a tiny saw attachment to smooth it out. A 12-inch saw would be easier, and I also think this could be done easily with a table saw if you have one. You could also use a circular saw. A chisel is also a great way to knock out the pieces of wood if you don’t have a Dremel.
I have had a million questions about the way I finished this table, which is my favorite. But I have decided to dedicate a single post to that.
Get My Weathered Wood Finishing Method
I LOOOOOOVE this finish. I have tried so many different ways of doing weathered wood style and this is my favorite. I made a critical error, however. I did not use a durable finish for the top. After only about a year, it was showing some horrible spots of wear and tear and the finish looked really uneven. I ended up having to completely re-do the finish and rather than sanding it all down and re-doing this stain (which in some ways I wish I had), I decided to use paint and achieve a weathered paint wood style. I actually do like it. Here’s a link to that post!
Painted Weathered Wood Table Finish
Because I painted it, I was able to put caulk in all the cracks which made it so much easier to clean. I was getting all kinds of crud down in between the cracks. If I were to ever build another table (which knowing me, I will), I’m going to run my planks through the table saw to get a nice, crisp edge. The pre-fab wood edge is nice and beveled but it makes for the obvious cracks. I have 5 kids and lots of crumb-makers. Anyway, since I caulked the cracks and painted over it, no more cracks. It also hid some imperfections.
Sealing the Farmhouse Table and Bench
Remember how the the first time I made the critical error in sealing? I did not make that a second time when I did the painted weathered wood finish. I used polyurethane and let it dry at least 12 hours in between each coat. It was a long ordeal because I seriously did like five coats. I’m happy to report it has held up better than the first coat but it’s not totally impervious. Let’s just say it’s a good thing it’s weathered looking because it hides all the wear and tear much better.
So what should I do? How should I seal it? Honestly, I’m not sure at this point. But here’s what I will be doing someday: I’m going to go into Sherwin-Williams and ask them for some type of industrial-grade sealer. If you don’t ever want to re-do your table, you need to get the hardest sealer you can.
Would I Build my Farm Table and Bench Again?
Abso-freakin-lutely. Hands down this is one of the best projects I ever made. It really elevated my confidence as a wood-worker and taught me some valuable new skills. Of course the best part is having a gorgeous and super durable farmhouse table and bench to eat on, play on, gather around, etc. The dinner table and bench is an essential piece of furniture to have and you can save yourself so much money by building it yourself!
____________________________________________________________________________
Pin this to save for later!
Building a Farmhouse Table
I really love the farmhouse style and building farmhouse style furniture is pretty addicting! I actually would love to try to build some different tables and maybe I will sell this one eventually and build another one. That’s the beauty of building your own furniture, especially out of pine! You save tons of money and when you get sick of it you can actually sell it for a profit. Awesome!
It looks like you did a much better job than I did! Bravo!
If you’re curious about what mine looks like:
http://theunfocusedlife.blogspot.com/2014/01/diy-farmhouse-table-finale.html
http://theunfocusedlife.blogspot.com/2014/05/diy-farmhouse-bench.html
Yours look amazing! Great job!
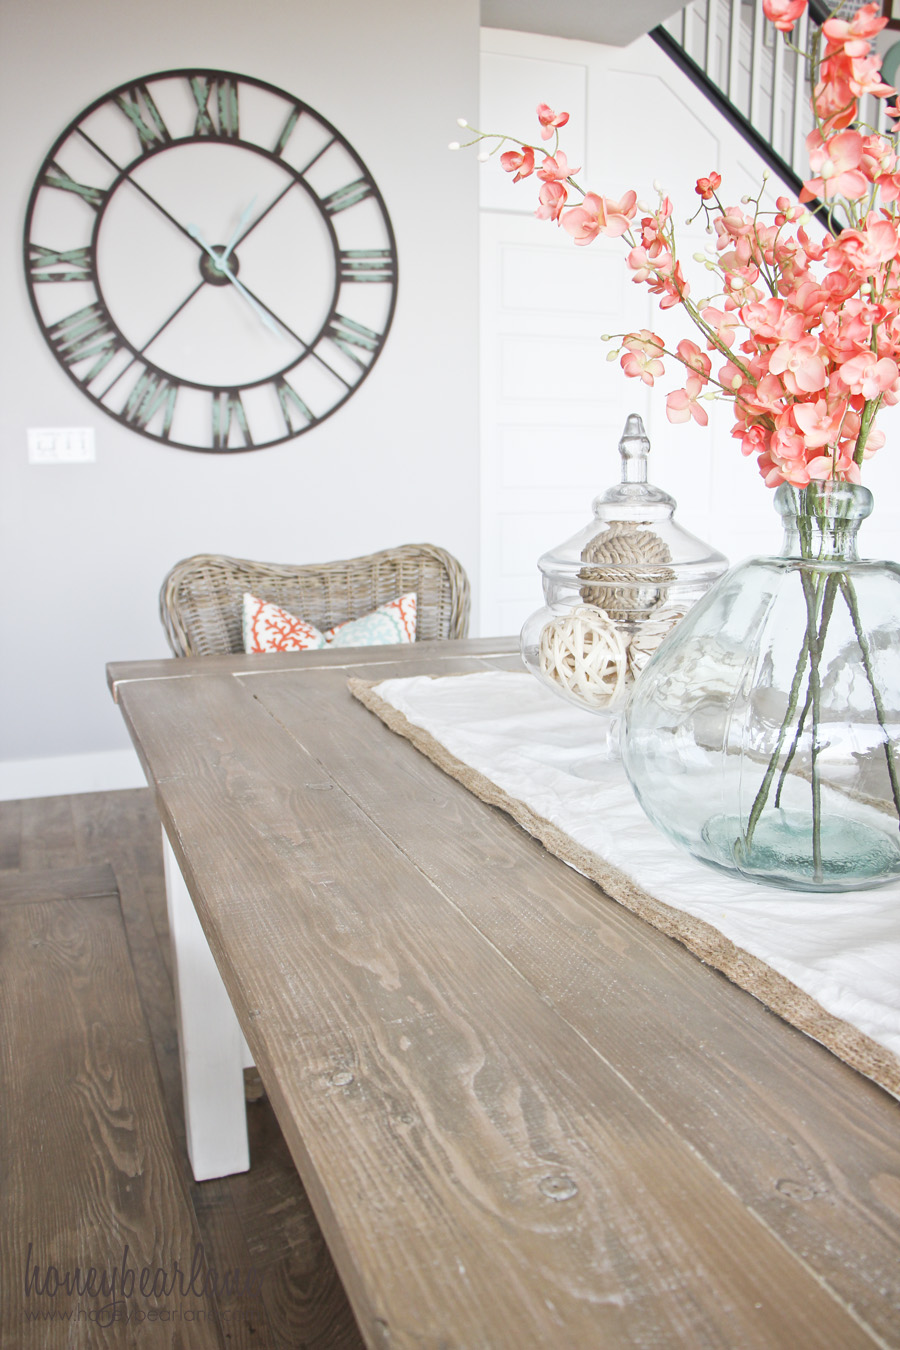
In love with the clock on your wall,where did you purchase that clock?
Thanks! It’s from World Market.
hi, I was wondering if you painted or spray painted the legs of the table and benches? thank you !!
No, they are hand painted with DecoArt Chalky Finish white paint.
You have done an excellent job and you should be so proud! It’s beautiful! Would you mind sharing the price breakdown?
Thanks! I am pretty proud of it 🙂 The price breakdown…I don’t remember the exact cost of each individual plank of wood. 2x4s are cheap though and I got everything for less than $75. The paint was sent to me since I blog for DecoArt but it’s normally about $10 a jar for the Chalky Finish, and $10 a quart for the stain and $10 a jar for the soft touch varnish. That’s one of my favorite things about the table–it was so inexpensive to make and it looks like $2000!
What wood species did you use. The regular Home Depot lumber would twist and warp within a few days
I just used the pine white wood from Home Depot. I had to dig around and find the most straight ones I could. They shouldn’t twist and warp after you purchase it unless it’s exposed to water or extreme temperatures.
What is the stain you used for the top of the table/bench
You can click the link at the end of the post to see the tutorial for the way I finished it.
Hi heidi we are actually making this table today and can’t get on your site anymore we did every thing but the top can you tell me or email me what you did for your stain? I would greatly appreciate it!
Does that $75 include the bench as well?
No, I don’t think so.
What paint specifically did you use for the tabletop? I love that weathered color.
I have a tutorial specifically about how to achieve the weathered wood affect. I used a whitewash and Minwax Dark Walnut.
Hi! I LOVE this table and have gotten all the wood to start today! So I’m guessing you didn’t fill in the gaps between the boards? Is the gap large because of the rounded edges? I’m debating if I should attempt planing it? Do the gaps create any issues for you guys?
Thanks so much!!
Amy
I know this reply is late coming and maybe you have already built your table. I’m curious whether you planed it or not. If I had a table saw, I would maybe have considered planing it. You just have to make up for the width. However having the gaps isn’t really that big of a deal so far.
Bravo! You are truly a talented person and an inspiration to us all. Your homes is beautiful and even more special with all of those hand-crafted items. I enjoy your blogs. Bravo! Maria, Playa del Carmen, MX
Your table is beautiful! I’m so jealous of your home….it is so pretty! I wish I could decorate a room half as good as you! I saw a few of your posts and I have been noticing your floors. I have no idea if you did your floors or if they were like that when you moved in, but if you know, could you tell me what kind of flooring that is? It is gorgeous!
Wow–thank you! My floors are actually a high quality laminate! It is so nice because I rarely have to worry about scratching it and this particular style hides SO much dirt haha! It’s Mannington Historic Oak in Ash.
do you know the brand and store you got them from? They are very pretty.
Chairs? The gray ones are super old, came with our original dining set we got from something like ShopKo as newlyweds. I repainted them several times. The end chairs are from IKEA.
Can u tell me your wall colour? I love it!
Thanks! It’s Sherwin Williams Passive Gray.
Wow! I absolutely love your home! Do you mind if I ask what’s the name of the color of your walls and where did you purchase your bar stools or what are they called? Thank you so much!
Thank you! My walls are Sherwin Williams Passive Gray and the bar stools are from World Market.
your table is amazing. I love the giant wall clock too! Where is that from?
Thanks! The clock is from World Market.
I absolutely LOVE your table. Exactly what I want my husband to build, I am hoping to help.
Where did you get the 3 chairs and the 2 wing back wicker chairs? Thanks!
Thank you! My chairs are just basic Windsor chairs that I got with an old table set years ago. But you can find these chairs everywhere, even at thrift stores probably. I painted them gray with Annie Sloan Chalk Paint (French Linen.) The wicker chairs are from IKEA.
hello beautiful work . where are your wicker chairs from .. someone built the table for me and i wanted the same ones
What is the paint brand and color you used on your walls? I love it! Ditto on your flooring. So pretty! We are re-doing our floors and walls and I want this same look but haven’t found the right flooring or wall color yet. Is your flooring engineered hardwood, solid hardwood, or laminate? Thank you 🙂
Oops I just saw that you already answered both of my questions in previous comments! So ignore my questions 🙂
But don’t ignore the comment that your home is beautiful! I am totally copying you! We already have a similar table and wall clock. Now for the floors and paint! 🙂
Thank you and good luck!
Any chance you could give the board sizes and types of wood for your table?
It was just the basic whitewood (common boards) that you can find at Home Depot or Lowes. I think it’s pine. And I used 2x6s and 2x8s and 2x4s. But you can read all the directions on Ana White’s site.
do you have a link to Ana whites plans for this exact table? I’m having a hard time following along with your directions 🙁 but I love the way it came out!
Her plans are linked within the post. Thanks!
First of all I just want to tell you how amazing your talent is, not only did you create a wonderful masterpiece but to break down each step and detail of your project!! That’s a lot of work….
Because of this I got the inspiration to redo my table with a chalk paint/ stain identical to yours!
Normally I don’t comment but I had to say THANK YOU!! It is exactly what I was looking for and I am glad people like you take the time to share.
Thank you so much!! It really was a labor of love and since I do love it so much I just had to share!
Question! I totally love the table and may try to build it. Another question. I also LOVE the color of your hardwood floors. Can you tell me the maker and color of the flooring? We are remodeling due to a flood on Christmas Day and need to start reconstruction immediately. My old floors were dark wood and they showed so much dirt. I imagine these do not. Can you confirm? Thank you!!
I love the look of dark wood floors as well but my laminate floors I have now are SO great at hiding dust and dirt. I still clean them every day but I can get away with not mopping more than once a month or more. I wrote a whole post about them here: http://www.honeybearlane.com/2015/10/why-i-chose-laminate-flooring.html Good luck!
Where did you get that clock??
It’s from World Market.
Is there instructions or a link for the bench?
You can find the bench instructions on ana-white.com also.
My husband and I are planning on making our own dining table. This is just the finish we have been looking for! I can’t wait to do it!
Good luck!
Beautiful table! I love the wall colour too, what colour is it ? (it allows the table to stand out beautifully!)
Thanks! The walls are SW Passive Gray.
Looks really good, Heidi! I’ve seen that gray/whitewashed style at west elm and wondered how they did it. I need to give this a try!
Thanks Jared!
Has anyone built this and run into a problem with seats at the end, not pushing in enough to actually eat at the table? I’m using this plan to build my own table to seat 10 in a couple of weeks and was curious if someone had any ideas on how to solve that problem? Thanks, love the plan!
My table is extended enough to push chairs in underneath the table. I left my length-wise planks on the table top longer and added the breadboards at the end. The problem is that the breadboards don’t have any support under them. Mine have held with pocket screws and glue so far but a friend of mine built this table and they added little braces on each side to solve this problem.
I adore your table! You did such a great job! Ana White’s plans are so perfect for us DIYers. I want a farm house table, but I have the opposite problem: not enough space! So it’s on my list of “someday” projects when we get a real house again!
You could probably make a smaller version of the table if you wanted to! And then you could sell it later if it’s not the right size for your new house. I LOVED making mine and can’t wait until it warms up so I can start building again!
Hi! This may be a dumb question so I apologize upfront, but if I wanted to make a little square version of his…what dimensions would I do? It is for a breakfast area not the “formal” bigger dining area. Can you give me some advise. Side note: I am new to DIY and just starting to do my house farmhouse and need all the help and advice I can get. 🙂
Thanks so much!!
Heather
Hmm, a square version? That could be cute! All you need to do is measure the length you need for the space and I would probably keep the width the same. Good luck!
Love everything about this picture! Where did you get that gorgeous glass vase from? The one on the table. Thanks so much 🙂
That’s from World Market. Thanks!
Hello! Came in via Pinterest.
I was wondering what you used to stop your mitre saw from cutting too deeply? Some kind of stop block on the arm?
I’ve been eyeing this plan for a while.
I want to make a kitchen island on casters, out of 2×2 oak tobacco stakes. They’re gorgeous, but I don’t have enough for error.
I, too, dislike the circular saw. One pinch of the blade and it kicks backwards. Frankly, I just don’t like saws because I don’t like loud noises. Difficult when you’re (re)building your house! LOL!
Thanks for the info.
Christine
Hi Christine! I actually didn’t use anything but a little practice and trial and error to get the depth right for cutting. I marked where it needed to be cut and just tried to cut to that line. Also I tried to make sure my saw blade was going down right in the center of the blade so the back or front didn’t cut deeper than the other side (which is where another wood block behind it comes in handy.) Maybe that’s what you meant. If you have a table saw, I actually think that would be a good way to do it. I didn’t have one when I built this table but I do now and I’m curious to try it, especially with my Dado blade set. Good luck!
I love the table and bench. They’re gorgeous. What wood species did you use for the wood seating?
Thanks! I actually just used the pine white wood from Home Depot!
Hello…. Beautiful table. My husband and I are going to attempt this. What new method did you use to paint the top of the table if you don’t mind me asking?
I wrote about the entire process of how I finished the top in the body of the post. Good luck!
Where did you but that clock at? Love it!
Thanks! It’s from World Market.
I like the simplicity of the look. But what I really like are the clear instructions and helpful links. These plus the pictures will make it easier for me to construct my own!
Hi Heidi
I am just finishing a farmhouse table following your finishing advice. I am so in love with it!!!!! It looks beautiful. With four kids I am concerned about how the varnish holds up. It doesn’t seem very hard. I was curious if you could let me know how your finish has held up since you completed your table?
Thanks!
It’s a softer finish so it’s not as hard as doing a polyurethane. Looking back, I would consider doing a poly as long as it doesn’t change the color. The soft touch varnish is nice but sometimes when I have had to scrub something off the table, it removed a little of the finish. I have the finish on hand so I can touch it up but poly is probably the safest bet with kids.
I love this and I have a family of 7 would be purfect! I was looking for the direction to make this but didn’t see them. Did I miss it or could you post instructions on how to build?
Thank you
They are from Ana-White.com but it is linked within the post.
This table is sooooo gorgeous as well as the entire room. Do you happen to remember where the stems are from in your centerpiece vase?? Thanks soooo much.
Thanks! They are just from Hobby Lobby!
Hi Heidi, maybe I missed where you talked about the base/table…is it just the chalky white finish applied straight to the pine? Then you sanded spots to age the legs/frame a little?
Thanks. Looks awesome.
You got it!
I’ve been looking for a DIY farmhouse table tutorial for months and I just found it. I love this table and I’m gonna give it a try. I was wondering what is the brand of the chalky paint you used and where did you get it? If you have the link to it I would really appreciate it. It also seems like you sanded the paint on the legs a little bit, I was wondering if you did it before or after applying the varnish? Thank you so much for the awesome tutorial!!
I used DecoArt Chalky Finish paint in Everlasting. I actually recommend you use a polyurethane on the top though…I’ve had some issues with the soft touch varnish I used. I did sand and distress before varnishing.
Hey there! First I wanted to say your table and bench turned out amazing! I’m about to make my own and I have a quick question! There are so many comments so I wasn’t able to find my answer. Did you make your bench the same length as your table?
Thank you for your time!
-Morgan
It’s nearly the same length. I wanted to be able to fit as many people as possible on it!
hello what an amazing job.. where did u get those wicker chairs from.. i had someone build this table now i want those same wicker chairs
IKEA!
LOL, I had someone build it for me too!! Great tip about the wicker chairs…once i don’t have messy little hands working food into my chairs i’d like to get some. For now we went with Galvanized metal Tolix chairs.
Did you pre-stain your wood with conditioner? If so did you use water-based or oil-based conditioner?
I don’t think I did this time because I was white washing it first.
This is beautiful! My husband and I are going to attempt to make this, but we are new to the furniture-making process. Hopefully it will turn out alright! Do you mind telling me how long this took you to make? It might be in the post, but I just missed it. Thanks!
Hi! It took me a weekend to build the table, and another day or so to paint/stain it.
You are amazing..I keep saying I want to do this….to learn how..to borrow or purchase the tools..then I chicken out..You have renewed my passion. Thank you for your bravery!!
Hi Heidi,
I wanted to say THANK YOU!! I am in the middle of refinishing my dining room table and the finish on it was a disaster…. Long story short, I came across your post and tried the stain over white wash method and it turned out beautiful! I’m grateful not to have to sand everything back down and start all over again. 🙂
Anyway, thank you for sharing how to achieve this look!
Rachel
I do have a question – I noticed in one of your comments you mentioned having trouble with the soft touch varnish. I am currently debating oil-based polyurethane or water based polycrylic… I know oil will make it more durable for a dining table, but do you think the color of this finish will be ruined by the amber colored polyurethane?
It can be risky. I would use a scrap piece of wood (the same wood you use for the table top) and test it out with the stain and everything. Replicate exactly what you are planning on doing and see if you like the final result. I will definitely be trying polyurethane next time.
Great! Thanks!
Looks fabulous! I am getting inspiration for tackling my own table! Thanks! http://www.lovesthefind.com/
I followed your plan and the table turned out great! My wife is very happy. What I did for the cracks that worked extremely well is I used plastic wood. It’s a soft pliable material that you use like epoxy but when it hardens it feels and looks like wood. It can also take a stain and be painted. So I was able to fill the cracks, sand it, then stain and polyurethane it. It’s smooth and is sealed from top to bottom.
Interesting! Glad it worked out great.
From the Ana plans it looks like they used 2x8s and a 2×10 for the table top planks, from your wood list did you instead do 2×6’s and a 2×8 for your table top? if so what’s your width dimension?
Can you tell me the brand and color name of the stain for this table??
It says in the post, Minwax Dark Walnut over a white wash.
Hello! SO IN LOVE! So can you tell me the process of how you did the top, with the stain and white washing? I want mine to look EXACTLY like this. 🙂 Thanks!
Thanks! I actually detailed the entire process in the post.
Hi Heidi,
I am so excited to start making this table just like yours. ^_^ It’s beautiful.
I’ve got the measurements and plans for the table but i couldn’t find the bench that you made in the picture.
is that on Ana white’s site too? I couldn’t find it. Please if you can help me with a link? Thank you!
Ops. nevermind. Just found the link. Sorry about that and thank you!
I think it’s on her site too but if you search pinterest for Farmhouse bench, you will find it.
I love this! I work full time, am a full time student and a mom! Would never have my own time to do This! Do you take orders!?! 😉
I don’t take orders, sorry. Best of luck!
Wow you have inspired me!!!! Can I ask how long it took you from start to finish? I have 3 little kids and not sure if I can find the time to do this project. Thanks!
It was a day or two of building and then another day or two of painting. It’s not too bad if you break it up. The notches take the longest.
Hi Heidi,
Before you painted or stained, did you sand the whole table down too? This is probably a basic question, but we are fairly new to building and just wanted to make sure we did it correctly. If you did sand everything down prior to the paint/stain phase, what kind of sandpaper or sander did you use?
Thanks!
I’m sure I did, I always sand things pretty well. I use an orbital sander or a mouse sander with a 150 grit and then a 220 grit for a smoother finish.
I had my husband build this table. We love it already! Thanks so much for posting! We love your decor on the table. Where did you get the table runner, etc displayed on your table? Thanks!
Thanks! I get most of my runners from places like Home Goods but I have a burlap one from Walmart (BHG brand) that I love. The glass vase is from World Market and flowers are from Hobby Lobby.
What colour did u paint your chairs?
It’s Annie Sloan Chalk Paint, French linen
What color is that stain?
Can you tell me the dimensions you cut your tabletop and bench top pieces since they differ from the plans? love the look of yours. How did you end up supporting your breadboard ends?
Just curious if you have any current pictures with how the table has held up since you built it? My husband is mostly curious about the sealer that you used. I would like to use the one that you used but he is not convinced that it will hold up to two very rowdy toddlers. Also how often do you use the table?
I use it everyday and the sealer hasn’t held up very well. I recommend a hard sealer like a polyurethane, but test it first to see how it looks over the stained wood.
Love the table! Where did you get the glass vase and flowers/
Vase is from World Market and flowers are from Hobby Lobby
Hi! We are in the process of building this table. We just loved it so much! One question we had though, what is the width of your table?
I think it’s about 37 or 38 inches.
I absolutely love it! I would pay you a lot more to make me one!!
Thank you!
Hello! Your table and Benches look beautiful. I’m trying to find the plans for the bench, but I am not able to find them on her website. Is there anyway you could send me a link to the benches? Thanks so much!
Both links are within the post.
Hi Heidi! I’m so excited to start on this table! Did you use pine for the whole thing?
Thanks,
Denna
Yes except for the legs which I think are Douglas Fir. However if I were to make another table I would consider making the top out of a harder wood like Oak, if you can afford it.
Hi, I love your farmhouse table, but I’m trying to read the full post and I don’t know why I can’t. I only see the pictures but not the post. Please can you help me?
The post is in a slideshow style so each slide has its own text with it explaining the photo. Make sure you scroll down past the photo to see the text. If you still can’t see it, maybe try viewing it in another browser. I’ve used Safari and Chrome and have seen the text in both. Sorry about that!
Wow, the ads on your page are out of control and I can hardly even see the post.. Not to mention that I can’t figure out how to view the full post.
Sorry about that, still tinkering with the new slideshow feature! Hopefully you can read it now!
Beautiful table! My husband and I just built Ana’s Rekourt table and I love it! I stained the top with Minwax Jacobean, but my husband thought it was too dark, so I mixed ASCP Old White with water and made a wash. I just brushed it on and wiped it off. It looks fantastic! It really looks like weathered wood.
Awesome! Send me a picture if you get a chance, I’d love to see it!
Can you share a photo of the Jacobean stain with the wash you did over it?
I’m not sure what you are referring to, I didn’t use Jacobean. I used Dark Walnut over a white wash. There is a link to the method within the post.
You nailed that stain..I built a similar table and have been rather bored with it..lol.so I did white chalk paint over the dark walnut and then dark Walnut again..just on the bench tops and table top… .gave it a much better look..thanks
B.
This has too much stuff on the page for me to even get to the plans or the pictures. Is there another link that shows just the plans and the photos without all the ads for ikea etc? My webpage won’t load with all the other stuff on there. Thanks!
What color stain and what color chalky finish did you use?
Nevermind! Found it in comments!
Hi. I love your wall color but what kind of sheen did you get it in? Flat, eggshell or satin?? Thanks
I think it’s satin. Possibly semi-gloss but I think it’s satin.
Never once have I been able to find wood that’s straight enough for these projects. None of the main hardware stores stock timber that can be used for these projects. Where do people source their wood, it’s definitely not Lowes or Home Depot.
I actually got all my wood at Home Depot. But I agree it can be very hard to find good quality wood among the common boards.
I had table made they painted it white but I want it to be more weathered or whitewash look any suggestions since it’s alread painted
You could sand it down until there is only a thin layer of paint, then apply a dark stain.
Would like to read your blog, but the ads are ridiculous. Annoying when I’m trying to read.
Heidi,
What a great job!!! You should be very proud of yourself. I love it when someone gets an idea and steps outside the box I live by the motto, I’d rather try and fail, than never to have tried. Kudo’s for a job well done. I’ll be waiting for more of your creative projects.
Thank you!
LOVE this! Would you consider making me one if I paid you? haha but seriously?!
Oh you can totally do it! 🙂
Table looks phenomenal! Did you use a grout or caulk in the grooves? Thanks for the help!
No, please do not use grout or caulk in the grooves (unless you plan on painting it.) They will not accept stain at all. You could use wood filler but even that doesn’t take stain that well. If you don’t want any grooves, I recommend cutting off the rounded edges in the beginning with a table saw or planing tool.
Just wanted to clarify your alteration in the bench seats. 4 2x4s would be approximately 16 inches wide. 2 2x6s would be approximately 12 inches wide, not giving it enough width to cover the base of Ana White’s bench plans. We made this mistake after reading your plans and had to add a 2×4 in the center of the 2x6s to make the right width.
Oh wow, I am so sorry! I did not realize I had that mistake in there! It was supposed to be 2x8s. Thanks for bringing this to my attention and again I’m sorry 🙁
These designs are perfect! I’ve been looking for a nice 8 foot dining table and everything is so expensive, so my husband and I are going to follow these plans to build our own. One question, did you extend the length of the bench seat planks as well? We are going to make the table lengthwise planks longer like you did to have more room on the ends, but I wasn’t sure if the bench should be longer as well..
Thanks!
Yes, I extended the length of the bench. Just add length to the top boards and the side apron boards.
A friend of mine built a similar table with the end boards crossways like your breadboards. His table eventually fell apart when the long boards expanded in length. I’m wondering why yours didn’t. Thanks for your reply
It’s hard to say exactly…it might not have been reinforced enough or maybe he didn’t use wood glue or maybe the screws weren’t long enough. I reinforced my breadboard ends with long metal braces since they didn’t have support underneath. Wood does expand and contract but it seems unlikely that that would cause an entire table to fall apart if it was built to last initially.
Hi. I love this table. Does it seat 10 people comfortably, do you think? Thanks.
It seats 9 comfortably…with 4 people on the bench. You could definitely squeeze in a 10th although I’m not sure how comfortable it would be…
How long did it take you to make this table?
Just a weekend!
Oh my goodness, hats off to you girl this is beautiful! I really need to get over my fear of power tools.
My husband built a similar table for our family two years ago. I’ve never found chairs for the end that I loved UNTIL I saw your picture today! Our table has a slightly different design so I’m curious if the IKEA chairs would work on our ends? The website gives dimensions but I’m most curious – what is the height of the arms on the chairs? The closest IKEA is 3.5 hours away so I can’t just swing in and measure! 🙂
I love your table and would love to build one like it, but I’m a bit concerned because pine is rather soft, and I have little kids. How has your table held up? Is there anything you would change about the way you built or finished it? Thanks!
Yes, it’s definitely soft and gets some dings in it. That’s the biggest reason I created a weathered wood look to it, so the dings would just fit right in. However you can build using a harder wood like maple or oak but just be warned that they are much more expensive!
Omg, love the DIY!! Thank you so much for the step-by-steo. It was really helpful and looks super easy to make. I’m definitely going to try it!!
I can’t seem to open or find the instructions to make this beautiful table. Please advise! Thanks!
When I click on this pin on pintrest it sends me to the comments and I can’t see the original post
You can make it yourself, just loook and learn from WoodPrix .
Hi! I LOVE your table and bench!! I’m not that crafty, so I’m having someone else build these for me! 😉He’s using white pine wood. What stain color did you use for the table top?
The custom stain method is described within the post. Thanks!
Do you know finished dimensions of table and bench?
Great work! Looks fantastic.
Looks amazing. What are the dimensions of the table when finished?
It’s about 38″ by 8 feet (tabletop.)
Can i please have the plans for this emailed to me in PDF format? I have tried downlaoding them, but keep getting an error.
You have to go to an external link which is on Ana-White.com. I don’t own these plans!
That is a fantastic table! I would love to build my own. How long did the whole process take you?
Thanks! I did the table in a weekend. The bench took another afternoon. And then painting and staining took a little more time but that’s because you have to wait for each coat to dry.
I love this! I’m so excited to try it! One question though, why did you use 2×8 and 2×6’s instead of the original plans of 2×8’s and 2×10 for the table top?
My dad just built me this table for my birthday and I used your white wash/stain technique and oh.my.gosh!!! I love it. It is so beautiful!!!
What a nice dad! Glad you love it!
Where did you get the table runner on the table?I am having the hardest time finding one I like and love the one you used
I get my table runners at Home Goods and Walmart.
Hey Heidi,
I want to build this table and I’ve purchased the materials on your list instead of the ones on the Ana white plans (ie I have 2X6s and 2X8, not 2×8 and 2x10s) I hate to bother you with questions, but I was wondering if you altered the width of the base since the width of the table top using the 2X6s is smaller than the one in the Ana white plans? I’ve read and re-read your post and all the comments to see if you already answered this but all I can see is that the width of your table top is about 38 inches? I’m just not sure how it’s that wife if you’re only using 5 2X6s so I’m kind of confused. Can you help me please? 🙂
How much did the supplies cost for this project excluding the tools?
I don’t remember the exact cost but it wasn’t that much, maybe under $100.
With havin so much content and articles do you ever
run into any problems of plagorism or copyright infringement?
My website has a lot of exclusive content I’ve either written myself or
outsourced but it appears a lot of it is popping it up all over the internet without my permission. Do you know any methods to help stop content from being stolen? I’d definitely
appreciate it.
Hi everyone, іt’s my first go to see at this webѕіte,
and post is truly fruitful in favor of me, ҝeep up posting these types ᧐f
articles or reviews.
Exceptional post however , I was wanting to know
if you could write a litte more on this topic?
I’d be very grateful if you could elaborate a little bit
more. Thanks!
I feel that is one of the such a lot significant information for me.
And i am glad reading your article. But want to
observation on few basic issues, The website style is perfect, the articles is in point of fact
nice : D. Good process, cheers
Hi there!! I am super new in building things on my own, but I started to do some small stuff and I enjoyed so much doing so!
I LOVE your table, but I was wondering what kind of wood do you recommend me buying, and also where to find it.
Thanks a lot for sharing!!
Hi, I do think this is an excellent blog. I stumbledupon it
😉 I’m going to revisit once again since i have book-marked it.
Money and freedom is the best way to change, may you be rich and continue to guide other people.
شركة كشف تسربات المياه بالاحساء
Добрый день !
Вы хотите качественный интернет проект который будет приносить вам прибыль на пассиве? – тогда вы по адресу DeNIKE разработчик предлагает грамотные решения по разработке интернет проектов для вашего бизнеса
[b]Я могу вам предложить:[/b]
– Разработка ботов
– Разработка сайтов
– Разработка скриптов
– Разработка инвестиционных платформ
продвижение и разработка сайта
Did you make the runner?
You’re house is so beautiful! I love this table, so unique! What would you say the estimated cost is to build this table? Including all power tools needed, lumber, paint/stains, etc.
This is an amazing table and bench. I may have found my next project. I am going to show it to my wife and see what she thinks.
Do you have diy farmhouse table and bench plan?
Love your table. I did one like this that’s similar. Do you remember where you got your vase for the centerpiece?
That vase is one of my favorite decor items I’ve ever bought. I got it from World Market!
Love it! I’m gonna have my husband make this! What type of wood did you use?
Hi Heidi! Any chance this can also be made into a small/medium round table instead of rectangular? This is what I have been wanting for my tiny dining room and purchasing is just so expensive! I’ve also really been wanting to get my creative juices flowing by attempting something myself!
Yes, I’m sure you could. Just shorten the base by quite a lot and then use a template and a circular saw to cut a round top. Good luck!
Hello Heidi,
I’m so eager to begin making this table much the same as yours. It’s delightful.
I have the estimations and plans for the table yet I was unable to discover the seat that you made in the image.
is that on Ana white’s site as well? I was unable to discover it. Kindly can you assist me with a connection? Much obliged to you!
LOVE this table so much! I am dying to recreate it for our home here in Dorchester County. After we do some kitchen cabinet painting this is going to be next on my to-do list. Thank you so much for sharing!!!
Pretty amazing this farmhouse table! I am keen to build one for our home here in Georgia County. I would love to share my DIY Farmhouse Table Project one its completed. Thank a lot for sharing!!!
Hi Heidi, I love your table. I am curious about the breadboards and how they are attached. I currently have a farmhouse table my dad built for me in 2014. At the time we built it for the starter house we were buying however our family has grown and we want to make the table bigger. My dad passed away a couple of years ago and I don’t have the heart to change it or get a new one but have toyed with the idea of adding breadboards to the end. My husband doesn’t know how it could work and I wondered if you had insight on brackets that could be used to help attach it!
Thank you!