My Gorgeous DIY Office Built ins Reveal
After what feels like years, my office built ins are finally finished. And it was worth all the hard work and effort, because I am in love with how they turned out. I’m dying to share it with you, and you’ve probably already seen them because of my last post/instagram, but just for the sake of this post, I’m going to go through the before/after progression. This project was a long time coming and was a lot of effort, so buckle up for a lengthy post!
This post contains affiliate links, please read more on my affiliate disclosure.
Before:
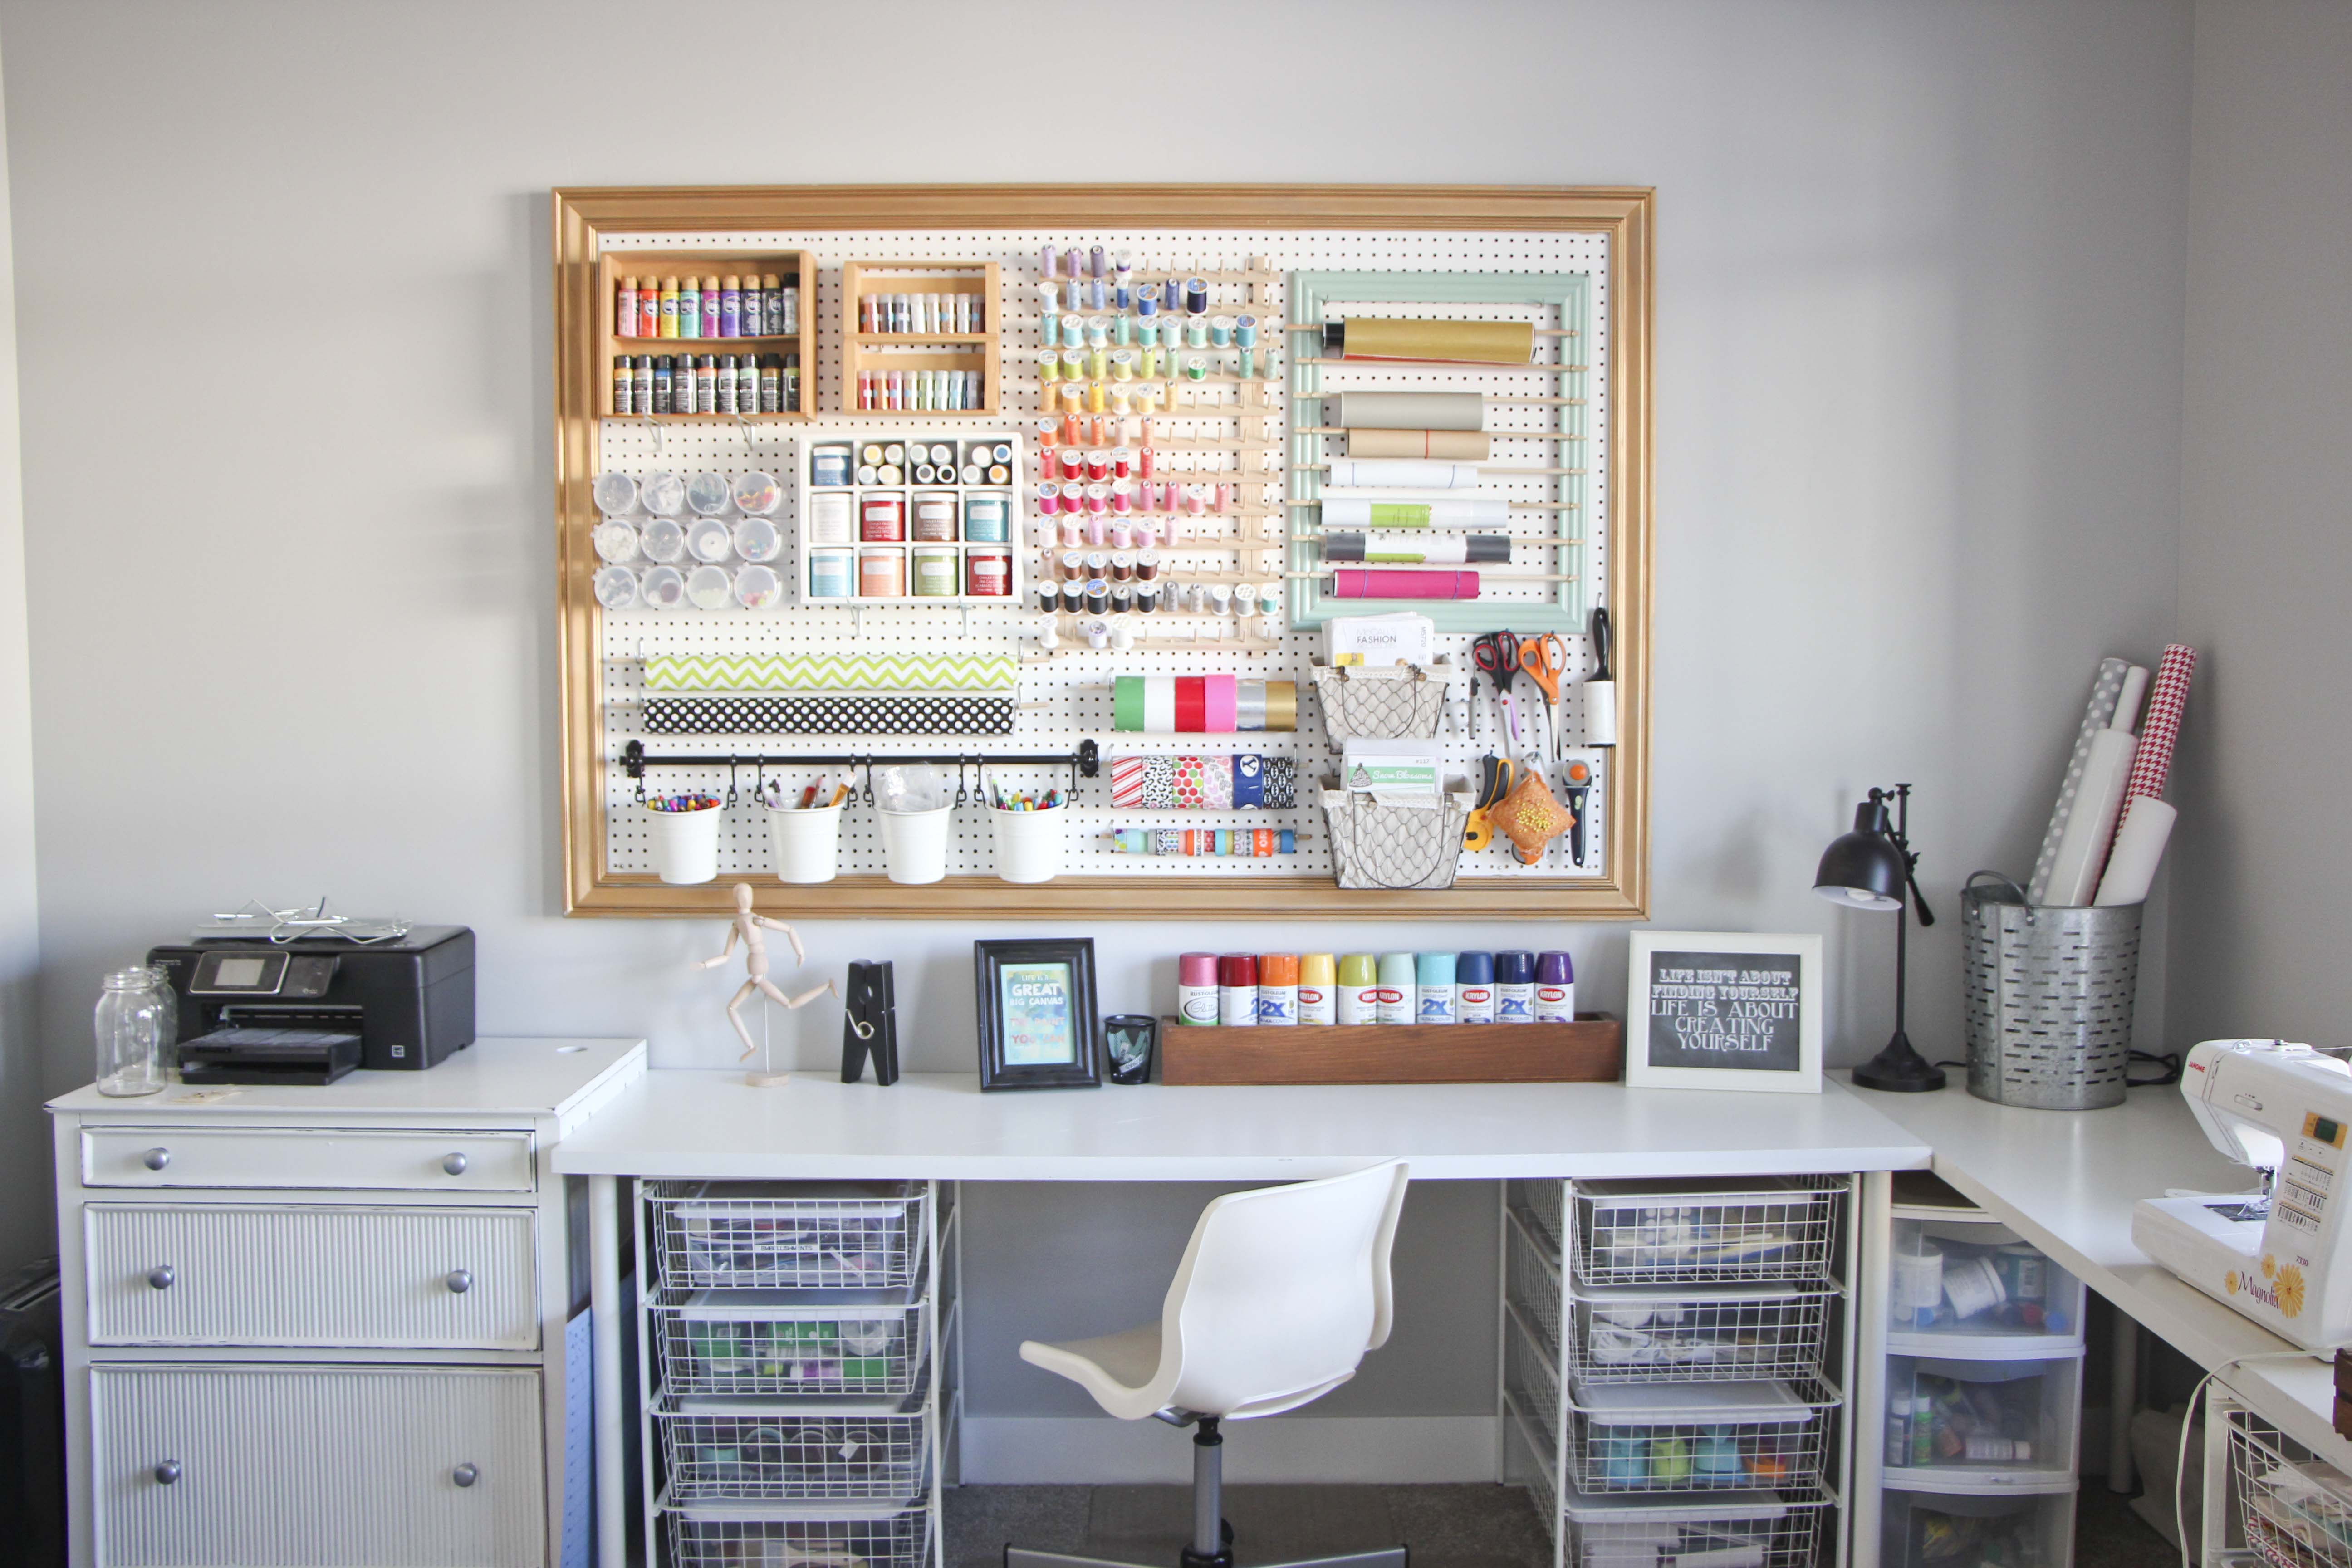
This was the craft room set up for the first two years. Then I made it look slightly better…
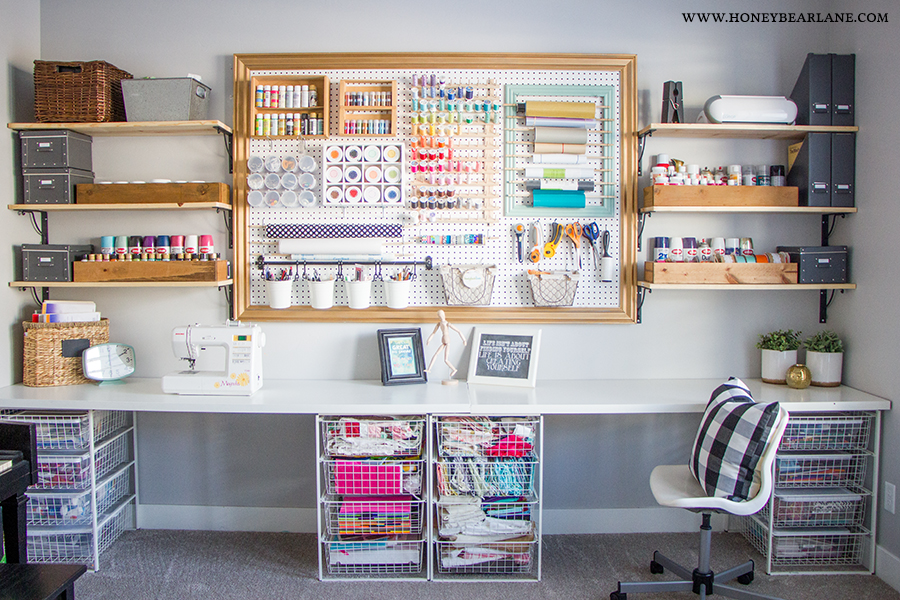
It was okay. I loved having my giant pegboard, and it was actually such a great space for a craft room. But it is literally the first room you see when you walk in my house and I just didn’t want people to see the mess and clutter, which it was more times than not.
A few years ago, when I was pregnant with my fifth baby, I decided to pass the days by starting on the project of my front room. I had always had plans to do office built ins for this room. I made a plan, that looked like this:
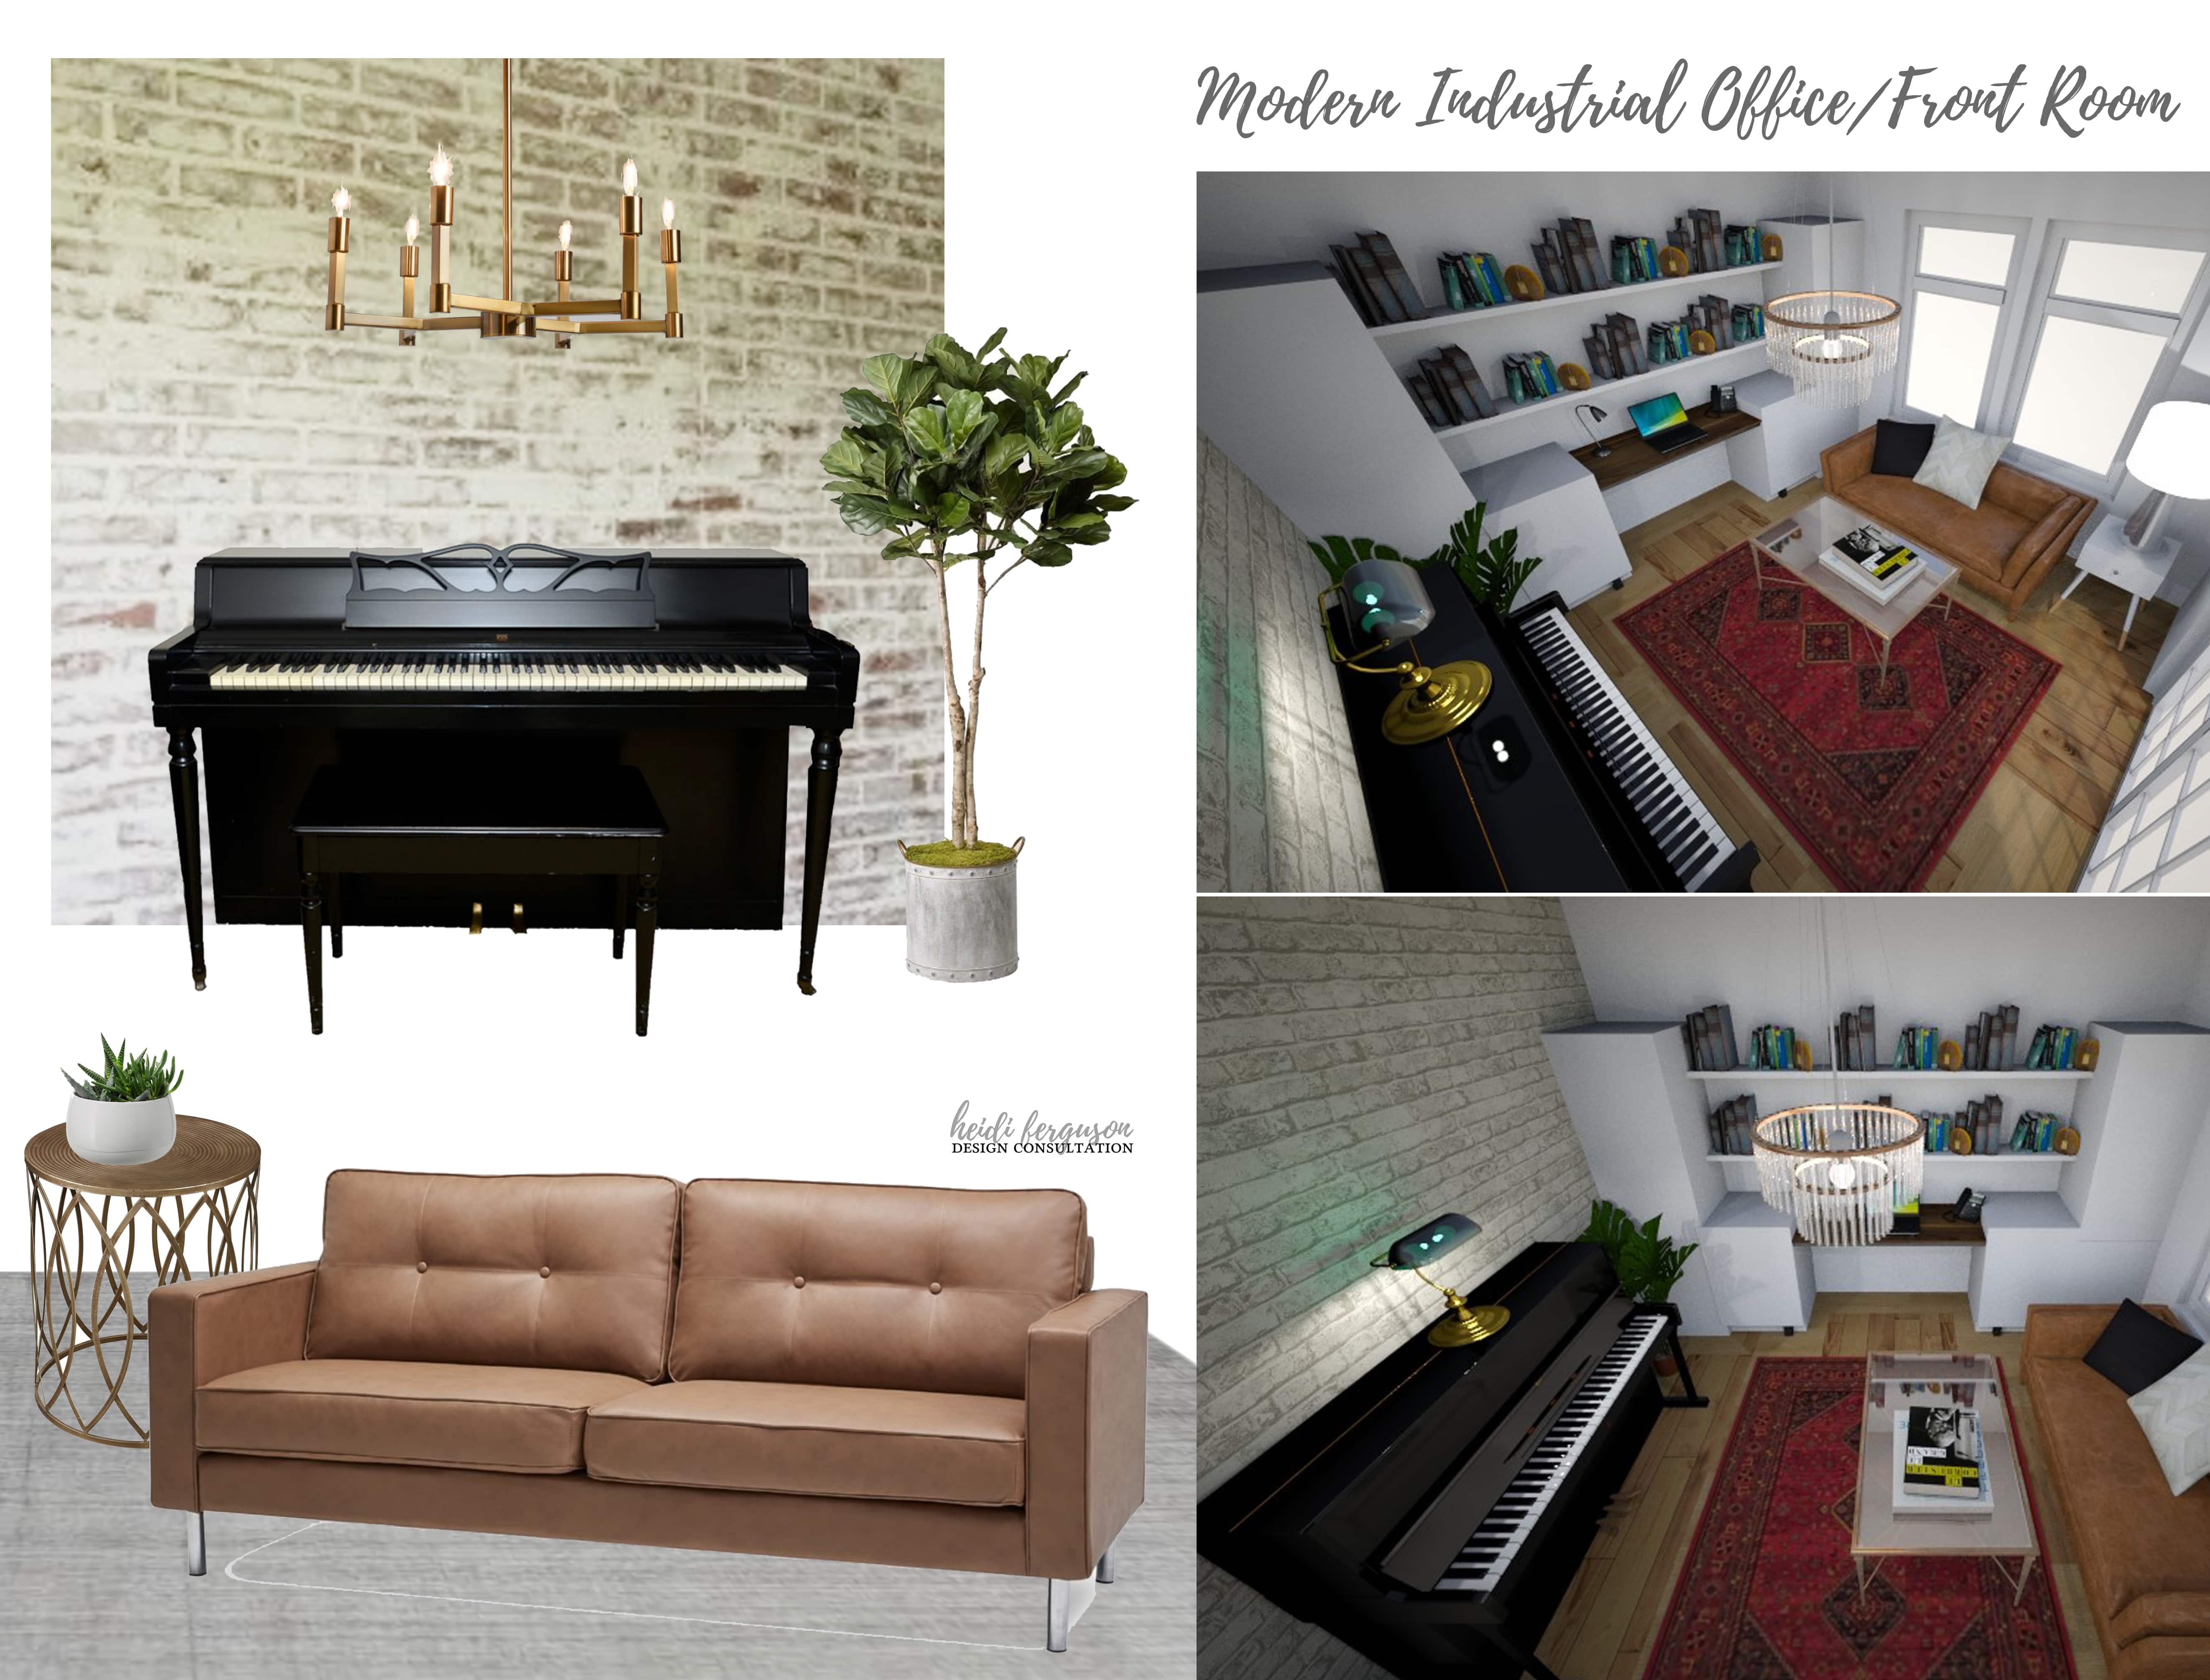
Yikes…looking at that plan again, it’s kinda ugly. Most mockup programs don’t really have the capability of doing good office built ins so there is my best attempt. I ended up bagging the brick wall, partially due to just wanting to be done, and partially because it didn’t quite feel right anymore. But who knows, maybe in the future I’ll add it in.
Getting Started on the Office Built ins
To get started, I moved everything out and put it in storage. Then I pulled out the carpet. And installed the laminate that matches the rest of my house (Mannington Historic Oak, Ash). It was a labor of love and a real learning experience. I did an okay job. And it wasn’t very enjoyable…so many hours on my hands and knees while being several months pregnant.
It sat empty with the hard flooring for another two years. I just didn’t have the time or energy with having a new baby and four other kids. But this last fall I finally made time for this project. It was so fun to get back into wood working, but this project was CURSED!! It felt like everything just kept going wrong. I made little allowances of error which ended up causing a giant headache later. I can’t even remember all the things that went wrong. And now that it’s all done, I’ve put that out of my mind. I just love how it turned out and I’m not going to agonize over the imperfections.
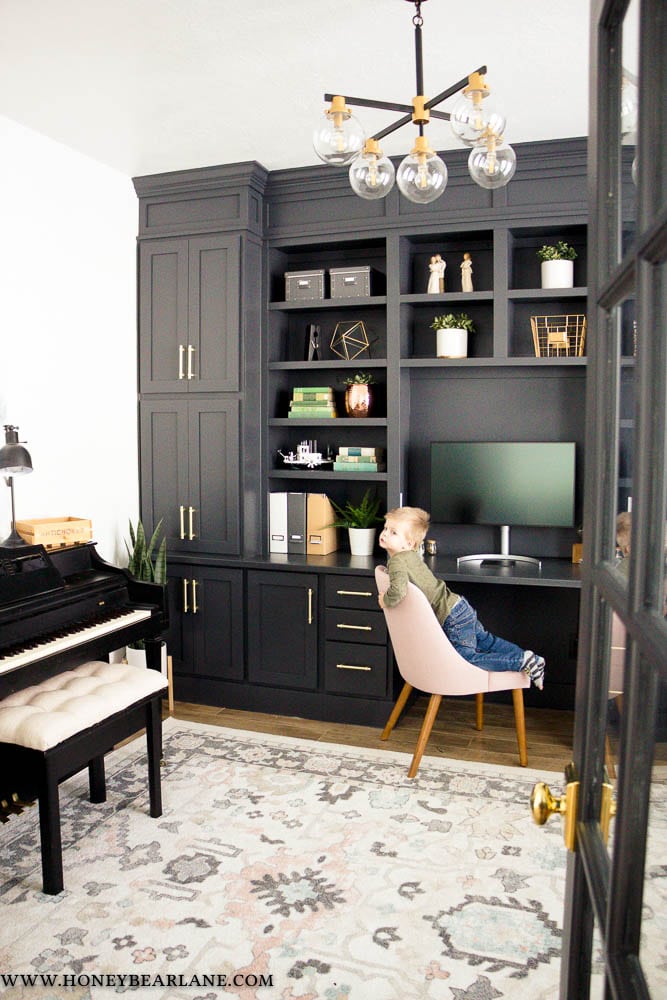
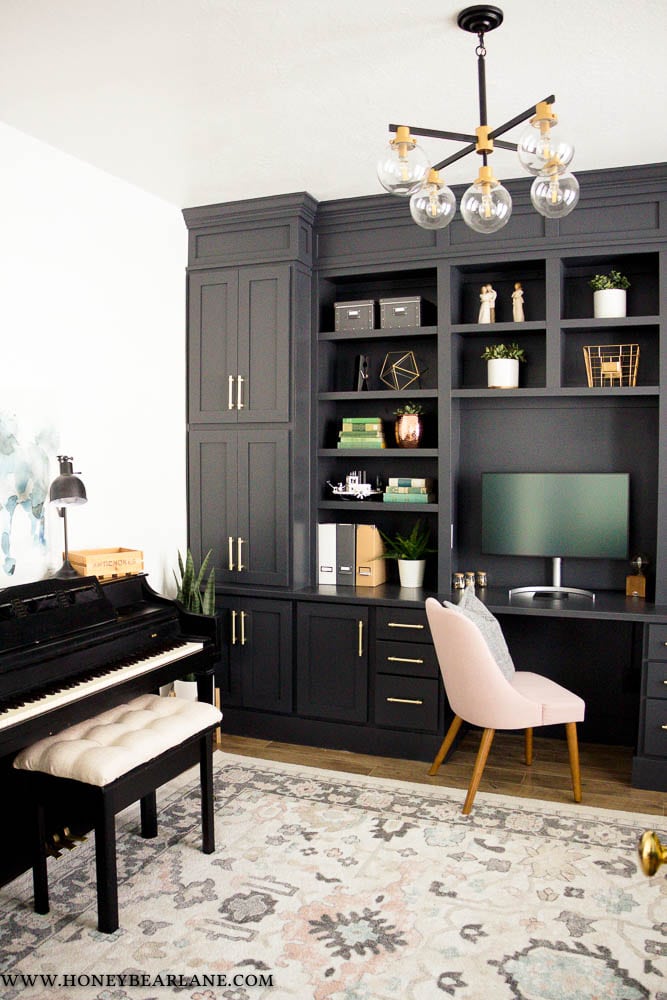
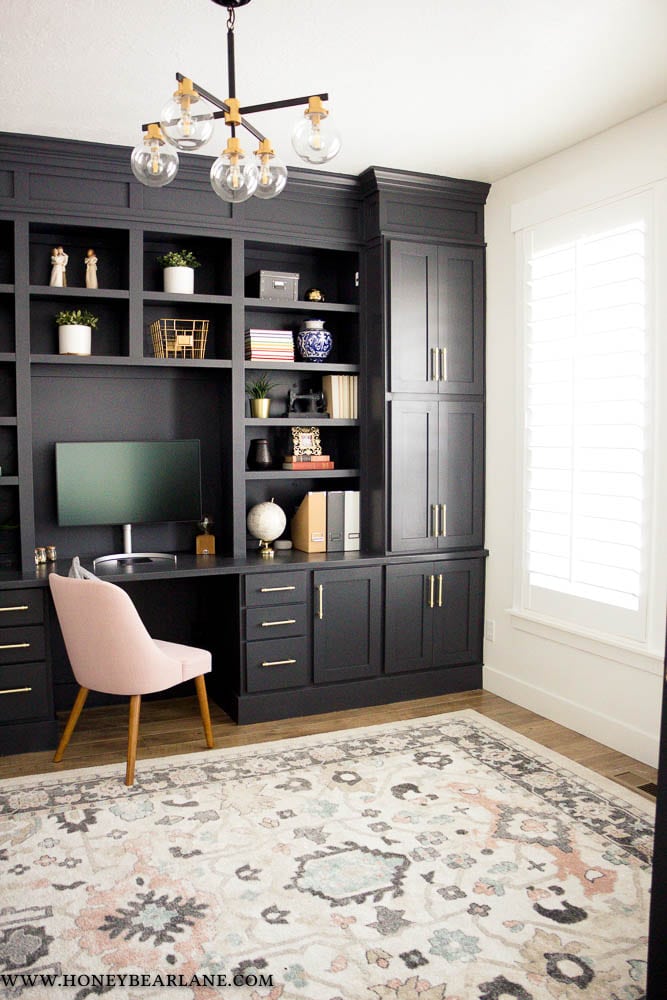
After:
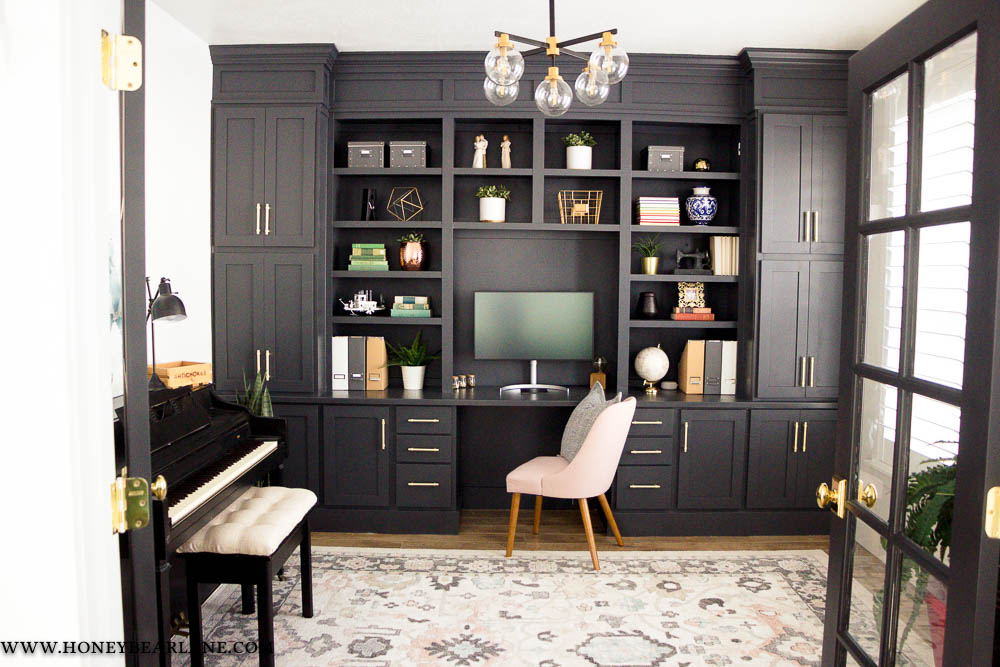
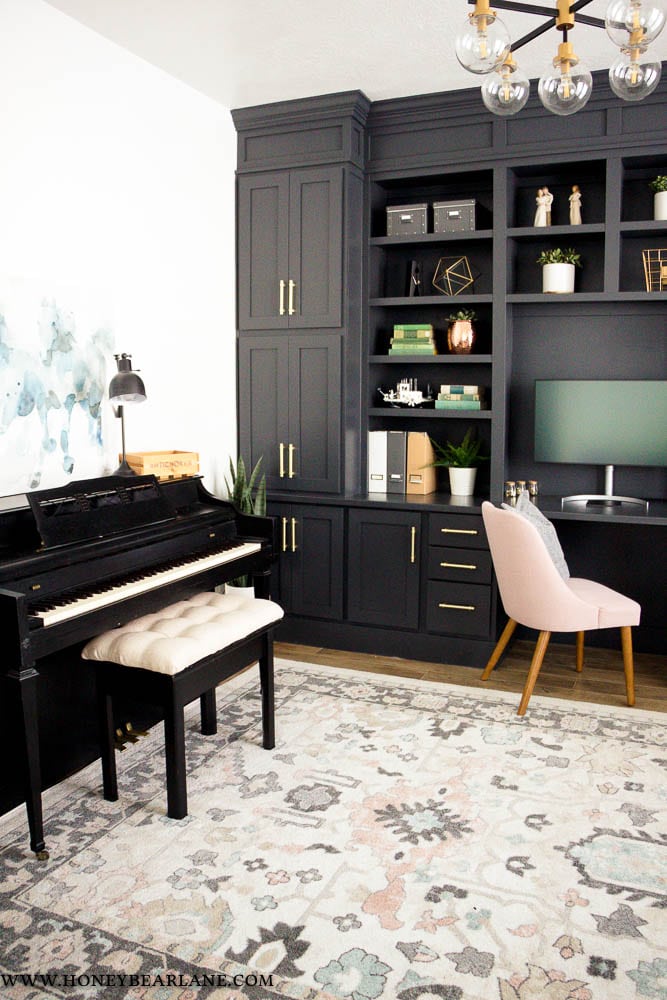
Tada! Unreal. It doesn’t look like the same room at all!
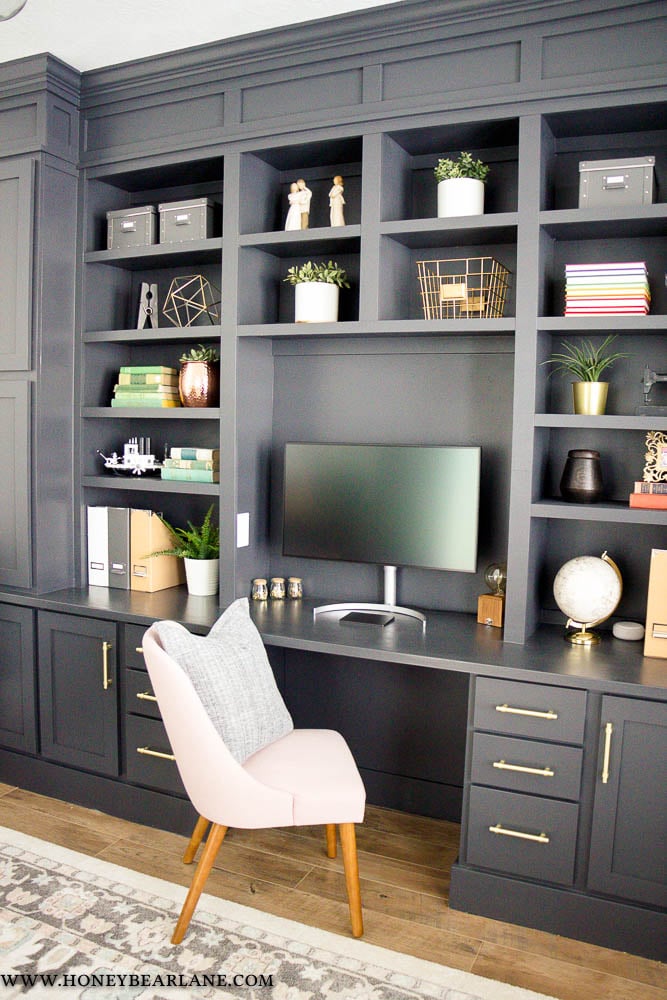
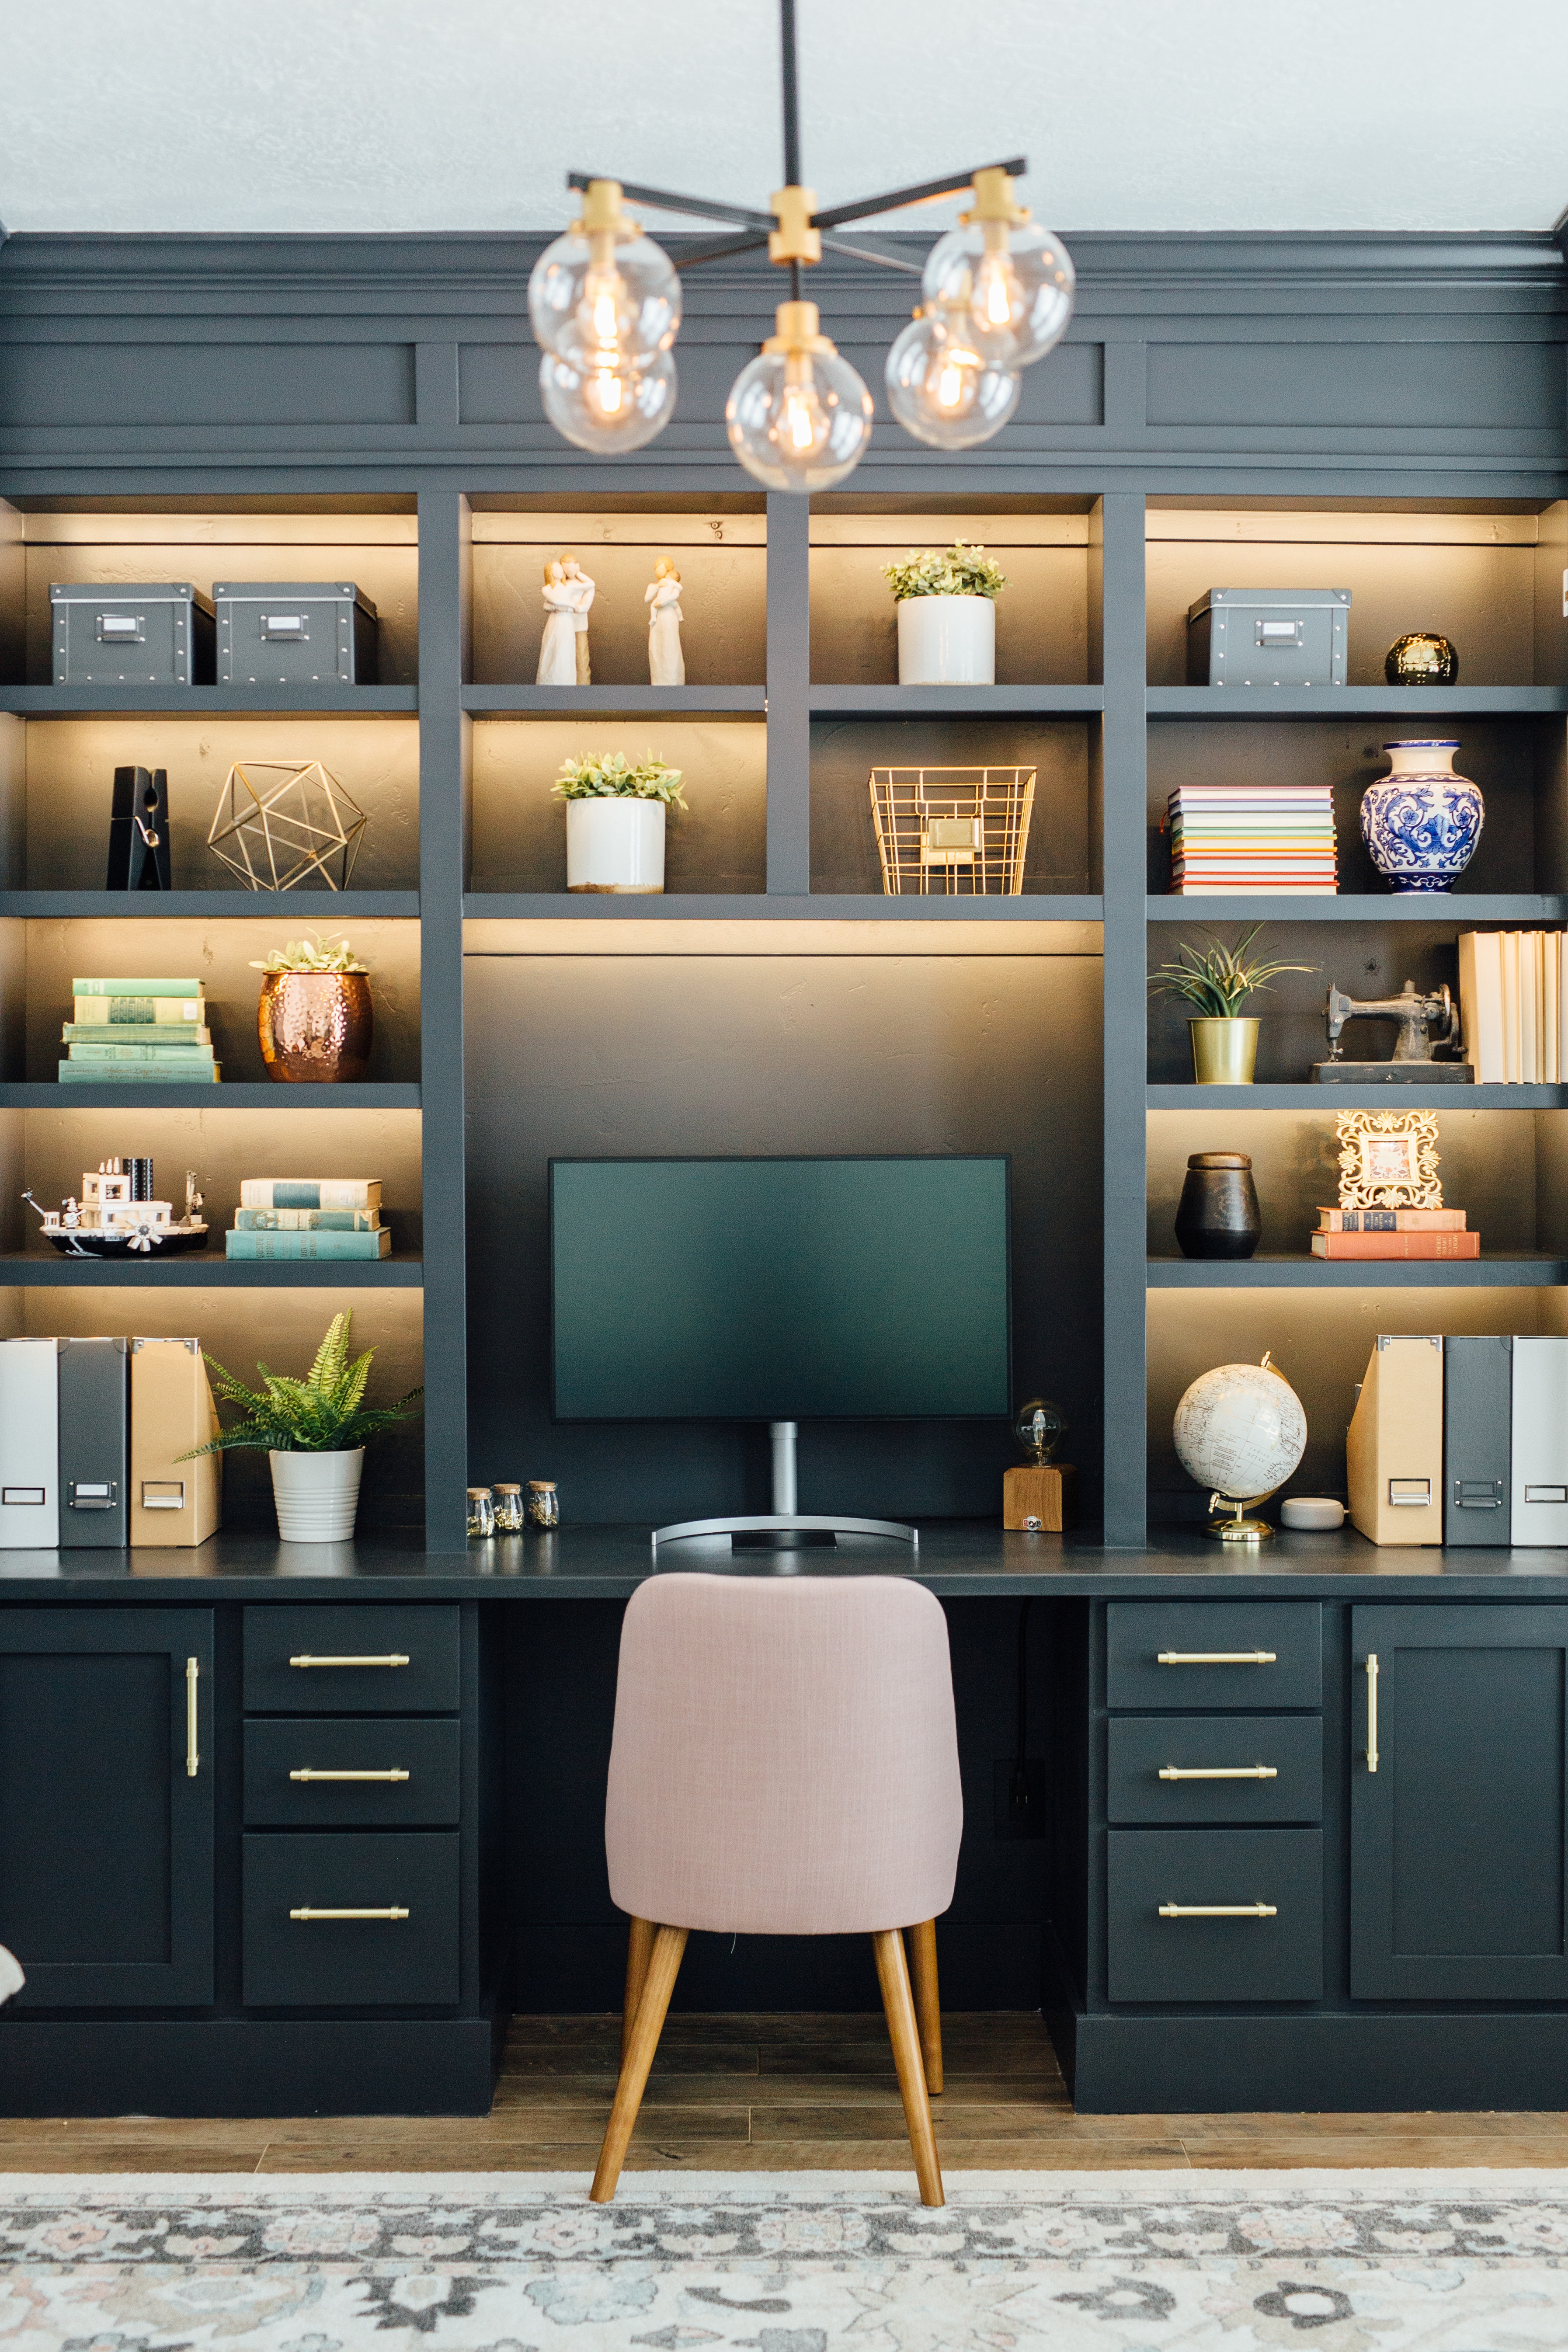
I initially was planning on doing the office built ins white, like everything else in my house. But black, being so trendy these days, was really appealing to me. My husband always liked the idea of a dark office space, although I’m sure he was visualizing some dark wood tone. He’s pretty traditional in his style, but when I do things, he usually starts to like it. After agonizing over the paint color for a couple of weeks, I chose Benjamin Moore Cheating Heart. I didn’t want something too blue and I was nervous about going too dark, since it’s a north-facing room. This color was the answer to those concerns. I love it!
All the little finishing touches really brought this room together! Here are the sources (affiliate links):
Room Source List
- Cabinet Color: Benjamin Moore Cheating Heart
- Cabinet Pulls: Cosmas 161 Brushed Brass Euro Style Cabinet Pulls
- Office Chair: Target
- Light: Overstock
- Rug: Joss and Main
I haven’t found the right furniture for this room yet, and to be honest, I kind of ran out of funds for this room anyway. Hopefully I can get some soon. It is so fun to have this room be functional!
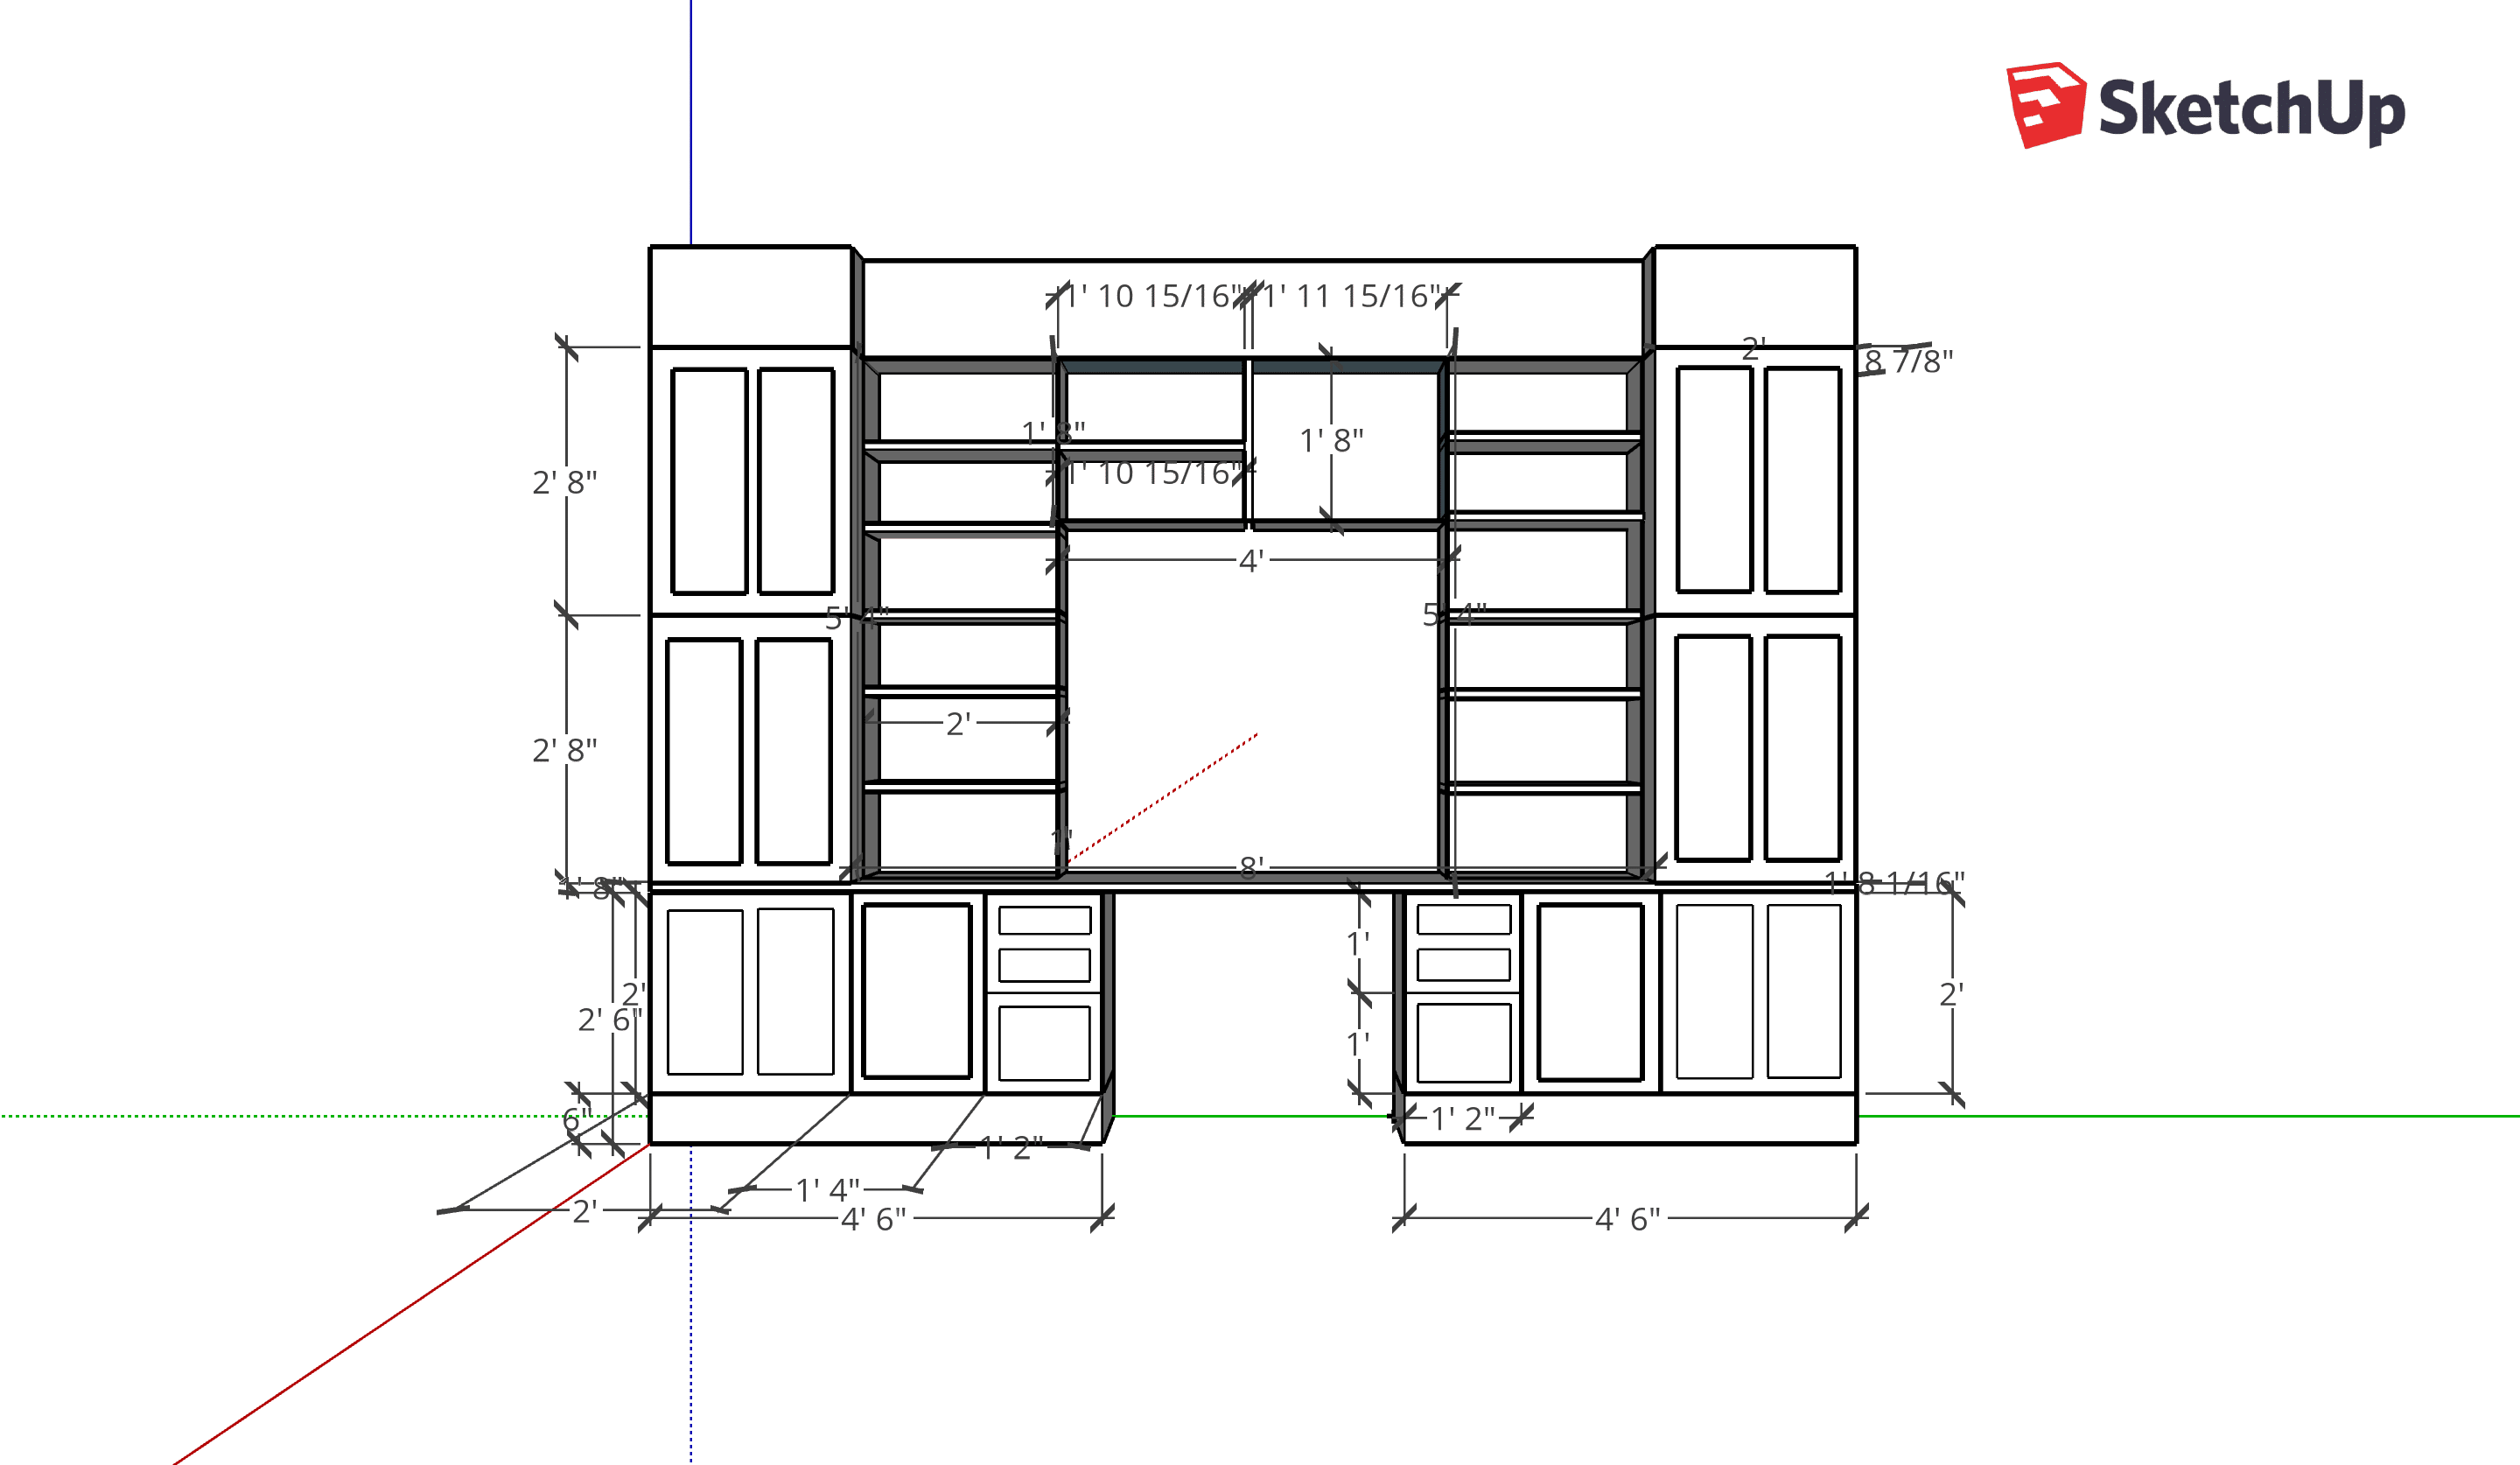
I made the design for the office built ins on Sketchup, but I realized it wasn’t going to work because of some dumb miscalculations. My initial plan was based on the height of regular kitchen cabinets, because I wasn’t thinking about the fact that when you build a desk, it has be more like table height, not counter height. So I completely re-did my plan.
The Build Process
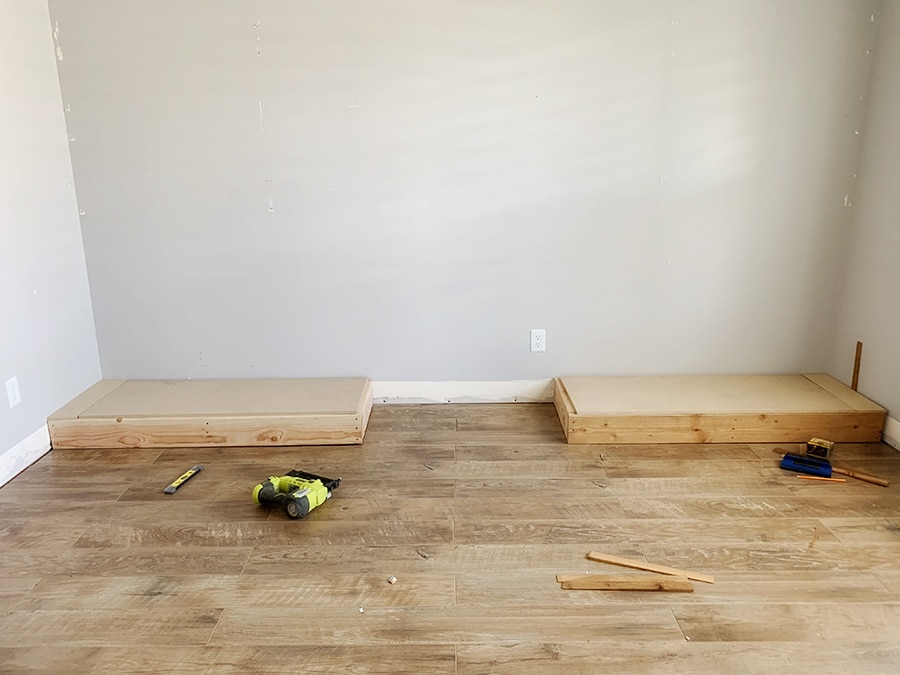
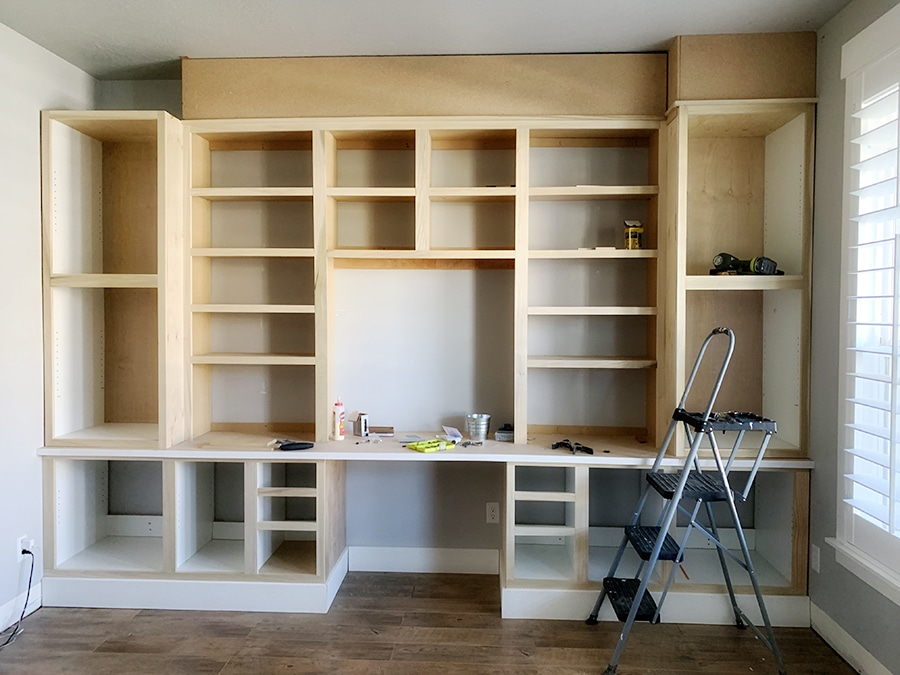
The first step was to build these two little platforms. I usually do platforms for my cabinet boxes to sit on because I haven’t even needed a kick plate cutout. I’m sure I will at some point. These are simply built out of 2x6s and particle board. You can get the cheapest stuff. Why did I use 2x6s? I wanted the base to be tall enough for the 5″ baseboards. However if I were to go back and do this again, I would use 3/4″ ripped MDF or plywood boards, because they are straight. It’s hard to work around the warped rough construction lumber.
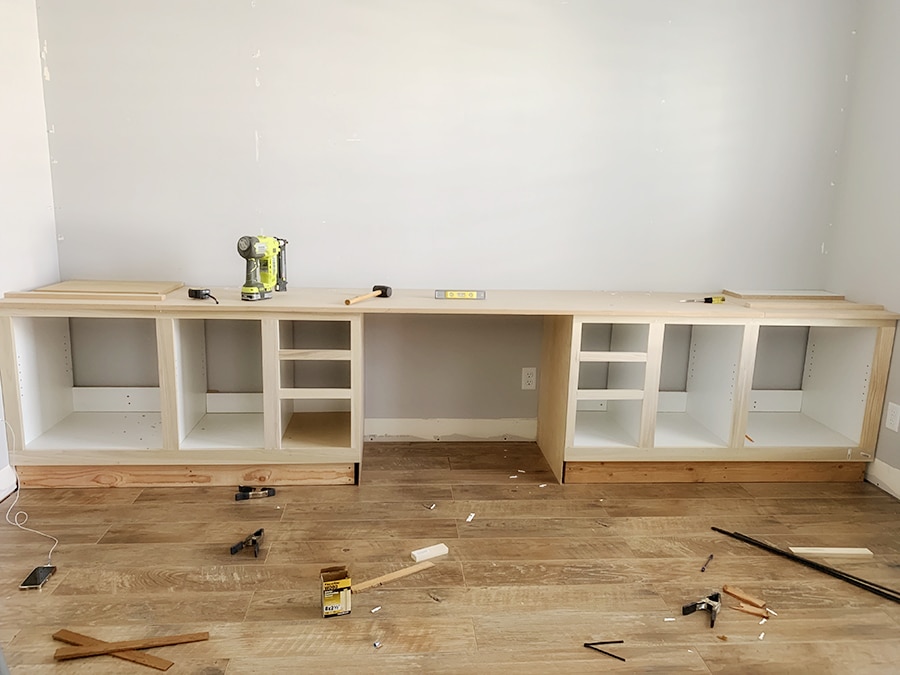
After the platforms were secured to the wall and level (using shims), I built the base cabinets. I built them using white Melamine board this time. This is a pretty good option for cabinets because you don’t have to paint the inside of the cabinets. However it was tricky because I had to really block these off when I sprayed the cabinets. I screwed the cabinets to the wall, then I built the face frames out of poplar wood and pocket holes, nailing it on. I used two pieces of 8 foot 3/4″ MDF for the desktop. I also used 1/4″ plywood to cover the exposed sides of the desk.
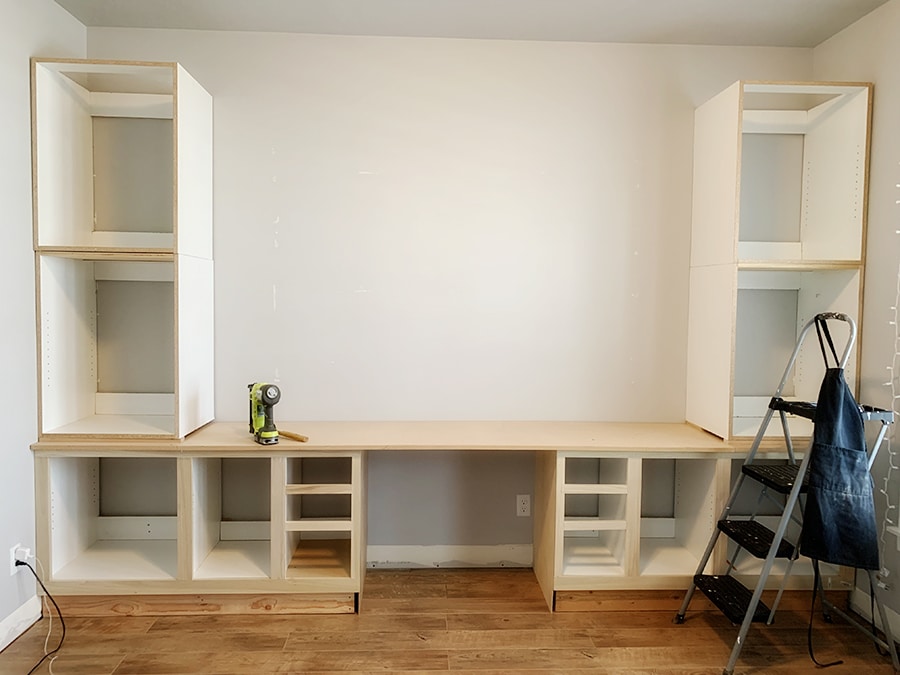
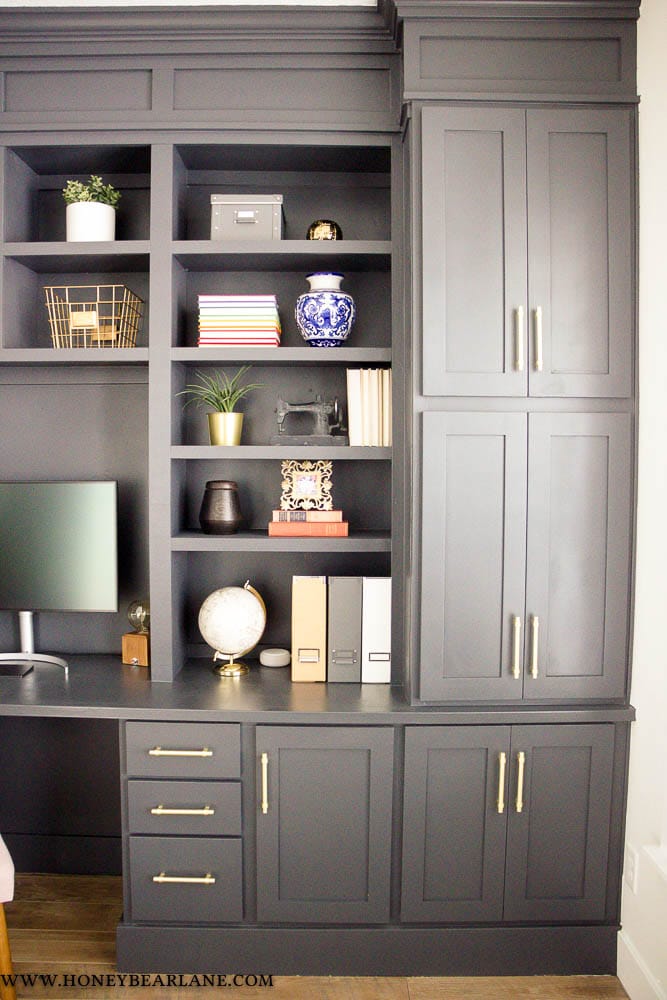
For the upper cabinets, I did them out of melamine as well. They were much larger because in my initial plan, they were going to be the base cabinets. When I re-did my plan, I made sure to work around the supplies I already had cut and ready so I didn’t waste much. I actually think this plan is better than my first plan anyway because these upper cabinets are nice and big and great for storage, including the printer! I just stacked them on top of each other and screwed them to the wall, making sure they were level. I also used some scraps to sit them on top so there would be space for the 1×2 face frame to be level with the bottom of the cabinet.
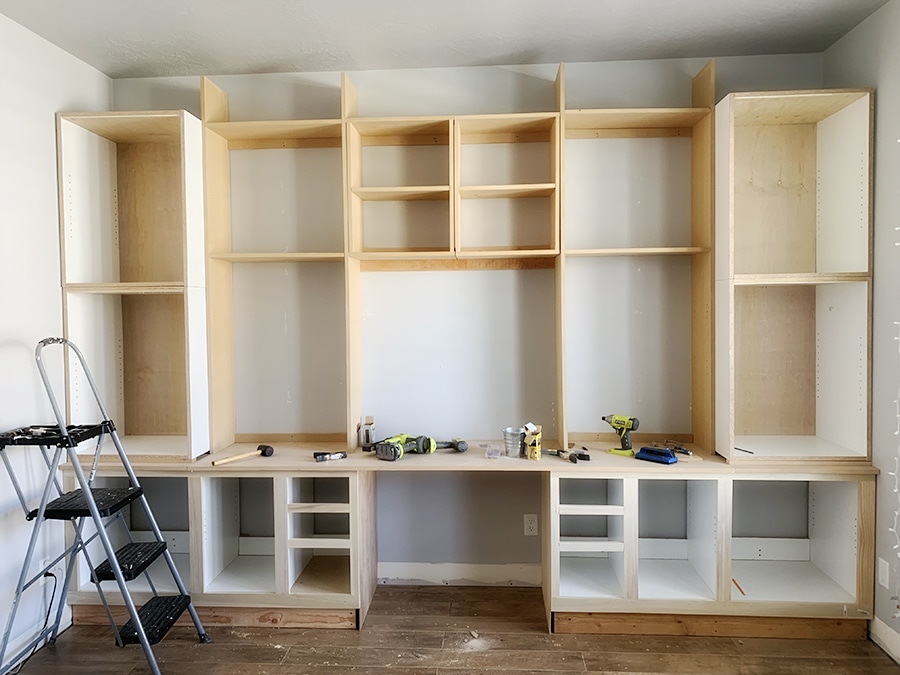
After the side cabinet were up, I cut some 1/4″ plywood for the backs of them, so they would look nicer. I usually don’t bother with backs on my cabinets, but I’d never done uppers before. Then I built the bookcases. The middle was tricky to get to fit right, I’m not really sure where I went wrong. I told you this project was cursed. To hang the middle shelves, I nailed up a cleat to the wall where they needed to sit and then let the shelves rest on it while I screwed them in. I also didn’t bother drilling the bookshelf pin holes before but I wouldn’t do that again. It was really tricky to get them to line up.
Here they are with their face frames on. This is where I screwed up a little. I forgot to put on the 1/4″ plywood to cover the seam of the side cabinets and so I had to put it on after the face frame was on. So it’s not super pretty right there, even though I sanded and caulked it with the hopes it would blend in better. You live, you learn. Then I messed up again somehow by not getting the measurements perfect on the face frame so it didn’t end up lining up with the top of the bookshelves. Man, writing this up is giving me traumatic flashbacks. It was such a headache. It really made me feel like such an amateur…which I guess I still am. But you learn with each project.
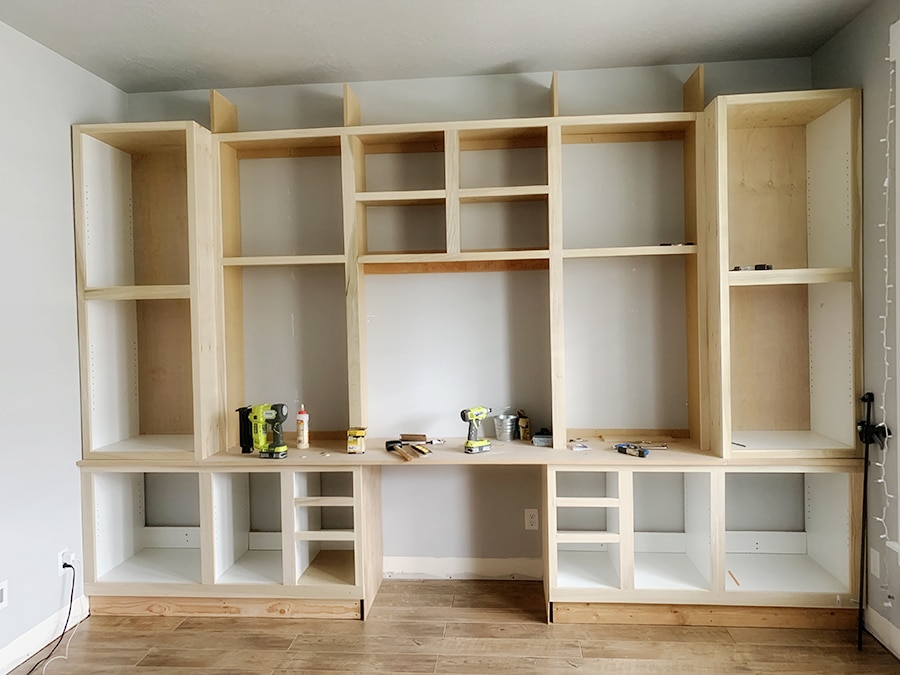
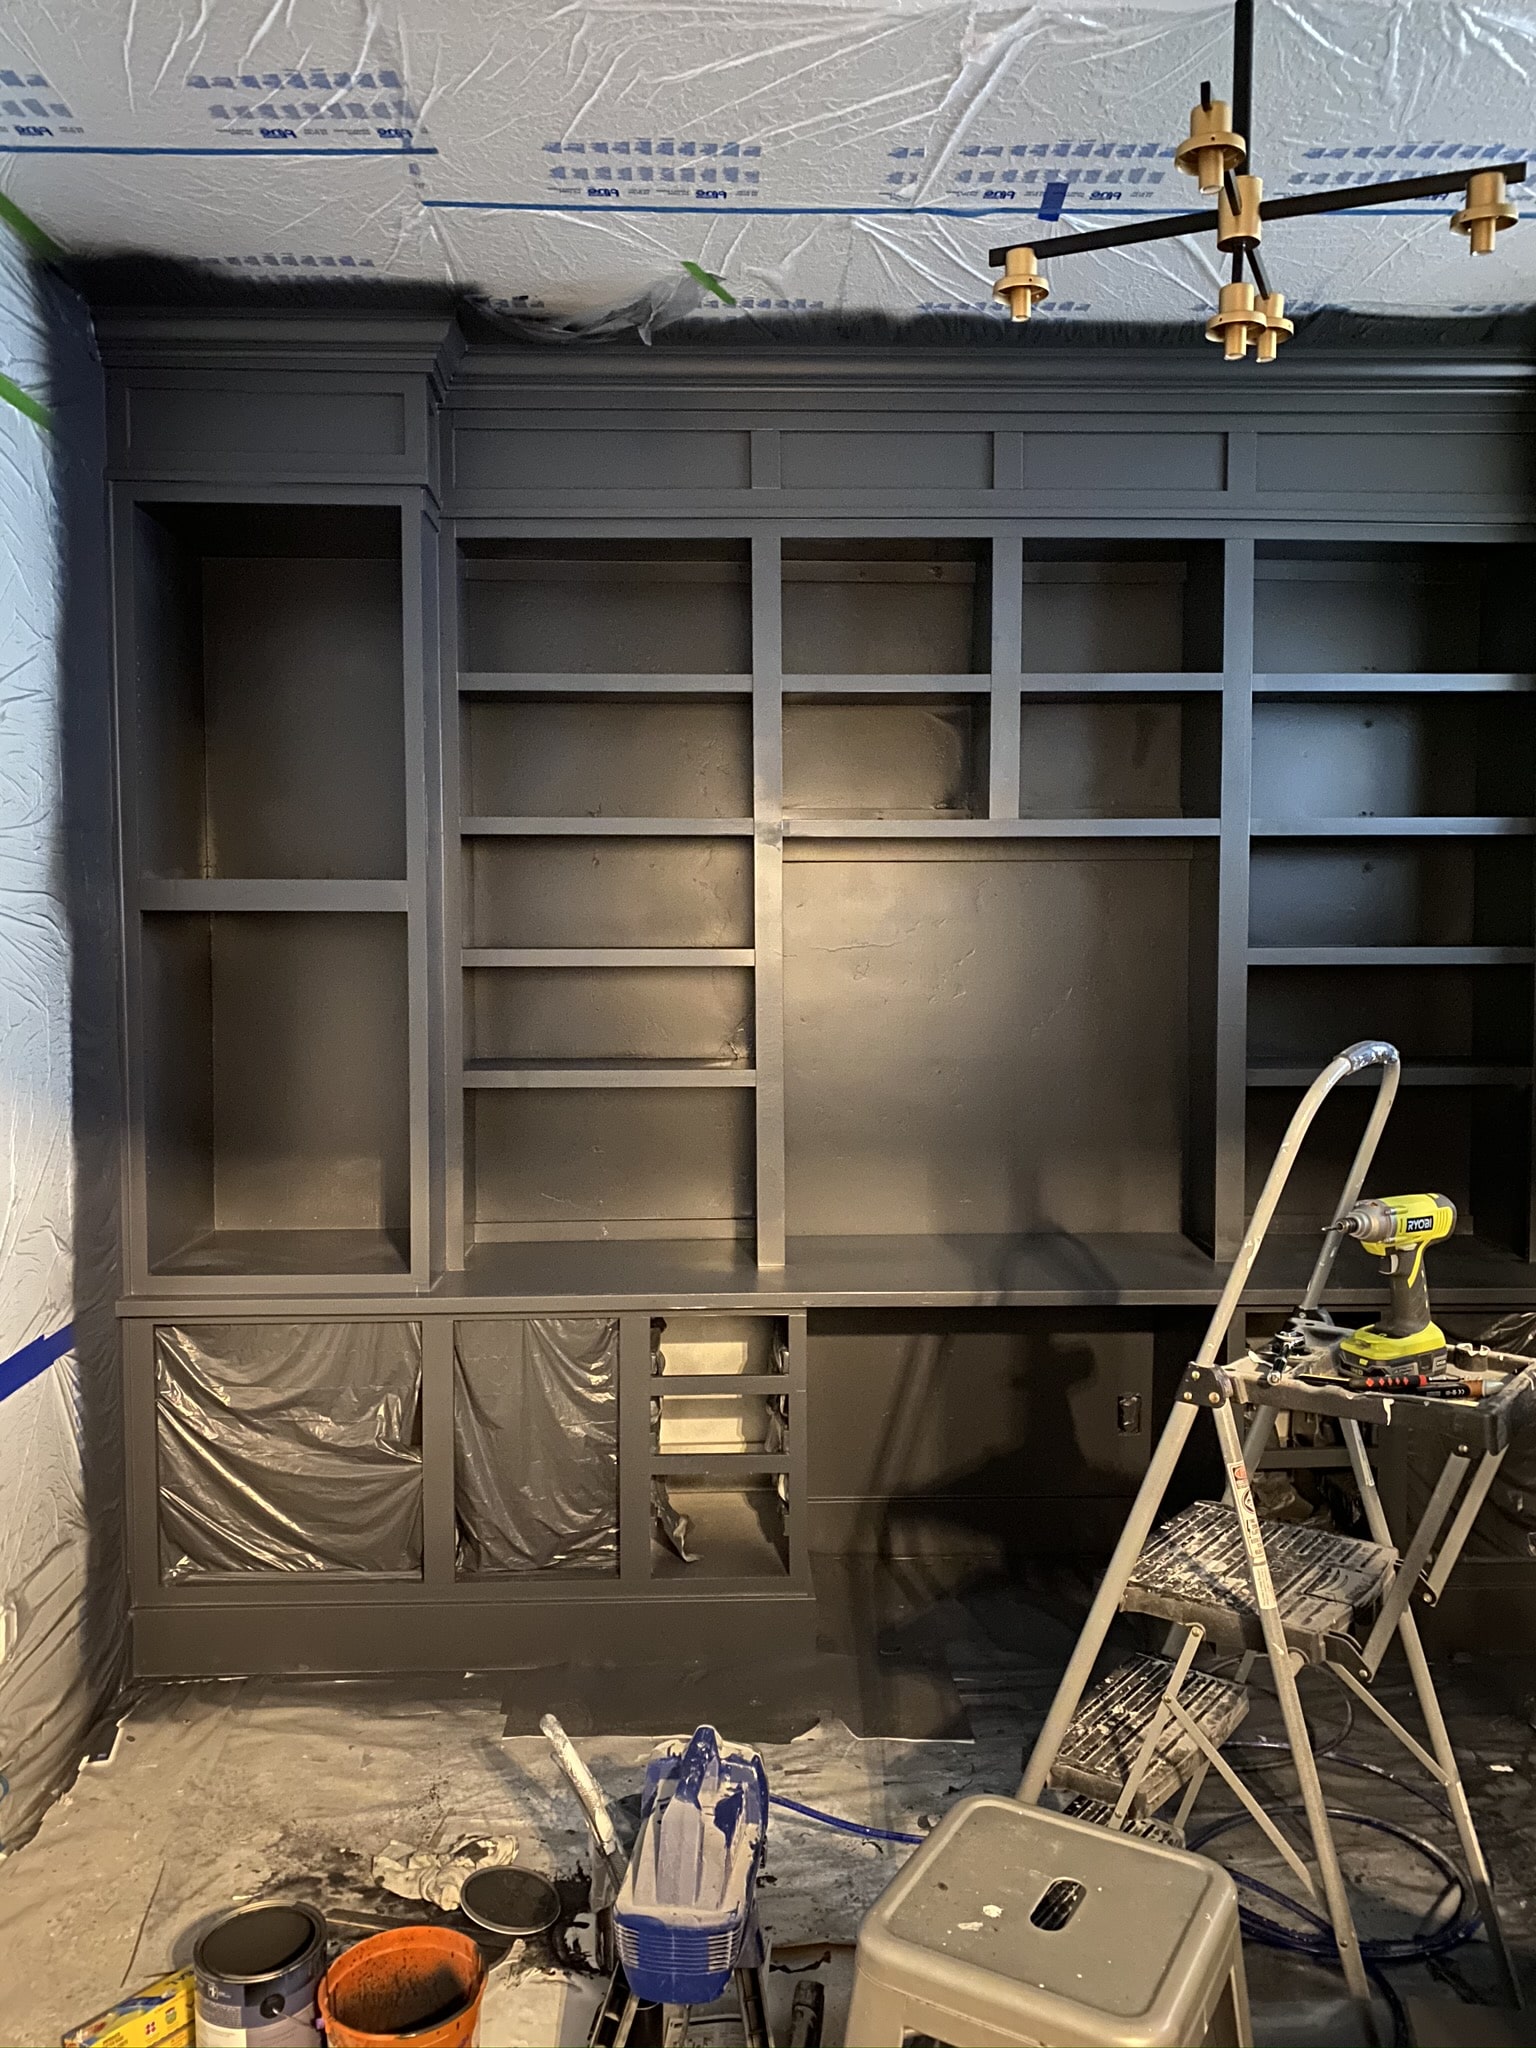
I had to close up the top, which I did with some more MDF. The middle was fine because the bookcase extended up beyond the top, so it provided something to nail it to. The sides didn’t have anything though, so I had to build a little frame.
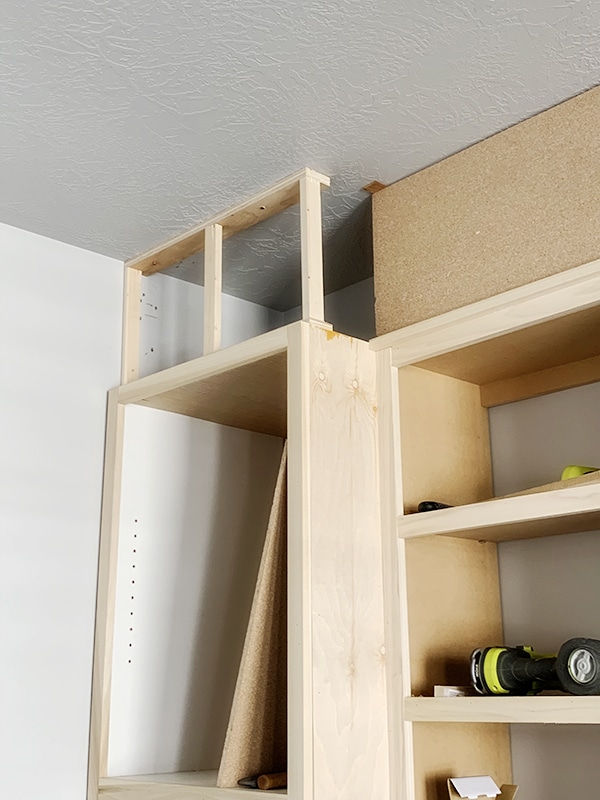
This was tricky, but I got these to fit perfectly between the cabinet and the ceiling. I screwed them in and then nailed the MDF to the front. This was not my favorite part.
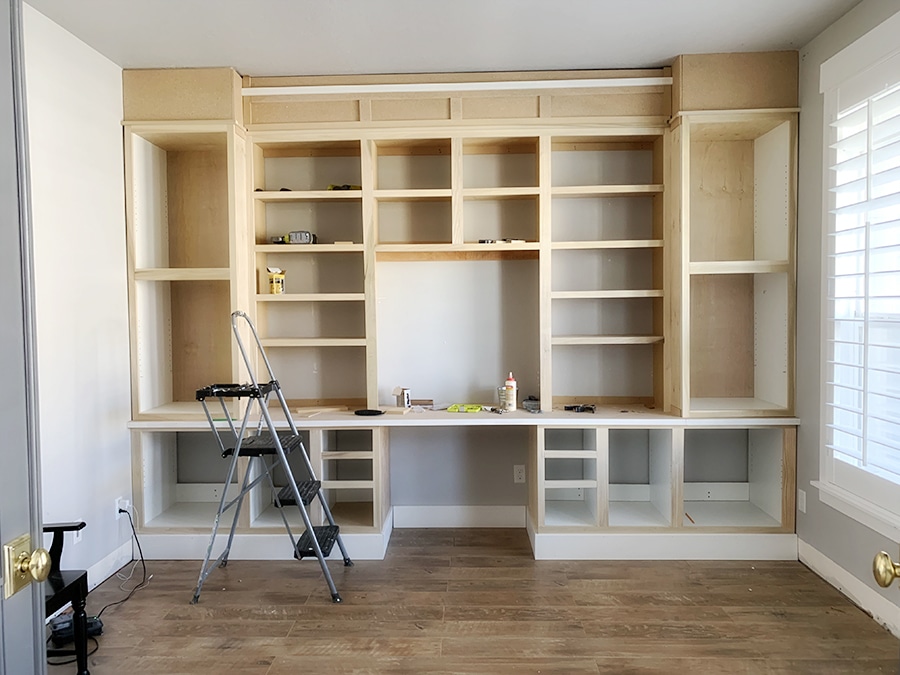
After they were closed up I added some finishing trim to the top so it wasn’t so basic. I finished it all off with crown molding, which is like doing it for the first time every. single. time. I freaking hate crown molding. I couldn’t do any of it with the Kreg Crown Pro.
Last step in the office built ins…doors and drawers!
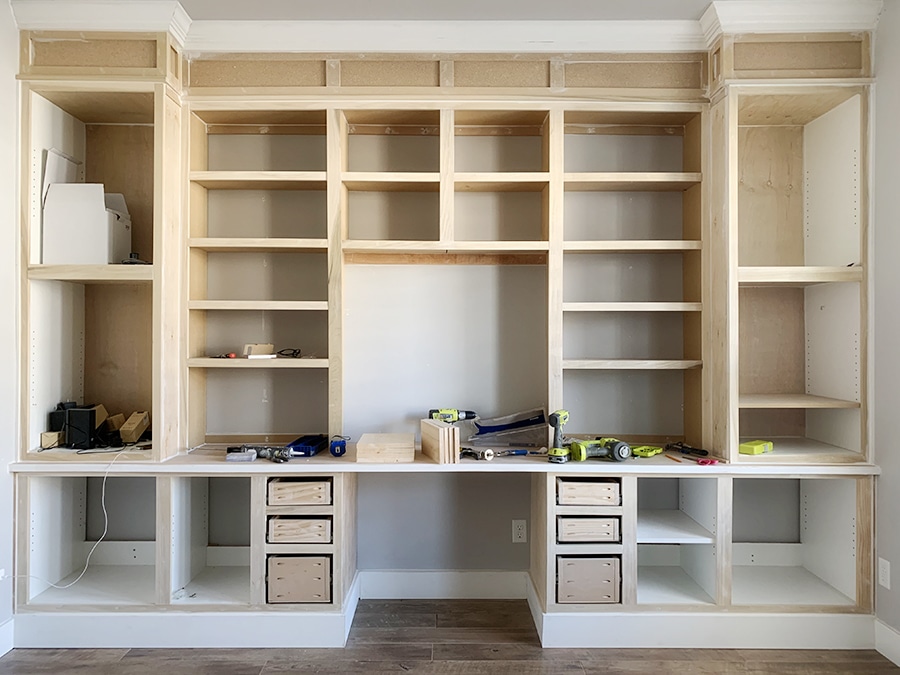
I opted to order the doors this time. I built them last time, but it does take some time and care and I was running out of time. I really wanted to be finished by the end of November, and it was almost the middle of November. I also wasn’t sure if they would work well not being in a climate-controlled shop (my garage) because doors have to have the right amount of pressure when they are being glued and the temperature can really affect it. Anyway, I ordered the doors from a local company and they did a great job. They weren’t cheap though. If you have time and are willing, it’s so much more cost effective to make your own. I had them drill the holes for the hinges as well.
As for the drawers, I wanted to do these myself since I’d never done drawers before and they are really basic boxes. I was pretty confident I could do it, but you have to be pretty precise with the measurements. I ordered these drawer slides from Amazon and they were straight forward to install. I used the handy Kreg Shelf Jig which I’m sure saved a lot of frustration and it was much easier than I thought.
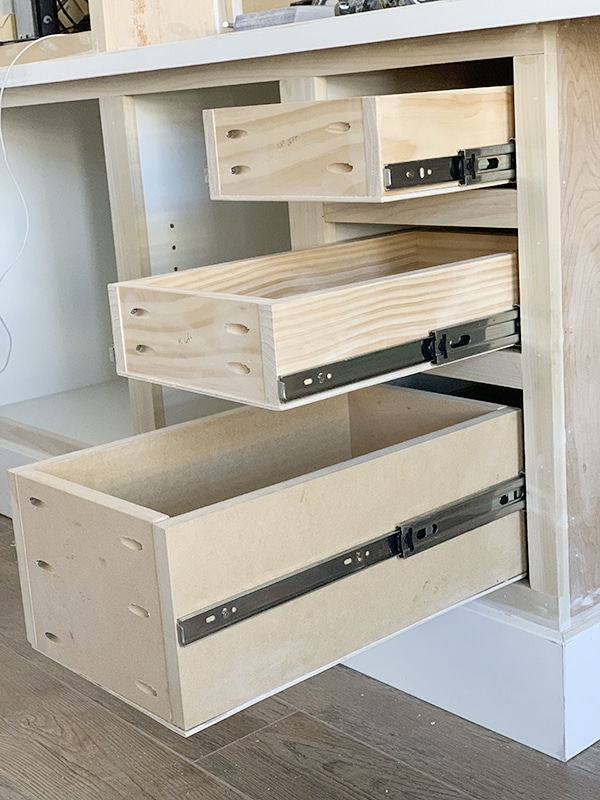
I built simple boxes with a 1/4″ plywood bottom nailed on. I installed them on the slides and then closed them. I nailed the fronts on in place and then screwed them in from inside the box.
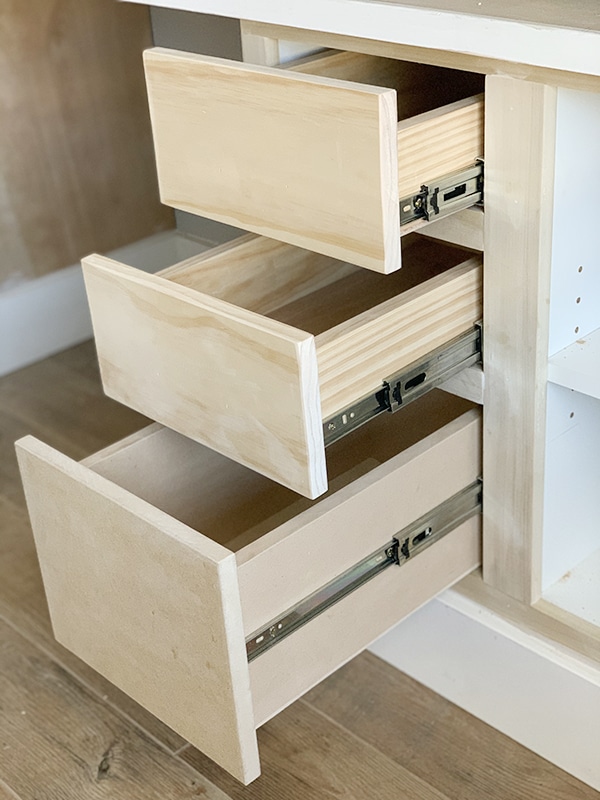
I opted to do plain drawer fronts because 1) it was WAY easier and 2) I liked the simple modern look.
Painting the Office Built Ins
After I had sanded, filled nail holes, and caulked, it was time to paint. I knew for this job I wanted to use a really good paint sprayer. This is something I should have bought YEARS ago, since I’ve done so many heavy painting jobs. I just couldn’t ever decide which one to get and ended up being intimidated by the whole buying process. This time around I knew which one I wanted, and it worked like a dream. I bought the Graco Magnum x5. The only thing I had to learn by trial was that it eats up paint VERY quickly! It does a great job with great coverage, but I went through about twice as much paint as I initially planned. I loved using it though.
I first painted everything white, including the walls and ceiling of the rest of the room. I did those first, with a higher quality paint, then got some basic primer for the office built ins. I sprayed just one coat of that on them.
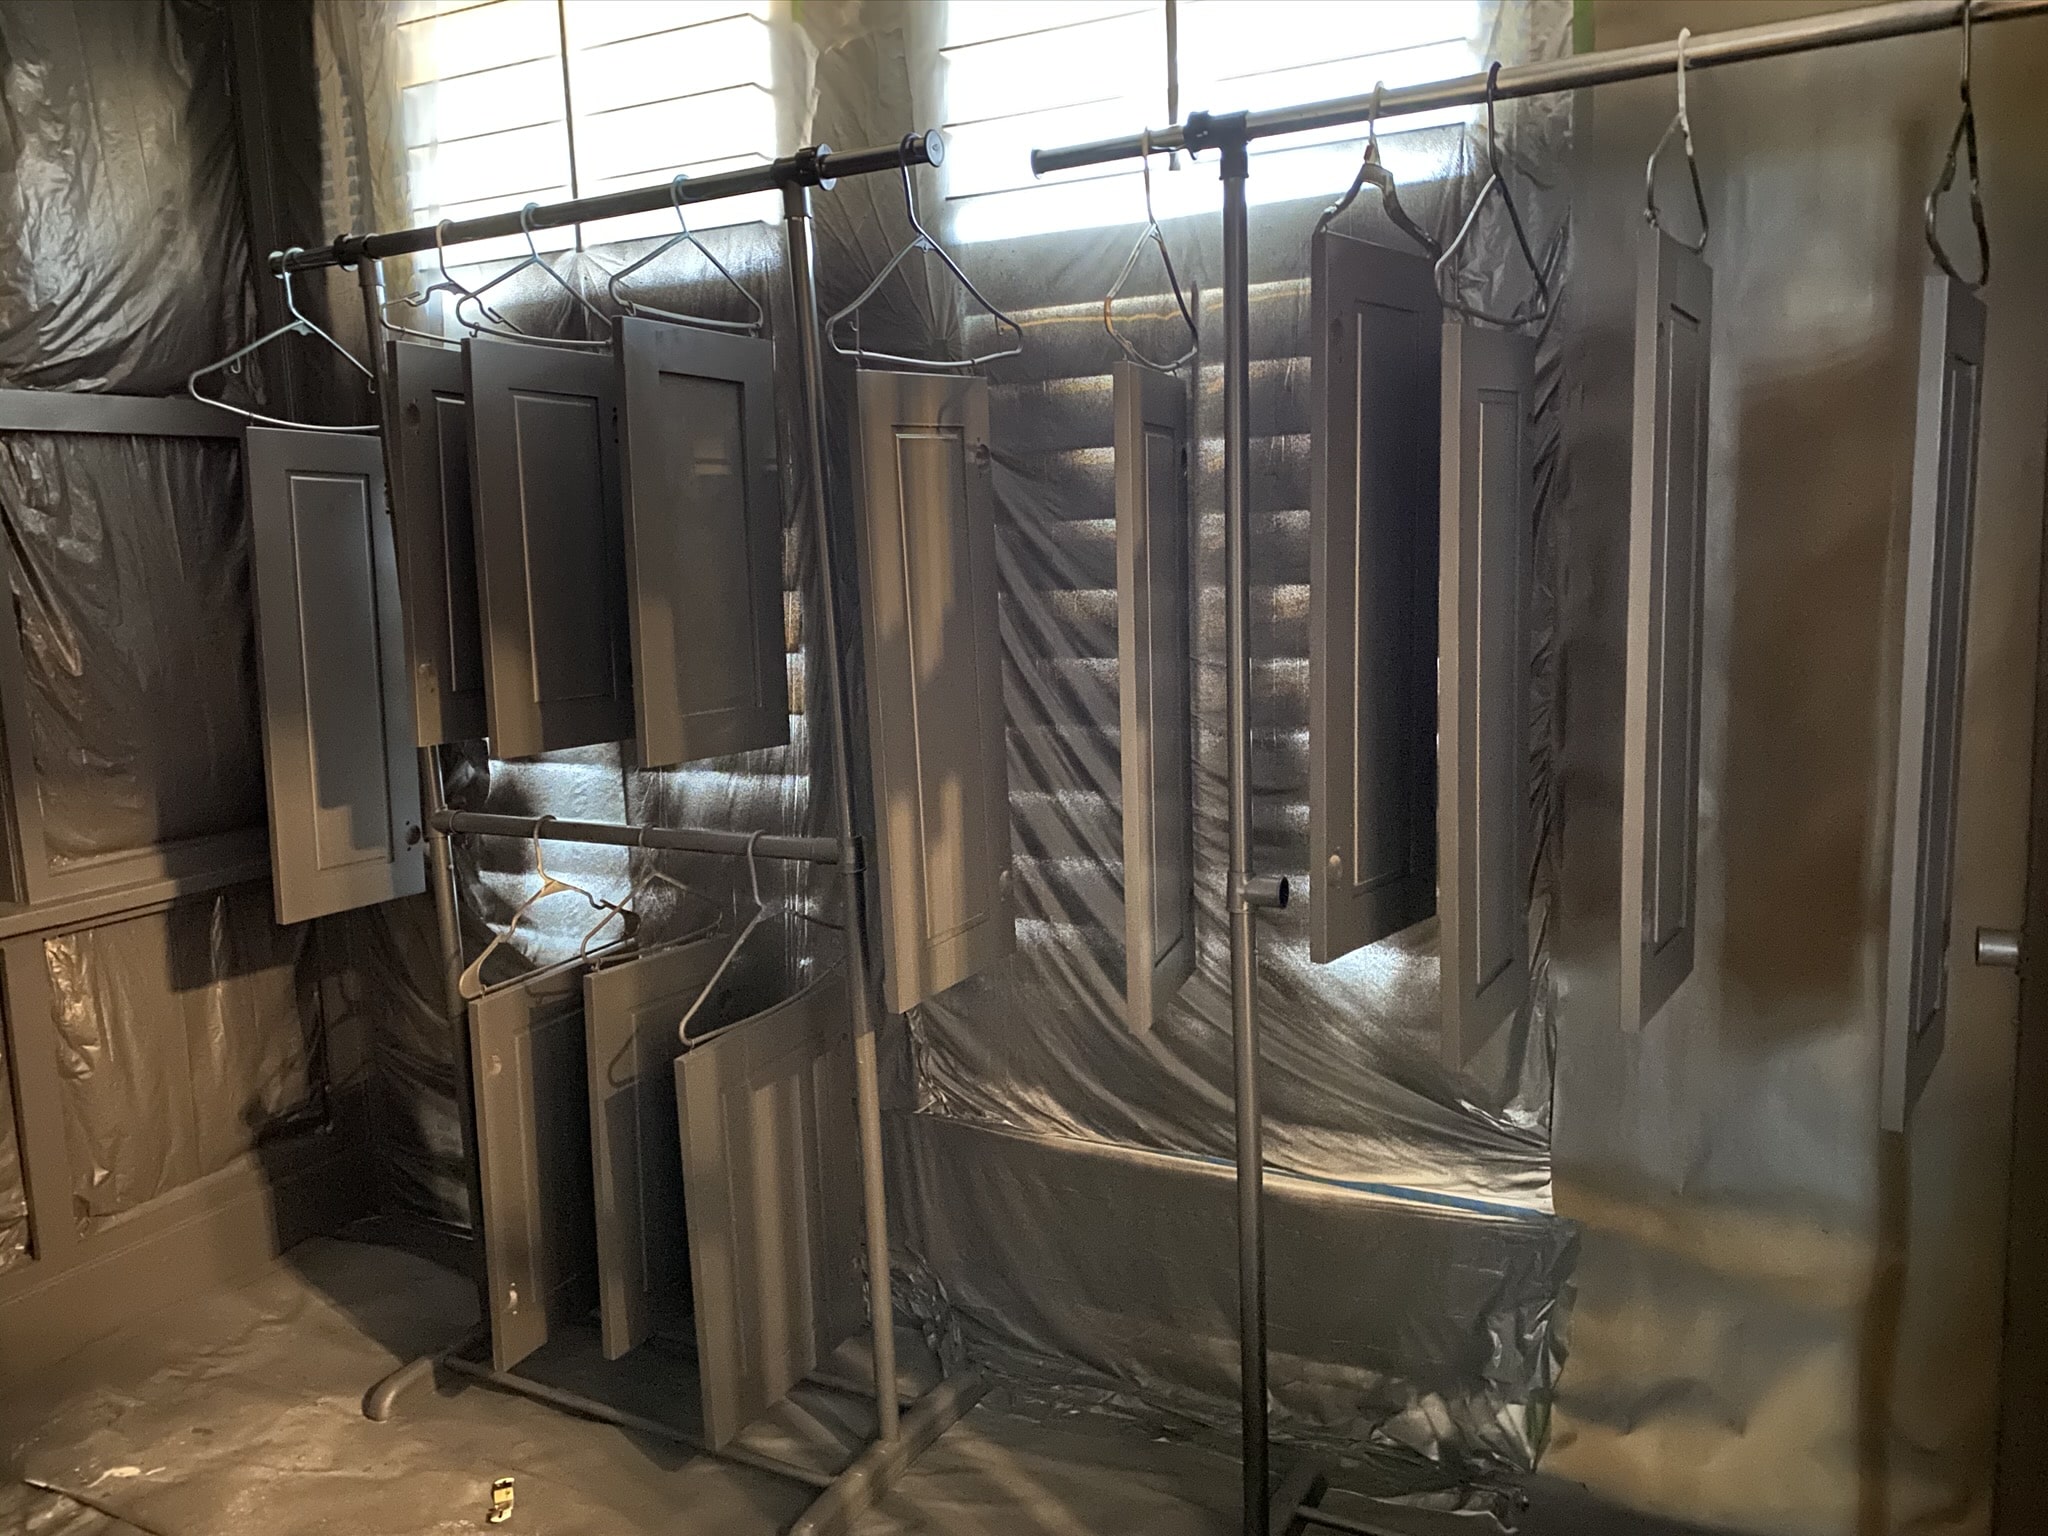
After the white was done, I took the French doors off and painted them black. They were gray before which I loved, but I knew the black would look more elegant when all was said and done. I just sprayed them with my Home Right sprayer because it was a smaller job. Then I used a spray bottle with a little vinegar to spray on the glass windows and the paint scraped right off. I forgot to take a picture of that, whoops!
After a few days of letting that dry, I taped and masked the room so the rest of the room wouldn’t get black paint on it. To paint the cabinet doors, I didn’t have a ton of space inside, so I tried this little trick I saw somewhere. You drill little holes in the top of the doors and screw in C hooks. Then you can hang each door on a hanger and hang that on a clothes rack. I bought two of these on Amazon and used them in the office. Then when I sprayed the cabinets, I also sprayed the doors.
These pictures were taken at night with my husband’s phone so sorry for the crappy light!
I made another dumb mistake though and put them by the window. This means that when I sprayed them, the overspray went onto the plastic covering the window, which was the only natural light coming into the room. I didn’t even have overhead light because I had painted the ceiling and we hadn’t installed the new light yet. So basically this meant my lighting during the day was very poor and at night it was non-existent. When I finally got some light, I could see that I hadn’t done a super great job on the doors. I had to sand quite a few down and respray and they were better when I finished but there’s another lesson learned.
Finally Almost Ready…
After a few days of drying, I installed the doors on Euro Hinges purchased from Home Depot and then installed the gold pulls which I love. It took me forever to decide on them, but I love what I chose. They look so good with the black cabinets!
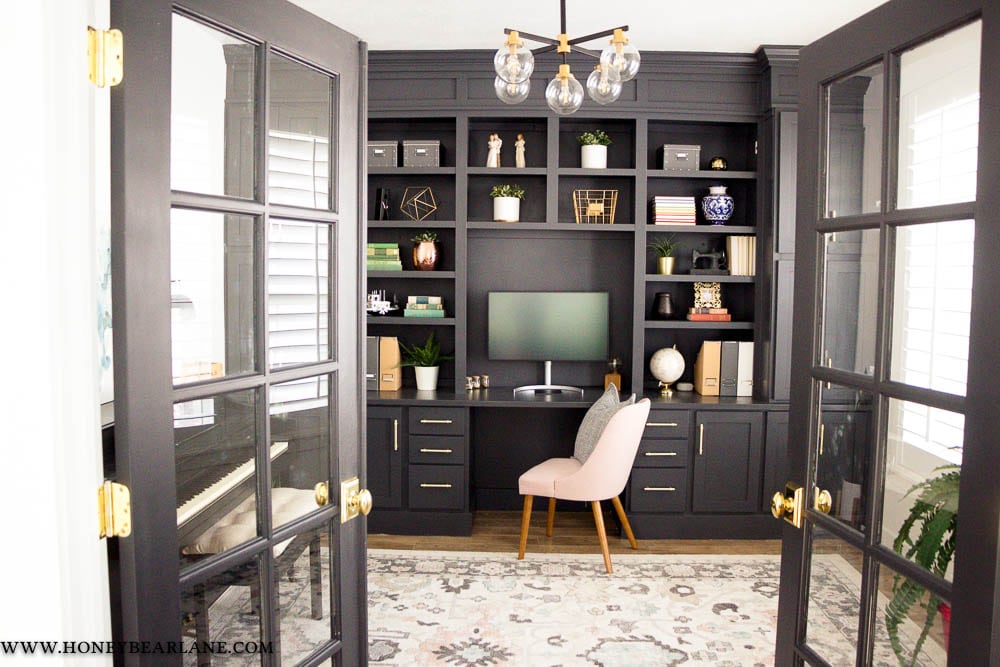
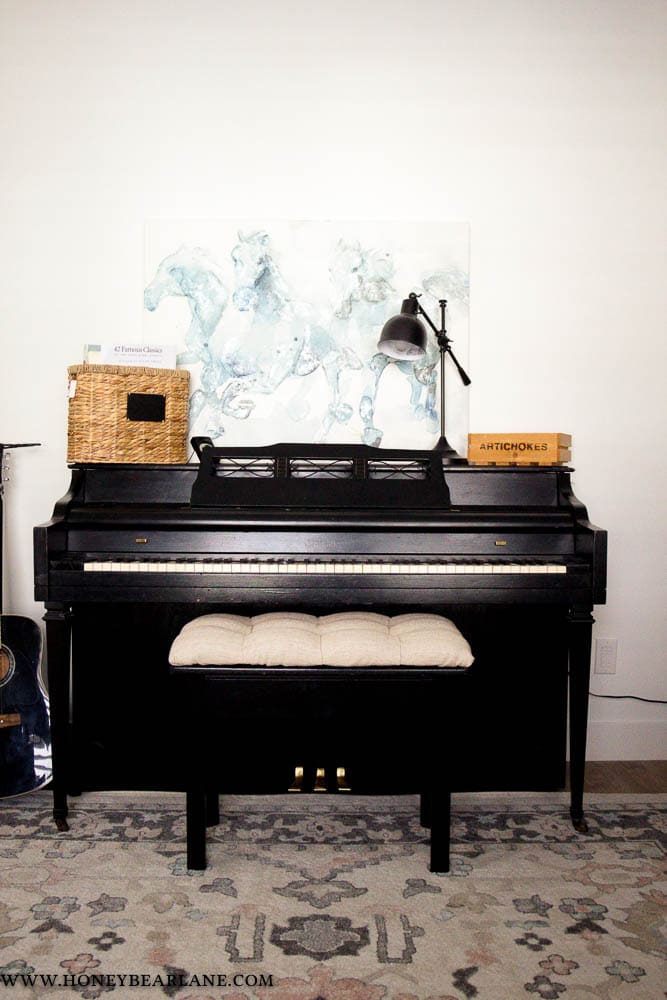
We moved the piano back into the front room, rolled out the rug, and I styled the shelves. My husband also installed some Hue lights under the shelves like he did in the family room. They really add so much ambiance to the space!
Can’t wait until I get my chairs and other stuff in here, but that won’t be for awhile. I want to get going on some other fun projects so the money won’t be there for a bit.
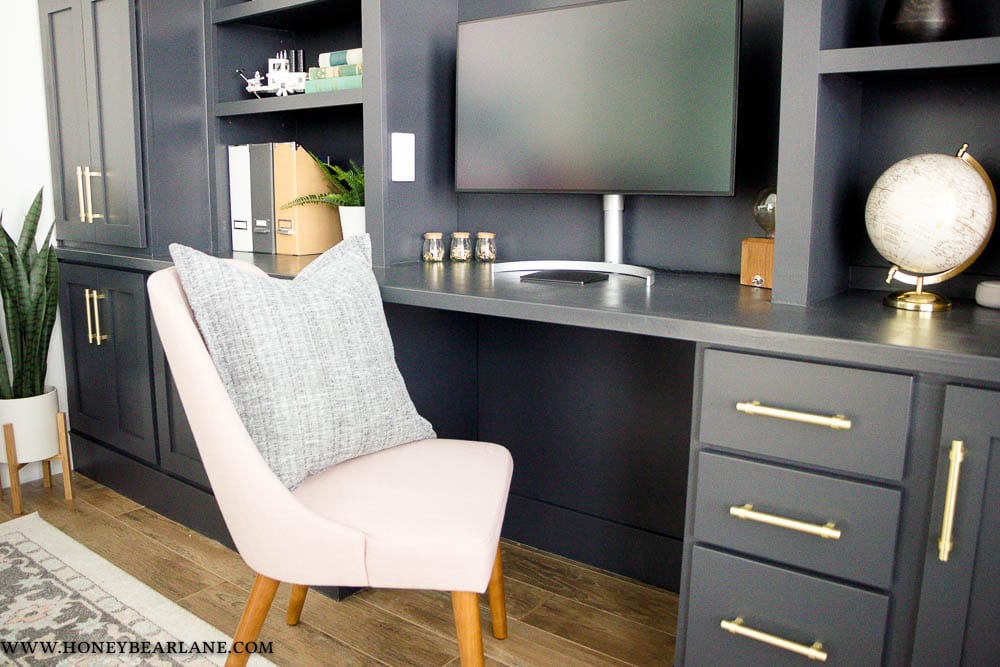
My husband agonized over buying this huge computer monitor. He wanted to find a pretty one that would fit that space well. It was kind of spendy, but we are happy we chose it. It’s going to be a place where anyone in the family can go to use the computer, along with some hookups to make it easy for me or my husband to use our laptops with that monitor.
Whew! That was a super long post, and here’s a trophy for you for reading all the way to the end. I’d love to hear any questions or comments you might have and I’ll do my best to respond!
Here are some related posts you might be interested in:
Oh my goodness, that looks like a million bucks! Wish I was allowed to do this in my rental..
what is the actual paint color name and brand?
It’s called Benjamin Moore Cheating Heart.
Fantastic job. What a headache the entire project must have been. But hard work and perseverance paid off. Beautiful work.
Thank you!
I know my hubby would love a dark office space as well. Do you think you need a lot of natural light to see all of the dark furniture details? Thanks.
Yes! I do not have a ton of light in my room but the dark builtins turned out amazing. I would 100% do it dark again.
Beautiful design, Love it. Could you tell me where you purchased the chandelier? It looks very good with the room.
It’s from Overstock! Thanks!
Hello,
I purchased the light but where do I get light bulbs like this? Thanks!!
You can find Edison bulbs at most home improvement stores. I’m sure we got ours at Home Depot!
Kudos to this incredible piece of art that you have brought to life through your hard work I should say dear Heidi. The efforts you have taken not only to build this office space but to give us readers a complete journey guide is a job well-done. The design along with the use of Benjamin Moore Cheating Heart paint colour, the chandelier and the dark office theme have all come together and collaborated well.
Thanks you!
Beautiful job! Looks fantastic!
Love the look! Did you use flat, egg shell, or semi gloss?
Looks great! Did you use a satin, egg shell, or semi gloss paint finish?
I always use a satin finish. Thanks!
This is absolutely stunning!!! You have to be so proud of yourself. I am about to embark on something very similar in my office. This is a GREAT help. Thanks for sharing!!!
Thank you!
Did you use mdf for the middle upper cabinets? Also, how wide were the other face frames? I see you used 1 x 2 face frames for some but you didn’t say what you use for the middle upper cabinets face frames? Thanks for your reply. You guys did a great job.
It looks like you used spacers between the lower and upper side cabinets so you could use the 1 x 2 face frames. Are the other face frames 1 x 1? Thanks.
All my face frames are made from 1x2s.
Thanks, I used MDF for the middle upper cabs and melamine for the other cabs.
My husband and I are looking to do the same thing in our office. We’ve looked at sooo many pictures and designs but yours has been our favorite. Your work is beautiful and it’s so helpful to see some of the steps pictured, so thanks! Would you mind sharing the dimensions of your room?
Thanks! The room is about 12’x12′.
almost done and ready to paint. What paint spray tip did you use? Thanks
This is absolutely gorgeous! I have been looking high and low for a picture of dark gray built ins and this is everything I have been wanting!! You are so talented! How did your husband hook up the hue lights?
Thank you! Here’s a post about it, although there isn’t a ton of detail, sorry! https://www.honeybearlane.com/2018/09/smart-home-lighting-and-back-to-school-routines.html
This is one of my favorite parts! Do you think the hubs could expand a little more than the above link? Are they cut for each shelf? Is there one plug? Are they battery operated?
Thanks!!
Do you happen to have a link or tutorial to show how your husband installed the lights in the shelves?
Here’s a post about it, although there isn’t a ton of detail, sorry! https://www.honeybearlane.com/2018/09/smart-home-lighting-and-back-to-school-routines.html
How much money do you think it would have cost to pay someone to do this? How much did you save by doing it yourself?
I spent more this time around since I bought the doors from a cabinet company. I didn’t keep as good track this time around with my costs, but I’m sure I saved money. It always costs at least double from what I spend, if not more! I think it would probably cost around $3k???
How deep are the shelves ( as well as the cabinets)? Thank you!
The shelves are 12″ deep and the cabinets are about 20″ deep.
Is that the outside measurement for the cabinets ? I have a depth of exactly 20” to a foot frame .
Ahhhh, I was combing your words and driving myself crazy looking for the depths — Perfect! I dunno why I won’t just trust my instincts and do what’ll fit my needs.. I guess bc my luck, I’d make them 2″ too narrow and kick myself afterwards. 😆 Thanks so much for this. I’d been looking for the perfect plan for weeks. I am on my way to grab my lumber and MDF right now!
Do you have a link for the rug? I love it and I can’t find it!
Yes- it’s https://www.jossandmain.com/rugs/pdp/new-weave-paige-ivorycharcoal-area-rug-sbbc1101.html?piid=38044504
It goes out of stock quickly!
This is very beautiful!! Can you tell me what the countertop is made of?
The countertop is just plain 3/4″ MDF.
Hi! About the counter tops, how is the MDF holding up? Did you put on a final layer of protection so the paint doesn’t chip off? Thanks!
I think I did put a coat of poly on, I can’t quite remember now. There is one spot where it has chipped a little, but it doesn’t really bother me. 🙂
These are gorgeous. Could you tell me how wide the opening where your desk chair slides into is?
Thank you! It’s 3 feet.
Can someone explain the melamine to me? Is it on both sides? Is it paintable?
Yes it’s a slick laminate type finish like you’d see on a piece of IKEA furniture. It’s both sides and it’s not super paintable. The idea is that I wouldn’t need to paint the inside of the cabinets because it’s already white. You can paint it with an oil-based primer but that’s just messy. I ended up painting inside of one of the cabinets because my plastic didn’t cover it well enough and it’s fine…it just gets scratched easily.
Heidi,
The built in is beautiful, and I am wanting to replicate it in our den. I have looked at the plans that you provided up top but don’t see the depth dimensions. Can you tell me what the dimensions are for the two bases that you built, as well as the depth of lower and upper cabinets. It appears that the upper cabinets are slightly less deep than the lower cabinets. Also, what is the depth of the desktop? Finally, what height were your ceilings? Thanks in advance.
The depth of the lower cabinets is about 22″ and the depth of the upper cabinets is about 19″. The bookshelves are 12″ deep. The desktop is 24″ deep. The ceiling height is 9 ft. Good luck!
Job well done. This looks really good. Do you mind sharing the link to the ceiling light fixture?
It’s from Overstock: https://www.overstock.com/Lighting-Ceiling-Fans/Carbon-Loft-McKinnon-5-light-Matte-Black-and-Gold-Chandelier-with-Glass-Globe-Shades/25558576/product.html
Thanks!
This is gorgeous. I also really appreciate you admitting to all the mistakes you made. I got pretty discouraged after my last project because I made so many mistakes and my confidence as a builder shot down. But you’re right. You learn with each project. Also, I hate crown molding too. And you’re right, it’s like the first time, every stinking time!! 😂 you did a gorgeous job and should feel very proud of this space!
Thank you so much! I would probably be a lot better if I was working on projects non-stop but as a mom of five kids, I just simply cant!
Looks awesome. What is the size of your room?
Its 12×12. Thanks!
awesome job! You said in your write up that the face was 1×2’s but did you also use 1×3’s as well? It looks like in your pics you did for most the bottom trim as well as some above the desktop. Is this correct? I just started building it in our office and am copying your plan via your pictures. Thank you!
Yes, that’s right. I used some 1x3s in some various places, like the sides of the bookcases. Good luck!
Does any one by any chance making this?!? If so can you post material list and cuts that would be so helpful.
Thank you in advance
Did you use regular paint or cabinet paint?
This was painted with latex paint. I’ve always painted my cabinets with latex with good results.
I can’t see any picture on your webpage at all.
Hi! I’m not able to view the photos on my phone or laptop. Did you take them down? Or maybe its me just continuing to be technology-challenged 😉
Thanks for telling me! I have been having other people tell me that as well, so I’m working on it.
Do you have instructions on how you laid your floor? Was it glued down or floating?
It’s a floating laminate which clicks together.
Like several others, I have found your post inspiring. The biggest obstacle for me is the doors. Who did you use?
This Utah-based company called Alpine cabinet doors. They did a beautiful job!
Fantastic work!! Would be awesome if you could share the SketchUp files so that I can copy your work and also put up something as stylish here in Sweden.
Your office looks amazing, this is exactly what I am looking for. Few questions, what thickness wood or MDF did you use for the detail on the top section? Also, it looks like there is a small piece of trim between the upper cabinet and that top section, what did you use there?
Thanks! I tried to use a lot of my scrap wood for the trim up top, and I think it’s about 5/8th inch thick. The top piece on top of the cabinets/below the top section you refer to is a 1×2 MDF trim piece that is turned on the flat side.
Correct me if I’m wrong, but it looks like you attached the front of the drawer to the trim? Did you add a spacer block in the back for the back side of the drawer slide?
I used the Kreg drawer slide jig to put in my drawer slides and I just worked with the basic drawer box to do so, screwing in the drawer front later and last. I did have to add in a spacer on either side of the drawer slides so they would be flush with the face frame.
Very nice work! Question – for the desktop you joined two MDF pieces lengthwise… did you finish the outside edge of the MDF with a trim piece, or just prime/sand/paint the MDF edge? Also, when joining the MDF edges did you just use glue/clamps? Happy with how the edges turned out? Thanks!
Thanks! I didn’t join the MDF pieces, just shoved them together as close as possible and nailed them into place. Also I used a ‘doorstop’ trim on the edge to finish it, which I have done several times before with other builtins. I don’t think finished MDF edges usually look that great. I love how it turned out!
Hello. Just seen ur DIY pg for the first time. . Beautiful work.
I seen how u hung up ur doors w hangers to paint them.. How did u manage that & cover the holes ? I’m redoing my kitchen doors cabinets & I have never seen it done this way. Very clever!
You can just patch up the holes with nail hole filler and touch up paint. To be honest I didn’t even bother, just hung the doors so the holes wouldn’t be noticeable haha!
What are the dimensions of each base cabinet and drawers.
Is there any electrical going to your built in? I see what looks like a face plate on your desktop but I’m not sure. If yes how was that done?
Also where did you end up putting the tower of your computer for that monitor? Wondering how working would go if I use this for my desktop setup
No, my husband just drilled holes and used some covering plate things to hide cords and such. The monitor is actually connected to an older laptop computer which sits inside the cabinet. You could probably put the tower inside the cabinet as long as the door was opened when in use for air.
Fantastic post! Really inspired me to plan bookcases in my office! I would have LOVED to see a few short videos when you were installing face frame, making pocket holes, etc etc. Thank you for all your time and for sharing with all of us!
Wow! Just WOW!
Going to try to duplicate this in our new home.. wish us luck!
Hi! Love the built ins. We’re knee deep in a similar project. For the cabinets – what finish paint did you use? Satin or semi gloss? All our trim in our house is semigloss. Thanks!
I usually use Satin finish because it’s the most forgiving, but I think semi-gloss is also very common in cabinet because of the durability and cleanability.
Thank you for the response – really appreciate it!
Love this entire post, with all the step-by-step details, including the things that didn’t go as planned! Very realistic about how things get done, its not just a ‘before’ and magically a beautiful ‘after’ like on HGTV. The end result was so worth it. Huge congrats, love it.
The strip lighting really adds to the dark moody look! Is the Hue lighting installed as one continuous strip? How is it applied to different levels and sections of shelving and still connected to a single power source? And where is the light strip applied so that its not visible? Thanks!
We stick the light strip to the spot right next to the face frame, or even sometimes against the inside of the face frame (the overhang). You can use one continuous piece or you can use connector pieces. They are connected to two different outlets.
Heidi, you rock! This is absolutely gorgeous! How on earth did you do it with 5 kids?? We were searching Pinterest for office/desk built-ins and just loved the ambiance created in this room. I forwarded your post to our carpenter to see if he could do a very similar version in our office. Thank you for sharing this project and for being so awesome!
What time of nail gun did you use for this project?
I use a Ryobi 18 gauge nail gun which is so great because you don’t need a compressor at all! It’s totally manageable.
How many hours do you think you spent on this project? And if you didn’t track hours, from end to end how many weeks or months did it take? Lastly, do you know what your materials and equipment total cost was? Was it less than $5,000? Thank you and beautiful job!
I’m sure it was less than $5000. I’m thinking the main material costs was less than $1000 but I purchase pre made doors which added another $600 I think. It took me quite a while to complete but it’s because I’m also a mother of five kids so I had to do it when I had time. I think maybe about six months? However I completed my family room builtins in about a month.
So inspirational!! I love the look of dark built ins! I made mine and now need to decide on a paint color. I LOVE the dark look of yours but mine have color RGB LED strips installed — I’m concerned the colors might look weird or not show up at all on a dark paint. Do your LED strips change colors?? If so how do they look? Is there any way you could post pictures of these dark built ins with the different light colors? Thanks!
The lights look great in the builtins. We keep them white nearly all the time but occasionally my husband will change it to a color and it doesn’t really affect the color at all.
Stunning!! I have read your entire post over and over and bookmarked it. We are in the middle of our office build and I am modeling them after your design and I am trying to mimic your crown/header piece. Are the dimensions correct at 11+” for the shaker style flat piece including the top crown in the sketch-up drawing? Can you tell me where you purchased your top crown pieces and how many pieces make up that top molding above the shaker flat piece?
Hi – what kind of hinges did you use for your cabinet doors? We’re still trying to finish our project (just had a baby in July) and are finding that our doors are hitting the wall with the hinges we bought. Almost like we can’t even add hardware on it. Thanks!
This looks really great. It is similar to something I would like to do in my office. Btw, the pictures on your website aren’t loading on the site itself. One has to click the blank space on the website to have the image pop up.
This is absolutely stunning and a testament that when you put your mind to do something beauty can be the result! Thank you for journaling your efforts, it’s a great way to calculate upcoming projects.
I love love love this plan. I’ve been humming and hawing for years over the right design for our office. I’m so happy I stumbled across yours. I’m going to replicate 🙂
Hello,
Can you share picture of how your husband installed the hue lighting? How many strips are needed? Is it on the front end or back end of the shelves?
I’m sorry, I don’t have pictures of that. He drilled holes in the sides of the cabinets and stuck the light strips to the face frames of the shelves. We’re going to try it a different way next time so we didn’t post about this.
You wouldn’t happen to have a list of all the wood/materials you had to order would you?
Hi,
I am hoping to build something similar. Do you by any chance have a full list of all the wood & parts you bought to make it?
Hi Heidi,
You and your hubby do great work. I’m in the planning stages of doing something similar with a window between shelves. I have sketchup up but the learning curve is killing me. Is it possible for you to share your design or possibly point me to a basic design to use as a base. Thank you, Pete
Hi Pete, if you want to see my plans, email me directly at honeybearlane@gmail.com.
Beautiful work! What is the cabinets depth?
Thanks! It’s about 20″
I love this! What is the paint color on the wall?
Hi. Beautiful work. I love it. What is the size of the pull handles?